background image

F

D

C

D

E

C

B

D

C

A

B

F

G

C

6

Assembly Instructions

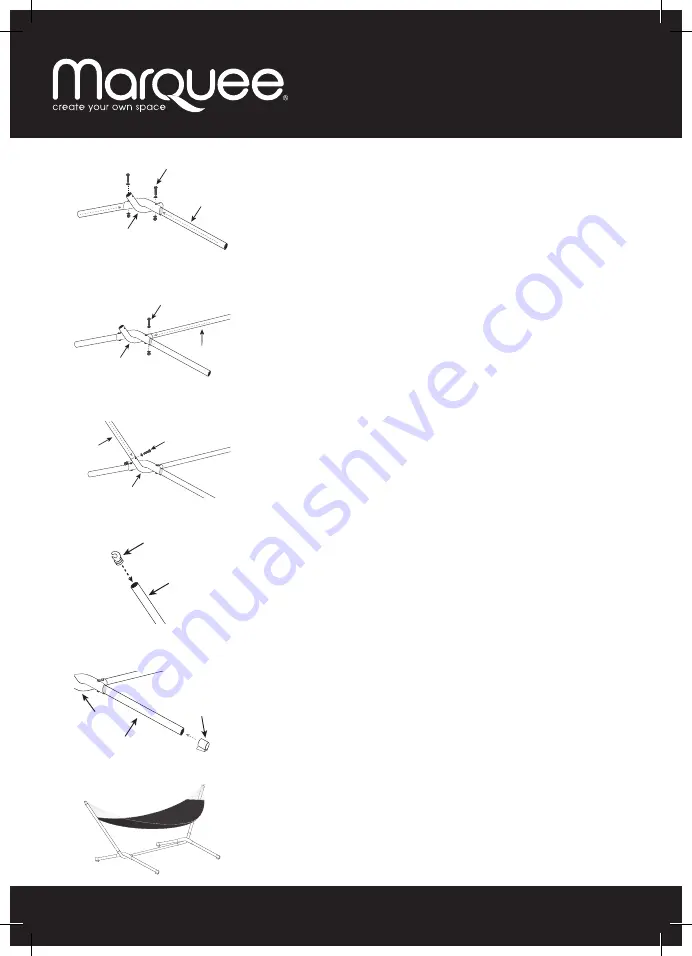
1

 Connect  item  C with the metal stand pipes F

Using the included spanners, secure the pipes with 

screw bolt and nut set D.

2

  Join both end bases C with the center base 

spreader tube E. Using the included spanners, 

secure the pipes with screw bolt and nut set D.

3

  Attach the metal arm pipes B on top of each end 

angle tube C. Using the included spanners, secure 

the pipes with screw bolt and nut set D.

4

  Take the hooks A and insert into the metal arm 

pipes B on either side. Ensure that the hooks fi nger 

faces outwards so that the hammock cannot slip 

out of the hook when being used.

5

  Take the plastic base feet G and attach to each end 

metal stand pipes F.

6

   Now you are ready to hang your hammock into the 

hook ends. Start relaxing. 


 Note: Your hammock will hang taut on the initial set 

up. With use, your hammock will stretch and hang 

in a more relaxed position. 

Содержание 0186267

Страница 1: ...d Size 120W x 290L x 102H cm Item No 0186267 WARNING DO NOT EXCEED THE MAXIMUM LOAD OF 200KGS Read instructions before use and keep for future reference Failure to read these instructions before use c...

Страница 2: ...loading capacity before use 16 Keep hammock clear of obstructions 17 Allow a minimum of 50cm clearance range around the perimeter of your hammock when in use Fig 1 18 Only use the hammock on level fl...

Страница 3: ...ammock and slowly and safely sit in the middle as you would a chair 2 Gently lie back on a diagonal with your head on the edge of the hammock 3 Bring your feet in and stretch them out so you are lying...

Страница 4: ...nsion ropes at both hanger ends Machine wash with cold water on a regular cycle using non bleach detergent DO NOT tumble dry DO NOT iron DO NOT use harsh chemicals or solvents Dry in shade Caring For...

Страница 5: ...tal arm pipe 42mm DIA x 1120mm 2 C End Angle X tube 2 D Screw bolt washer and nut set 8 E Center base spreader tube 40mm DIA x 1120mm 1 F Metal stand pipe 40mm DIA x 560mm 4 G Plastic base feet 4 H Do...

Страница 6: ...ach end angle tube C Using the included spanners secure the pipes with screw bolt and nut set D 4 Take the hooks A and insert into the metal arm pipes B on either side Ensure that the hooks finger fac...

Страница 7: ...Guarantees Act 1993 NZ You are entitled to replacement or refund for a major failure and to compensation for other reasonably foreseeable loss or damage You are also entitled to have the goods repair...

Страница 8: ...8...

Отзывы: