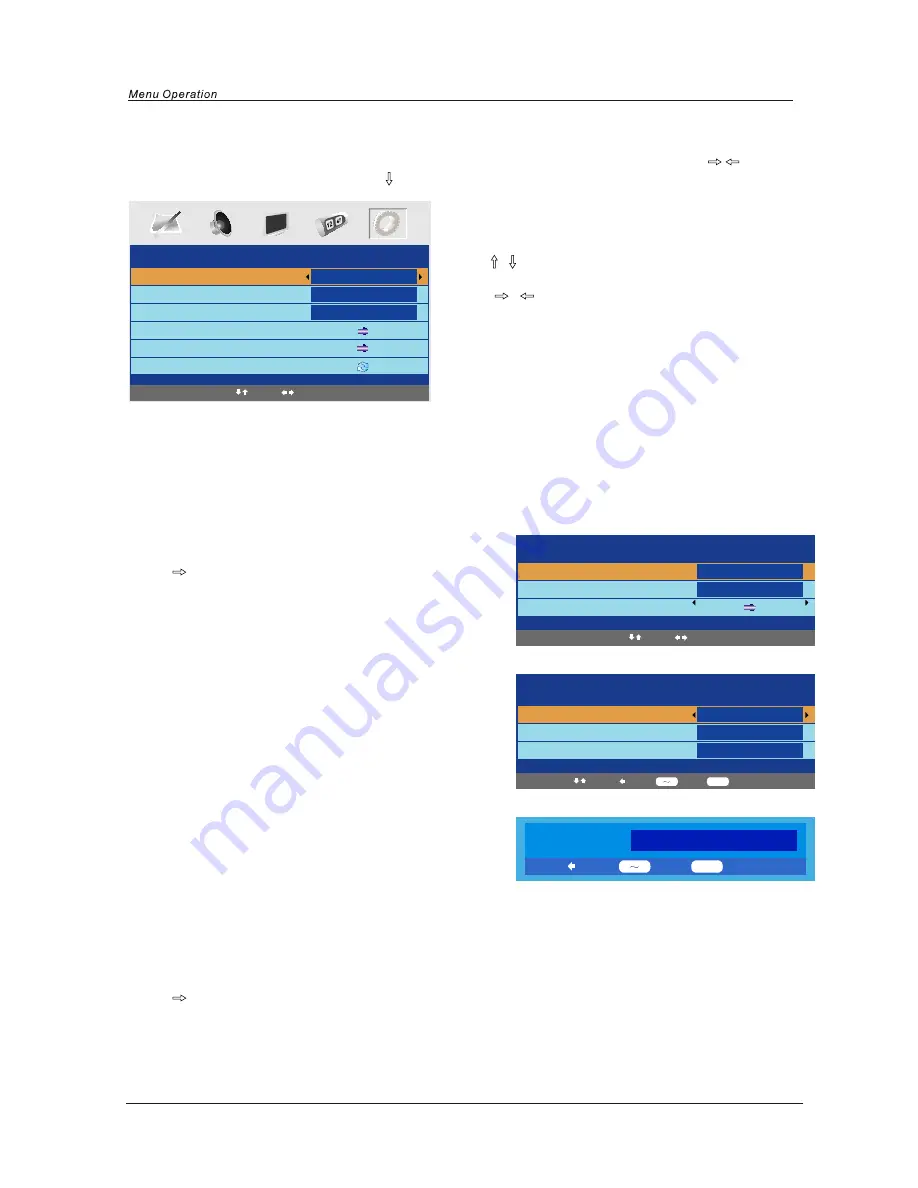
Marks & Spencer MS1975F Скачать руководство пользователя страница 16

13

FUNCTION

Language

Video Size

Blue Screen

Child Lock

First Time Installation

Reset

English

Full Screen

On

1. Use 

/

button to select what you want to 

    adjust in the Function menu.
2. Press 

/

button to Adjust.

3. When you are satisfied with your adjustment, press 

MENU

button.

Language

Select the language of the OSD menu.

Video Size

Select the screen display mode.
Note: The available aspect modes may differ from one input source to another.

Blue Screen

To turn on/off the function, when the function is turned on, the screen background will turn blue at very weak
or no signal condition.

Child Lock

Press

button to enter the Child Lock menu as below:

     Child Lock: Turn on/off the child lock function.
     Key Lock: This option allows you to lock the buttons on 
                      the TV set, so that a child may not accidentally
                      change your viewing preferences.

Change PIN Code: Set pin code.

Old PIN Code: The default is no password, press

OK to confirm. If the Pin code has been changed you must 

          New PIN Code: Enter the new password.
          Enter Again: Enter the new password and press 

 OK to complete the change. 

FUNCTION menu options

Select

Adjust

Child Lock

Child Lock

Key Lock

Change PIN Code

Off

Off

Select

Adjust

Change PIN Code

Old PIN Code

New PIN Code

Enter Again

Select

Delete

Input

Confirm

0

9

OK

If you turn on the Child Lock function, and set the PIN
Code, you have to enter the program edit option in Menu Setup (page 14) to lock one or more channels.
If the quick start button is pressed you will also be prompted for the child lock Password.

Note: If the pin code is changed and the number forgotten or lost, please call the helpline.

Reset

Press

button to reset the setup.

Delete

Input

Enter

0

9

OK

PIN Code:

enter the present code.

Press the MENU button on the top of your tv or the MENU button on the remote control then use 

/

button to select the Function menu, press 

to enter the menu. (see picture below) .

Содержание MS1975F

Страница 1: ...LCD digital colour TV MS1975F USER GUIDE...

Страница 2: ...y appear or bright points of light red blue or green may appear constantly on the LCD screen and is not a malfunction If you have any problem setting up this Television trouble getting a signal or dif...

Страница 3: ...n Basic TV operation PICTURE menu options SOUND menu options TIMER menu options FUNCTION menu options SETUP menu options DVD operation DVD System Operation 3 4 4 5 6 7 8 9 9 10 11 12 12 13 14 15 16 17...

Страница 4: ...osal of this Product This unit is a CLASS 1 laser product This product uses a visible laser beam which could cause hazardous radiation exposure Ensure the recorder is operated as instructed Do not rem...

Страница 5: ...hrooms steamy kitchens or near swimming pools x Pull the plug out immediately and seek professional help if the mains plug or cable is damaged liquid is spilt onto the set or if it is accidentally exp...

Страница 6: ...GUIDE EASY START GUIDE EASY START GUIDE USER GUIDE Unit and Accessories PROG VOL TEXT HOLD T I X E U N E M QUICK START MUTE EPG SUBTITLES PICTURE SOUND TIMER ASPECT DISPLAY FAV FUNCTION STANDBY OK 1...

Страница 7: ...ss POWER to turn on and off Indicator on RED Standby mode Indicator on GREEN Power on mode Getting Started Getting Started CH VOL Power MENU TV AV PLAY EJECT Press to display the input source menu see...

Страница 8: ...DVD Power ON OFF 5 Getting Started COAX out Output to Audio amplifier TV Signal Common Interface Satellite Box or Blue Ray DVD...

Страница 9: ...IN PC Audio IN Headphone RF Connect to power supply SCART Connect to the HDMI socket of your DVD or Satellite Box Audio signal input for AV S Video signal input Video signal input PC audio input Conne...

Страница 10: ...display HOLD Hold or carry on the current subpage EPG Electronic Program Guide SUBTITLES For DVD and DTV only Cursor left right up down Cursor buttons used in menus OK CONFIRM BUTTON MENU System setup...

Страница 11: ...nu ZOOM adjust picture size in DVD mode DVD MENU DVD Disc menu DVD fast forward DVD fast reverse DVD next chapter DVD previous chapter load eject DVD disc play pause DVD program stop DVD program 0 9 C...

Страница 12: ...turn the TV off into standby mode the indicator will light red NOTE When you initially use the TV you will see the First Time Installation menu as below Please make sure the TV aerial is plugged into...

Страница 13: ...20 Music 60 52 50 SETUP Country Auto tuning Manual tuning Program Edit Common interface UK FUNCTION Language Video Size Blue Screen Child Lock First Time Installation Reset English Auto On TV SCART C...

Страница 14: ...shown in gray Sharpness Select sharpness mode of the picture Colour Temperature in VGA mode Select an optimum color temperature mode to suit your eyes for viewing among Normal Warm and Cold DNR If the...

Страница 15: ...rs Sleep Timer Select the sleep time to put automatically the TV in standby mode Timer can be selected as 15 30 45 60 75 90 105 120 and 0 Min Off You may select the sleep time by pressing SLEEP repeat...

Страница 16: ...IN Code Set pin code Old PIN Code The default is no password press OK to confirm If the Pin code has been changed you must New PIN Code Enter the new password Enter Again Enter the new password and pr...

Страница 17: ...ing Manual Tuning Program Edit Common Interface UK Select Adjust Auto tuning Press OK key to start Enter Return OK MENU Program Select the current channel Sound System Select a corresponding sound sys...

Страница 18: ...to set and there will be a on the channel press the green button again to cancel Such as channel 2 Delete Delete the channel the channel will be deleted Lock Lock the channel you have to enter the cod...

Страница 19: ...rial number of playing language the amount of optional languages or Off Language Type Audio Type Subtitle the serial number of playing subtitle the amount of optional subtitles or Off Press the button...

Страница 20: ...ss OK When launching the setup routine the pressing of the following buttons will turn off the setup menu while the choices that have been changed will be saved Menu specification 1 SYSTEM SETUP The s...

Страница 21: ...DIF PCM is selected for amplifiers with no built in digital decoder TONE Use the button to move the scroll and adjust the tone RATING The Rating feature is a rating limit feature like movie ratings Th...

Страница 22: ...TAL SETUP The video setup options are illustrated below DYNAMIC RANGE Use the button to move the scroll and adjust the dynamic range DUAL MONO Choose the mode of the audio output There are four modes...

Страница 23: ...density compressed data that needs proper handling 1 Hold the disc with fingers by outer edge and or the center spindle hole Do not touch the discs surface 2 Do not bend or press the disc 3 Do not ex...

Страница 24: ...leads not connected if used Check all external leads are connected DVD Will not accept disc DVD not selected Select DVD mode with FUNCTION button Disc placed incorrectly Disc must have mirror side fac...

Страница 25: ...tem PAL SECAM BG DK I Screen size 19 diagonal Resolution 1440x900 pixels RGB Aerial input 75 unbalanced Audio output power Remote control Type Control distance Control angle Batteries Dimensions Weigh...

Страница 26: ......

Страница 27: ......

Страница 28: ...change your mind or if you damage the goods after you buy them Should a repair not be possible we will exchange the product for a new or nearest equivalent product In the unlikely event of being unabl...

Отзывы: