background image

9

4.0 INSTALLATION

1) Damage Inspection:

Reporting shipping damage is the responsibility of the purchaser.

Do not discard packaging if filing a freight damage claim. Upon receipt of steamer
immediately inspect the exterior of packaging for damage. Remove wrapping. Inspect the
exterior of the

Altair II

for visible shipping damage.

2) Unpacking / removal from pallet:

To remove the steamer from the pallet, carefully cut

the strapping.

3) Legs / caster installation:

Install 4 legs or casters (shipped inside the steamer) into the

threaded mounting holes located on the base of the unit. If casters are supplied, locking
casters should be on the front of the steamer.

4) Vent pipe installation (double & single compartment steamers):

Steamers come with

the vent piping in rear of unit completely assembled. Two 90° elbows are shipped loose
for your convenience that may be useful in running a drain line to your floor trough (if
applicable). DO NOT BLOCK VENT PIPE.

5)

Make sure the pan racks, water reservoir cover and standpipe installed inside the
steamer have not become dislodged during shipping.

6) Physical location of steamer:

98% of all maintenance and service can be done from

the front or left side. Some local codes may require installation under ventilation, but
ventilation is not required in most cases. A minimum of 4” clearance from adjacent
equipment on the left side and rear is recommended.

7) Electrical hookups:

The access hole to electrically wire your steamer is located in the

bottom right corner (facing the back of the steamer) on the rear panel. Your electrician
may install a cord set to make the steamer more portable or the unit may be hard-wired.
Please follow local codes when installing the cord set.

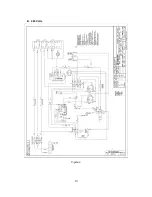
8) Electrical Diagrams:

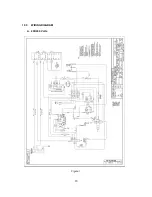
The electrical diagrams are located on the inside of the left side

access panel.

9) Water hookup:

Steamer requires ½” water line. Termination is ¾” male garden hose

connection. Make sure waterline is flushed to remove grit and soldering particles prior to
connecting steamer. Dirty water lines may affect solenoid operation.

Double (stacked) compartment steamers

require separate water connections, which

may be manifolded. Inadequate water supply may cause one steamer not to fill properly
when both steamers are turned on at the same time. If that happens turn on one steamer
a few minutes after the first.

Do not connect to de-ionized water. Probes will not sense the level of the water.
Recommended water pressure is 30 – 35 lbs.

10) Recommended water quality:

This steamer does not require water filtration in line with

the steamer’s water line. However, it is important to properly drain and clean your water
reservoir at least daily (see 6.0 Cleaning Guidelines in this manual).

NOTE:

A qualified electrician must perform all electrical hookups and meet all local codes.

Installation is the responsibility of the purchaser.

NOTE:

Stacked units will require 2 separate electrical connections.

CAUTION:

Flush incoming water line prior to connecting to steamer. Debris in water lines may

cause solenoid valve to malfunction. If solenoid valve is stuck open water must be turned off at
the source.

NOTE:

Water level probes will not sense water level if steamer is connected to a de-ionized water

or reverse osmosis system.

Содержание Altair II-10

Страница 1: ...4 ALTAIR II 8 ALTAIR II 6 ALTAIR II 10 ALTAIR II 12 INSTALLATION OPERATION MAINTENANCE STEAM COOKING GUIDELINES PARTS LISTS PARTS SERVICE 35 Garvey Street Everett MA 02149 Tel 617 387 4100 Fax 617 387 4458 custserv mfii com www mfii com 12 13 2011 REV 1 ...

Страница 2: ...EAM COOKING GUIDELINES15 A Cooking with atmospheric pressureless steam 15 B Recommended Uses 15 C Typical Foods 15 D Tips on cooking frozen product 15 E Blanching 15 F Tips on pan use 15 G Other helpful hints 16 9 0 WARNINGS AND CAUTIONS 16 A Warnings 16 B Cautions 17 10 0 WIRING DIAGRAM 18 A 208 240 Volts 18 Figure 1 18 B 480 Volts 19 Figure 2 19 11 0 ILLUSTRATED PARTS LIST 20 A Cabinet Assembly ...

Страница 3: ...3 Figure 12 24 D Control Panel Components 26 Figure 13 26 Figure 14 27 E Convection Fan and Motor Components 28 Figure 15 28 Figure 16 28 ...

Страница 4: ... Never spray water into electrical components WARNING Do not store or use gasoline or other flammable vapors or liquids in the vicinity of this or any other appliance WARNING Please make certain that every operator of this piece of equipment has been instructed on its proper and safe use and has read and understands all warnings cautions and notes in this manual This equipment is to be installed w...

Страница 5: ...he steamer in case of a waterfill malfunction 4 High water sensor Two water level sensors are located on the lower backside of the steamer The lower sensor activates the waterfill mechanism The upper sensor will shut off water flow if an overflow situation occurs It is important that both sensors are kept clean so that the stainless part is shiny 5 Door open safety switch There is a safety switch ...

Страница 6: ...x 28 deep plus vent pipe 12 pan External dimensions are 24 wide x 66 high plus 6 9 adjustable legs x 28 deep plus vent pipe 4 Service Contacts Should repairs be required a network of authorized agencies is available to assist with prompt service A current Directory of Authorized Service Agencies may be obtained by contacting Market Forge Industries Inc 35 Garvey Street Everett Massachusetts 02149 ...

Страница 7: ...7 3 0 SERVICE CONNECTIONS Models Altair II 4 Altair II 6 ...

Страница 8: ...8 SERVICE CONNECTIONS continued Models Altair II 8 Altair II 10 Altair II 12 ...

Страница 9: ... the steamer on the rear panel Your electrician may install a cord set to make the steamer more portable or the unit may be hard wired Please follow local codes when installing the cord set 8 Electrical Diagrams The electrical diagrams are located on the inside of the left side access panel 9 Water hookup Steamer requires water line Termination is male garden hose connection Make sure waterline is...

Страница 10: ...ris prior to use Rinse with clean water 4 Make sure drain overflow standpipe is fitted firmly into cooking compartment drain opening 5 Install reservoir cover with left side drain fitted into hole at side of steamer tip cover slightly to insert drain fitting into side drain hole Lip at front of reservoir cover fits over base of door opening 6 Power on heat up Make sure the door is closed then turn...

Страница 11: ...lt and will shut down the heaters until the fault has been cleared Most commonly this requires cleaning the water sensor probes 6 Condensate trough The trough under the door catches water dripping from the door and exits the steamer at the rear 7 Power on heat up Make sure the door is closed then turn the cooking mode selector switch to the desired setting 1 2 or 3 The steamer will begin warming u...

Страница 12: ...Using a soft sponge clean the non stick coating on the interior of the cooking chamber Clean the door gasket with gentle soap and water and allow to air dry NOTICE Only use mild soap vinegar and water to clean your steamer Do not use abrasive utensils caustic cleaners or products containing chlorine lye or phosphorus such as Lime A Way After cleaning rinse thoroughly by wiping with a wet cloth dam...

Страница 13: ...must be replaced or the steamer will not function properly Your steamer is now ready for another day s work B Monthly Cleaning It is recommended to use the Stellar Descaling Powder to clean your steamer on a monthly basis or whenever necessary Make sure the steamer is off and cool Drain water from the cooking cavity and wipe away any food debris Make sure the drain is plugged Pour one pound of des...

Страница 14: ...ss To reorder Stellar Descaling Powder Part Number 92 1009 case of four 2 lb bottles contact your local Parts and Service agency or Market Forge Industries Inc 35 Garvey Street Everett Massachusetts 02149 4403 Telephone 617 387 4100 Toll Free 866 698 3188 Fax 617 387 4458 Outside MA Fax 800 227 2659 Parts Price Service Telephone 888 259 7076 Email custserv mfii com Web Site www mfii com ...

Страница 15: ... frozen vegetables or product if possible 3 If product is an ice block set it in the pan on its narrowest side This allows the steam to contact a greater surface area 4 Thawing is faster and better for the food in atmospheric steaming 5 Make sure frozen product is uniform in size to get best results 6 Season vegetables AFTER steaming 7 Less seasoning is required because steaming preserves natural ...

Страница 16: ...perforated pans 4 Loosely packed pans will cook faster than tightly packed pans 5 To skin tomatoes oranges etc more easily steam for a short time then chill in cold water 6 When steaming pasta shrimp or ground meat nesting a perforated pan in a solid pan works well Lift out the perforated pan to drain 7 Never have the water high enough or a pan low enough to touch water Allow enough space for stea...

Страница 17: ...leaning Do not add cold water to a hot empty cooking chamber until unit has cooled down or damage may result B Cautions 1 Do not use utensils steel wool or other harsh abrasives to clean your steamer Scratching of the non stick surface and stainless steel casing may occur 2 Flush incoming water line prior to connecting to steamer Debris in water lines may cause solenoid valve to malfunction If sol...

Страница 18: ...18 10 0 WIRING DIAGRAM A 208 240 Volts Figure 1 ...

Страница 19: ...19 B 480 Volts Figure 2 ...

Страница 20: ...nt View Figure 4 Control Panel View ITEM No PART No DESCRIPTION QTY 1 92 0185 LED Light Color Red 1 2 92 0184 LED Light Color Amber 1 3 92 0125 Rotary Switch 4 Position 1 4 92 0137 Timer 240v 60 Minutes 1 5 Door Assembly See Section B below for details 1 3 4 2 5 1 ...

Страница 21: ...Pan unit 2 7 92 0082 Screw 20 x Oval Head Stainless Steel 4 8 97 6178 Door Striker 8 5021 1 9 92 0428 Condensate Trough Guard 1 10 92 0014 Clean Reservoir Pan 1 11 92 0050 Bottom Oven Chamber Casting 1 12 92 0404 Casting Bolster 6 Pan unit only 1 13 92 0076 Top Oven Chamber Casting 1 14 92 0011 Fan Baffle 1 14 13 12 11 10 6 8 9 7 ...

Страница 22: ...w of Door ITEM No PART No DESCRIPTION QTY 1 92 0548 Door Assembly 4 Pan 1 1 92 0549 Door Assembly 6 Pan 1 2 92 0063 Door Gasket 4 Pan 1 2 92 0159 Door Gasket 6 Pan 1 3 92 0380 Gasket Plate 4 Pan 1 3 92 0381 Gasket Plate 6 Pan 1 4 92 0064 Paddle Latch Assembly 1 1 2 3 4 ...

Страница 23: ...3b 92 0726 Right Side Panel 4 Pan Not Shown 1 3c 92 0729 Left Side Panel 6 Pan 1 3d 92 0728 Right Side Panel 6 Pan Not Shown 1 4 10 0239 Rubber Hose 1 Dia 4 Pan Unit X ft 6 Pan Unit Y ft 1 5 92 0060 Garden Hose Adapter 1 6 10 4137 Hose Clamp 2 7 92 0028 Copper Tubing 1 Dia x 4 Length 1 8 92 0700 Pipe Hanger Clamp 1 9 10 8045 1 Black Tee 1 10 08 1207 1 chrome Hose Barb 1 2 3a 3b 4 3c 3d 6 7 8 9 1a ...

Страница 24: ...mbly continued Figure 9 Stacked Oven Rear View Figure 10 Stacked Oven Top Section Figure 11 Stacked Oven Mid Section Figure 12 Stacked Oven Bottom Section 11 11 13 14 15 15 17 18 19 21 16 17 16 15 17 21 16 22 20 23 15 ...

Страница 25: ...per Tubing 1 Dia x 4 Length 2 14 92 0700 Pipe Hanger Clamp 2 15 10 4137 Hose Clamp 6 16 92 0683 1 90 Street Elbow 4 17 08 1207 1 chrome Hose Barb 4 18 10 8045 1 Black Tee 1 19 92 0681 1 x 4 Black Iron Nipple 1 20 92 0682 1 Black Iron 90 Elbow 2 21 92 0685 1 Black Cross 1 22 92 0684 1 x 3 Black Iron Nipple 1 23 92 0060 Garden Hose Adapter 1 ...

Страница 26: ...perature Controller 240v 1 3 92 0187 Timer Delay 220v 1 60 Seconds 1 4 92 0188 Timer Delay 220v 60 Seconds 1 5 92 0414 Fuse 2 Amp 2 6 92 0137 Timer 240v 60 Minutes 1 7 92 0125 Rotary Switch 4 Position 1 8 92 0186 Buzzer 240v 1 9 92 0140 Terminal Strip 6 Pole 2 10 92 0181 Waterfill Controller 208 240v 1 8 6 5 7 2 4 3 1 ...

Страница 27: ...0411 Heater Element Alum 208v for all 208v units Heater Element Alum 240v for all 240v 480v units 4 4 pan units 5 6 pan units 17 92 0354 Heat Exchanger Drain Assembly 1 18 92 0172 Solenoid Valve 230V 1 19 92 0069 Terminal Block 1 20 92 0140 Terminal Strip 6 Pole 1 SEE PREVIOUS PAGE FOR THESE PART NUMBERS 15 16 20 19 18 17 ...

Страница 28: ... 2 08 5601 Pulley 25 Dia Bore 22 Teeth 1 3 08 5600 Pulley 25 Dia Bore 18 Teeth 1 4 92 0606 Mounting Pedestal 1 5 92 0605 Mounting Plate 1 6 92 0676 Blower Drive Insulation Not Shown 1 7 08 1414 Belt 1 8 92 0016 Convection Fan Blower Wheel 1 9 92 0704 Tubular Heater for all 240Vunits 1 9 92 0731 Tubular Heater for all 480V units 1 10 92 0732 Gasket Tubular Heater 1 1 2 3 4 5 6 7 8 9 10 ...

Отзывы: