background image

20

Mark Levinson

Pressing Play also takes the Nº512 out of Standby mode. If the 
player had a disc loaded when put into Standby mode, the disc 
starts playing when the Nº512 is taken out of Standby mode.

Stop

 (

) – stops the playback of a loaded CD/SACD disc. Pressing 

the Stop button also deactivates Shuffle mode.

4. Time button

Indicates the time mode that is used on the front panel display. 
Multiple presses of the Time button scrolls through the four 
time-mode options, using the Time on Disc and Time Remaining 
LEDs to indicate which mode is selected at any point. Refer to the 
“Front Panel Display” section found previously in this manual for 
more details about the Time Indicator option.

5. Volume buttons

Controls the volume level of the Nº512 audio output when the 
variable volume mode is active. Press the Up (

) button to increase 

the volume level, or press the Down (

) button to lower the 

volume level.

6. SACD/CD button

Allows you to select different layers on a SACD disc. When a SACD 
disc is first loaded, the Nº512 automatically selects the two-channel 
SACD layer. 

If the SACD disc is a hybrid with alternate layers, multiple presses of 
the SACD/CD button scrolls through the multichannel SACD, the 
2-channel SACD, and the CD layers. If a multichannel layer is 
selected, it is downmixed to a 2-channel output.

Note

When playing a SACD disc, the SACD layer is only available on the 
analog audio outputs. However, the CD layer may be played normally 
using digital or analog outputs.

The SACD LED under the front panel display lights when a SACD 
disc is loaded into the player. If the CD layer is selected on the disc, 
then the SACD LED is not lit.

Once playback of the SACD disc has started, the SACD/CD button 
becomes inactive. Only when the player is in Stop mode can the 
different layers of the SACD disc be accessed.

Note

If a normal CD is loaded in the player, then this button is inactive and 
has no function.

7. Clear button

Removes the last track entry from a program. This button only 
functions when Program mode is active.

Содержание 512

Страница 1: ...No 512 CD SACD Disc Player Owner s Manual ...

Страница 2: ...ected Consult the dealer or an experienced radio TV technician for help Caution Changes or modifications not expressly approved by the party responsible for compliance could void the user s authority to operate the equipment Canada This Class B digital apparatus complies with Canadian ICES 003 Cet appareil numérique de la Classe B est conforme à la norme NMB 003 du Canada For customer service and ...

Страница 3: ...fer all servicing to qualified service personnel Servicing is required when the apparatus has been damaged in any way such as when the power supply cord or plug is damaged liquid has been spilled or objects have fallen into the apparatus or the apparatus has been exposed to rain or moisture does not operate normally or has been dropped 15 The MAINS cord is intended to be the safety disconnect devi...

Страница 4: ...ltage inside the enclosure voltage that may be sufficient to constitute a risk of shock Appears on the component to indicate important operation and maintenance instructions included in the accompanying documentation Appears on the component to indicate compliance with the EMC Electromagnetic Compatibility and LVD Low Voltage Directive standards of the European community Documentation Conventions ...

Страница 5: ...rol Overview 18 Initial Setup 24 Set Up Using Analog to a Preamplifier 24 Set Up Using Analog to an Amplifier 25 Set Up Using Digital Outputs 26 Internal Web Page 27 Network Setup 27 Material Requirements 28 Computer Requirements 28 Connecting the Cables 29 Network Setup Parameters 29 Connecting With DHCP Recommended 30 Setting Up the Computer 31 Connecting With Static IP Addressing 33 Direct Conn...

Страница 6: ...nced mode wherever possible The analog audio printed circuit board is manufactured using high performance Nelco a modern equivalent of Arlon with similar high bandwidth properties Another important feature of the data conversion system is the handling of audio clocks Since jitter and noise can cause inaccuracies during the data conversion process a clean master clock provides improved digital to a...

Страница 7: ...es special care during installation to ensure optimal performance Pay particular attention to instructions included in this section and to precautions included throughout this owner s manual Unpacking DO save all packing materials for possible future shipping needs DO inspect the Nº512 for signs of damage during shipment If damage is discovered contact your authorized Mark Levinson dealer for assi...

Страница 8: ... excessive dust Avoid installing the player near radiators and other heat producing appliances DO NOT install the Nº512 near unshielded TV or FM antennas cable TV decoders or other RF emitting devices that might cause interference DO NOT place the Nº512 on a window sill or in any location where it will be exposed to direct sunlight DO NOT obstruct the IR infrared receiver transmitter located on th...

Страница 9: ... operating voltages may require the use of different power cords and or attachment plugs Contact a Mark Levinson dealer for additional assistance Operating States The Nº512 CD SACD player is designed for continuous operation and has three operating states Off when the front panel Power switch is turned off or the power cord is removed from the rear panel Standby when the Nº512 is powered up but th...

Страница 10: ...ing the Remote Control Batteries The Nº512 CD SACD player remote control has two installed AA batteries These should be replaced as required We recommend using alkaline batteries which are long lasting and do not leak To replace the remote control batteries 1 Locate the battery compartment cover on the bottom of the remote control 2 Using a Phillips head screwdriver remove the three screws from th...

Страница 11: ... Check with the owner s manual of the software application for more detailed information Handling and Care of Discs Discs require special care and handling to ensure their optimal performance Pay particular attention to the following DO remove the disc from its storage case by pressing down on the center of the case and lifting the disc out holding it carefully by the edges DO hold the disc at its...

Страница 12: ... drawer DO NOT use chemicals such as record sprays antistatic sprays or fluids benzine or thinner to clean the disc Such chemicals may do irreparable damage to the disc s plastic surface DO NOT use irregularly shaped discs as they may damage the player Mini discs may be used so long as they can be properly seated in the disc drawer DO NOT write on the disc label or disc surface with ballpoint pens...

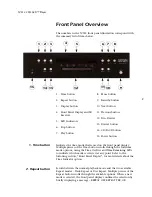
Страница 13: ...he front panel display Multiple presses of the Time button scrolls through the four time mode options using the Time On Disc and Time Remaining LEDs to indicate which mode is selected at any point Refer to the following section Front Panel Display for more details about the Time Indicator option 2 Repeat button Scrolls between the normal playback mode and the two available Repeat modes Track Repea...

Страница 14: ...cation of infor mation within the display identifies what kind of information it is Refer to the next section Front Panel Display for more details Infrared commands transmitted from the Nº512 remote control are received by an IR receiver behind the display Remote control of the Nº512 player may be unreliable if there is not a clear line of sight between the remote control and the front panel displ...

Страница 15: ...pears from the display and playback of the disc resumes from the point at which it was paused 9 Standby button Activates and deactivates the Standby mode The Standby LED located directly above the Standby button is illuminated when the Nº512 is operational and blinks slowly when the Nº512 is in Standby mode To remove the Nº512 from Standby mode press the Standby Drawer or Play button 10 Next butto...

Страница 16: ...times scrolls through the fast rewind settings 2x 4x 8x and then fast rewind off which returns the Nº512 to normal playback mode 12 Disc Drawer Made from solid aluminum it is normally opened and closed by pressing the Drawer button The drawer can also be closed by gently nudging the front edge inward The Nº512 interprets the gentle pressure as a request to close the door Caution Do NOT try to forc...

Страница 17: ...lied power cord is connected between the rear panel power connector and an electrical outlet Caution Before operating the No 512 verify that the voltage label near the AC input connector indicates an operating voltage compatible with the voltage level of the electrical outlet you intend to use When the Nº512 is off pressing the Power button supplies AC power putting the Nº512 into Standby mode Whe...

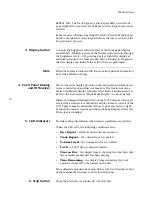
Страница 18: ... being used or When Fast Rewind mode is activated the first three positions indicate the fast rewind arrow The number of arrows indicates which of the three fast rewind speeds is currently being used or Track Number The sixth and seventh character positions of the display are used to indicate the track number If a disc is loaded and the Nº512 is in Play mode then the display indicates the track nu...

Страница 19: ... indicates the total amount of time that the disc has left to play Both the Time on Disc and Time Remaining LEDs are lit The Nº512 continues to display the time as selected until a new format is selected the disc is ejected or the Stop button is pressed When a disc is loaded but in Stop mode the time indicator always displays the total time on the disc The Time Indicator mode is selected by pressi...

Страница 20: ...nt with the standards adopted by the Audio Engineering Society Refer to the operating manual of your preamplifier to ensure that the pin assignments of its balanced output connectors correspond to the Mark Levinson Nº512 CD SACD player If not wire the cables so that the appropriate input pin connects to the equivalent output pin 2 Digital Outputs Provide an AES EBU or an S PDIF connector for the d...

Страница 21: ...nt The trigger input passes through to the trigger output signal enabling a daisy chain of devices to be controlled by a single trigger signal Receiving a trigger signal causes the Nº512 to change its power state If the Nº512 is in Standby mode it is powered on when a 12V DC signal is received on the trigger input Conversely if the Nº512 is powered on then 0V DC on the trigger signal puts the Nº51...

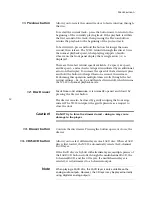
Страница 22: ...st Forward buttons 3 Transport buttons Pause Play Stop 4 Time button 5 Volume buttons 6 SACD CD button 7 Clear button 8 Number keypad 0 to 9 and 10 buttons 9 Display Intensity button 10 Light button 11 Standby button 12 Previous and Next buttons 13 Shuffle button 14 Repeat button 15 Mute button 16 Program button 17 Volume Fix Var button 1 2 3 4 5 6 7 8 9 10 11 12 13 14 15 16 17 ...

Страница 23: ...that a single arrow is displayed There are three fast rewind and three fast forward speeds available 2x speed 4x speed and 8x speed and each selected speed is indicated by an additional arrow on the display To increase the speed press and release the fast rewind or the fast forward button Performing this operation multiple times scrolls through the settings 2x 4x 8x and then off which returns the ...

Страница 24: ... button Allows you to select different layers on a SACD disc When a SACD disc is first loaded the Nº512 automatically selects the two channel SACD layer If the SACD disc is a hybrid with alternate layers multiple presses of the SACD CD button scrolls through the multichannel SACD the 2 channel SACD and the CD layers If a multichannel layer is selected it is downmixed to a 2 channel output Note Whe...

Страница 25: ...ights the display at medium intensity for several seconds before turning it off again so that the display can indicate the action that you performed Note When the display intensity is set to Off the active front panel LEDs remain lit but at their dimmest setting 10 Light button Illuminates the Nº512 remote control with a backlight After a short period of illumination the backlight automatically tu...

Страница 26: ...epeat button the disc is ejected or the Stop button is pressed 15 Mute button Mutes the audio outputs When the Mute button is pressed the front panel display briefly states Full Mute and the output is muted Press the Mute button again to return the volume to its previous level Mute is only available if the Volume control is set to variable and is otherwise inactive 16 Program Button Allows you to ...

Страница 27: ...f the Volume Fixed LED is NOT lit then the volume is variable and can be changed with the remote control Volume Up and Down buttons The variable volume attenuates the output level from 0 off to 73 2 maximum volume The variable volume level defaults to 30 when the Nº512 is taken out of Standby mode or powered on or if the volume is changed from Fixed to Variable If the Volume Fixed LED is lit then ...

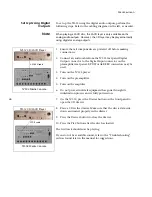
Страница 28: ...og Input Left connector on the preamplifier rear panel RCA or XLR connectors may be used 4 Turn on the Nº512 player 5 Turn on the preamplifier 6 Turn on the amplifier 7 Do not proceed until all equipment has gone through its initialization process and is fully powered on 8 On the Nº512 press the Drawer button on the front panel to open the CD drawer 9 Place a CD or SACD disc in the drawer Make sur...

Страница 29: ...illuminated Warning Since the volume and mute controls are NOT active when the volume is set to Fixed you will have no way to turn the volume down when a disc is played 6 Turn on the amplifier 7 Do not proceed until all equipment has gone through its initialization process and is fully powered on 8 On the Nº512 press the Drawer button on the front panel to open the CD drawer 9 Place a CD or SACD d...

Страница 30: ...F or AES EBU connectors may be used 3 Turn on the Nº512 player 4 Turn on the preamplifier 5 Turn on the amplifier 6 Do not proceed until all equipment has gone through its initialization process and is fully powered on 7 On the Nº512 press the Drawer button on the front panel to open the CD drawer 8 Place a CD in the drawer Make sure that the disc is data side down and seated properly in the drawe...

Страница 31: ...actory default values Clicking the Restore Defaults button displays a pop up asking for confirmation click Yes to restore the factory default values Network Setup The Nº512 CD SACD player supports a network connection through the Ethernet port The Nº512 can connect to a network through use of a router or directly to a computer The Nº512 can be 1 Connected to a router with DHCP active We highly rec...

Страница 32: ...on because you will need to access the status page of the router to locate the name of the Nº512 Typically switches and hubs do not have status pages The following materials are required to connect the Nº512 to a computer without the use of a router Nº512 CD SACD player Network crossover cable PC compatible computer with 10 100BaseT network card Computer Requirements The PC compatible computer use...

Страница 33: ...le from the Ethernet port on the rear panel of the Nº512 to the Ethernet port of the computer Network Setup Parameters Accessible only through the Nº512 internal Web page the network setup parameters include Static IP Address provides a fixed IP address This IP address is NOT automatically selected it must be entered If DHCP is on then an IP address doesn t need to be entered IP address 192 168 50...

Страница 34: ...ive 2 Press the Power button on the Nº512 3 On the computer open the Internet Explorer Web browser 4 Access the status page of the router to identify the name of the Nº512 player Refer to your router s owner s manual to determine how to access the status page Most routers identify the device names of all located devices on the status page However some may only list the assigned IP address Note If ...

Страница 35: ... to the appropriate section to connect to the Nº512 player For the computer to find the Nº512 the TCP IP Internet Protocol and LAN Local Area Network settings of the computer must be set up The parameter setups vary slightly depending upon the operating system of the computer Refer to the procedure below that matches the operating system on your computer Note Due to your preference settings in the...

Страница 36: ...rowser 11 From the menu bar select the Tools Internet Options menu 12 Select the Connections tab 13 Click the LAN Settings button 14 Verify that Use a proxy server for your LAN is NOT checked 15 Click OK to save and exit the menu Network Setup for Windows 2000 1 From the Start menu select Settings Control Panel 2 Double click on the Network and Dial Up Connections option 3 Double click on the Loca...

Страница 37: ...er for your LAN is NOT checked 15 Click OK to save and exit the menu Connecting With Static IP Addressing If you plan to connect with static IP addresses DHCP is turned off use this procedure Otherwise skip to the next procedure to connect directly to a computer Connect one Nº512 player to the router as described in the previous Connecting the Cables section Make sure that everything is powered of...

Страница 38: ...he Nº512 player The host name can be modified but only the first eight characters are affected anything after the underscore may not be modified To change the host name of the Nº512 A Type the new name into the white box to the right of the parameter The new name must be made from the capital letters A to Z and the numbers 0 to 9 Underscores may also be used Only eight characters are allowed B Cli...

Страница 39: ...e bottom of the page contains the network parameters setup 5 Observe that the Status section of the Web page identifies the host name of the Nº512 player The host name can be modified but only the first eight characters are affected anything after the underscore may not be modified To change the host name of the Nº512 A Type the new name into the white box to the right of the parameter The new nam...

Страница 40: ... the commands of the master device The Nº512 CD SACD player is always a slave device A separate master device must be used in conjunction with the Nº512 player As a slave device the Nº512 responds to the following ML Net commands sent from the master device Standby State the master device controls the Standby state of the Nº512 player Synchronized LEDs the Standby LEDS of the master device and all...

Страница 41: ...s first to a switch then connect the uplink of the switch to a normal port on the router Discovering Slaves Before the master device can control any slave device the slave devices must be discovered and assigned to the master device Refer to the owner s manual of the designated master device for further information about discovering and assigning slave devices ...

Страница 42: ...2 is not blown For further instructions refer to the Replacing the AC Mains Fuse description in the Care and Maintenance section that follows No Output 1 Make sure that the Nº512 is powered on and playing audio 2 Verify that the Nº512 is not in Pause mode The display should not show the double bar symbol 3 Verify that Mute is turned off 4 Verify that the volume level is set to an audible level 5 E...

Страница 43: ...same electrical circuit as the Nº512 Remote Control Doesn t Work 1 Eliminate obstructions between the remote control IR transmitter and the front panel display IR receiver transmitter The remote control must be in line of sight with the front panel IR receiver for proper operation 2 Replace the remote control batteries Verify that the remote control batteries are inserted correctly with the proper...

Страница 44: ... is in the correct port 2 Verify that the Nº512 network setup is correct A PC compatible computer is required to access the internal Web page of the Nº512 to verify its network settings Refer to the Network Setup section found earlier in this manual for more details 3 Verify the age of the router switch or hub If the router switch or hub is more than ten years old a communication issue with the Nº...

Страница 45: ...he cloth with benzene acetone based cleaners or other commercial cleaners Wipe the Nº512 s exterior surface in the same direction as the grain of the brushed aluminum Caution DO NOT apply liquid directly to the No 512 s exterior surface Doing so may damage electrical components Replacing the AC Mains Fuse Use these instructions to verify the condition of the fuse and to replace one that has blown ...

Страница 46: ...tructions below to reset the factory default settings from the front panel 1 Power off the Nº512 2 Press and hold the Time button 3 Press the Power button to turn on the power 4 Keep holding down the Time button until the front panel display states CLEARING 5 Release the Time button The display cycles through the messages CLEARING FACTORY SETTINGS RESTORED When the RESTORED message is displayed th...

Страница 47: ...er connector Frequency Response 0 0dB 0 2dB PCM CD 0 0dB 0 5dB DSD SACD Signal to Noise Ratio 108dB Dynamic Range 108dB Total Harmonic Distortion 92dB PCM CD 99dB DSD SACD Decodable Formats CD and SACD Fixed Output Level 4V balanced 2V single ended Maximum Output Level 16V balanced 8V single ended Output Impedance 10Ω Power Requirements 100 120 220 230 240V 100W 50 60Hz factory set for destination...

Страница 48: ...6 EN 61000 3 3 1995 A1 2001 A2 2005 EN 60065 2002 Manufacturer Harman Specialty Group 3 Oak Park Drive Bedford MA 01730 1413 The equipment identified here conforms to the Directive s and Standard s specified above Type of Equipment CD SACD player Models Mark Levinson No 512 Date August 2008 Harman Specialty Group Vice President of Engineering 3 Oak Park Drive Bedford MA 01730 1413 USA Tel 781 280 ...

Страница 49: ......

Страница 50: ......

Отзывы: