background image

28


MPC-MLR-UM(A)  10/2009

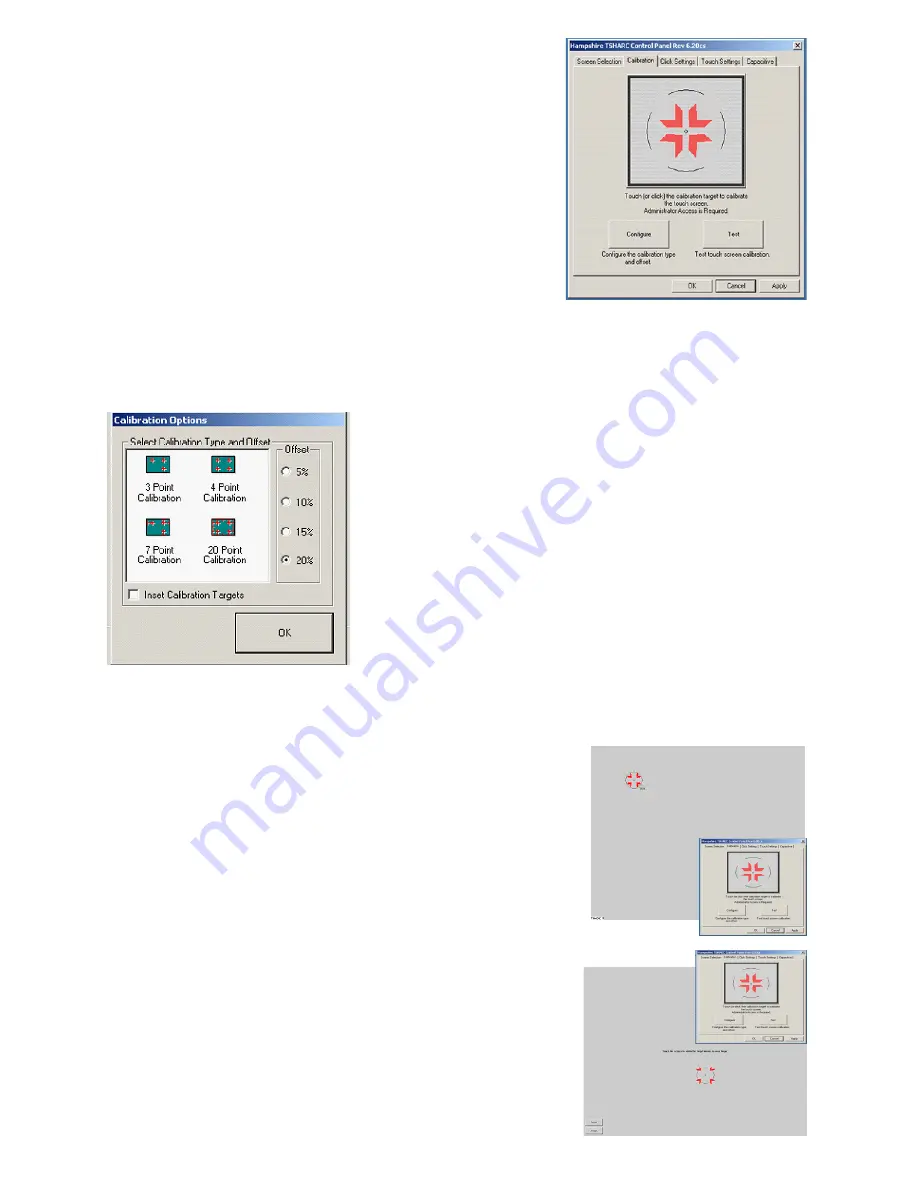
Calibration 

The calibration process aligns the Touch Screen overlay
to specific points on the Display screen. 

1.  Select the Calibration tab or, in ten seconds, the 

calibration program launches, unless a Multi-monitor 
situation is present, then go to section Configuring a 
Multi-monitor Installation 

2.  There are three buttons: Graphic, Calibration and 

Test. For default Four-point calibration, select the 
Graphic square. This is the best known general 

    calibration; it compensates for skew and some edge 

linearity anomalies, and

3.  Go to section Calibration Process.

Custom Calibration Settings

1.  To customize the calibration process, select the Calibration button to bring up 

    Calibration Options and the Offset menu
2.  Select OK when calibration and/or offset selections 

are made:

•  Three-Point Calibration: Quick calibration of a 

known good Touch Screen overlay. No correc-
tion is applied

•  Four-Point Calibration: Compensates for skew 

and some edge linearity anomalies

•  Seven-Point Calibration: More accurate than 

three-point calibration. No correction is applied

•  Twenty-Point Calibration: Provides the highest 

level of Touch Screen linearization and skew cor-
rection, and

•  Offset: Varied linearity exists between Touch 

Screen types; user may want to calibrate the 
edges of the Touch Screen more precisely.  
Default is 20%.

Calibration Process

1.  Press the Center Graphic to start calibration
2.  Targets are used to calibrate the Touch Screen. Follow 

the on-screen instructions - “Touch” the target center, 
“hold” until it shrinks, then “release” the target, and

3.  Repeat the process for all targets. 

Note: the calibration screen shall time-out and return to the


Calibration tab if the first point is not touched within 10 
seconds.

Calibration Verification Test

1.  Touch the screen in several places to verify the 
    calibration target is displayed under the finger, and
2.  Select the Accept button to apply and record the 
    calibration data. 

Note: If the calibration target is not displayed under the finger, 
select the Cancel button, repeat Custom Calibration Settings, 
then Calibration Process.


Содержание MPC-MLR

Страница 1: ...MPC MLR MIL Spec LCD Displays User Manual www MarinePC com N S E W MARINE PC MARINE PC ...

Страница 2: ...se of or the inability to use MarinePC s product or its documentation even if advised of the possibility of such damages Endorsement Product names mentioned herein are used for identification purposes only and may be trademarks and or regis tered trademarks of their respective companies Copyright This document contains proprietary information protected by copyright All rights are reserved No part ...

Страница 3: ...MPC MLR UM A 10 2009 _ MPC MLR Military Grade All Weather LCD Displays User Manual www MarinePC com ...

Страница 4: ...ystem Set up 10 Installation 11 Cable Connections 13 Computer Hook up 15 Operator Controls 18 On Screen Display OSD 19 Optional USB Pass Through 23 Optional Touch Screen Display 24 Appendix A Mechanical Drawings 31 Appendix B Troubleshooting 31 Appendix C Technical Environmental Specifications 34 ...

Страница 5: ...slim profile MPC MLR is light weight and watertight with fully sealed military grade connectors Front mounted controls and various mounting options makes the MPC MLR user friendly You will soon become familiar with the quality difference in this bright sunlight read able Display MIL L 85762A MIL PRF 22885G compliant The MPC MLR incorporates the latest optical engineering to achieve optimal viewabi...

Страница 6: ...amaged cord Do not operate if the unit has been dropped or damaged The unit needs inspected by quali fied MarinePC Service Personnel Position the power cord so it shall not be in contact with hot surfaces Do not allow anything to rest on the power cord and Do not place the power cord where there shall be foot traffic General Safety Precautions Power cord must be connected to a properly wired and g...

Страница 7: ...n installation instructions are followed Does not operate normally when operating instructions are followed Has been dropped or damaged or Exhibits a distinct change in performance indicating a need for service Shipping If the unit should need to be shipped to the MarinePC Service Center the original packing mate rial should be used to insure safety in shipping Repack the unit as it would have ori...

Страница 8: ...ted for antistatic coatings Lightly dampen a soft clean cloth with water vinegar based cleaner or a general purpose mild detergent solution Keep a fresh side of the cleaning cloth towards the screen surface to avoid scratching it with accumulated grit and To minimize the risk of abrasion to the screen air drying is recommended Monitor Enclosure Clean the unit enclosure with a soft clean cloth ligh...

Страница 9: ...ge For pedestal mount units disconnect the cable s and loosen the arm adjustment to a point where the ball can be removed from the arm or For Flush or Panel Mount units cover the product with a protective covering that shall not scratch or transfer any dyes to the Display screen Maintenance Other Maintenance Only MarinePC Qualified Service Personnel shall perform all maintenance except for the pow...

Страница 10: ...OM port for the connector is required Shipping Box Contents The MPC MLR is shipped in a custom box with custom foam packaging We recommend you save the box and all packaging materials in case the unit would need to be returned to the MarinePC Service Center Figure 1 In the shipping box you shall find MPC MLR unit Power Cable Optional VGA Cable Optional Mounting System and Applicable Hardware Touch...

Страница 11: ...ust the viewing angle to improve viewability in changing environments This ball and socket system has proven to be successful in supporting an extreme amount of weight in high vibration and difficult mount applications See Appendix A for link to drawings Locate the ball and socket system in the shipping box The kit consists of two RAM balls on mounting plates and a RAM arm with an adjustable T kno...

Страница 12: ...tor shall be mounted on the installer shall provide the screws to mount the other ball Surface Panel Mount The Panel Mount installation should be specified at the time of order the ball and socket mount system will not be included in the shipping box The mounting hardware packet is included with the unit accessories in the shipping box This packet includes four 4 threaded screws approximately 7 6 ...

Страница 13: ... MIL DTL connectors on the MPC MLR Power Input and Video Input Figure 6 7 Connectors are located on bottom of Display housing From left to right Power Input a 3 Pin Connector and Video Input a 13 Pin Connector Power cable 3 pin plug MIL C 26482 SERIES I PIN SIGNAL A 28 VOLT DC B 28 VOLT RTN C CHASSIS_GND AMPH 71 533721 33P MATE PT06E833SSR Table 1 Caution Use care when inserting or removing connec...

Страница 14: ...ble 2 Line up with Connector 2 in Figure 6 Add a twist to lock Table 2 Video cable 13 pin plug MIL DTL 38999 SERIES I PIN SIGNAL 1 Red Video Signal 2 Red Video Ground 3 Green Video Signal 4 Green Video Ground 5 Blue Video Signal 6 Blue Video Ground 7 H SNYC 8 V SNYC 9 H V SYNC Ground 10 USB RS 232 RXD 11 USB RS 232 TXD 12 Digital Ground 13 RI OUT AMPH 88 569722 35P MATE MS27467E11B35S ...

Страница 15: ...bit less precise images and Pixel settings over 1280 x 1024 flash out of range with no display 1 Right mouse click on an open area of the desktop screen to bring up the Desktop Menu 2 Left mouse click on Properties to open the Display Properties menu 3 Connect to a CRT monitor to establish the computer display properties 4 Select the Settings tab 5 Under Screen Resolution verify or slide the bar u...

Страница 16: ...erties dialog box verify the Screen Resolution is at 800 x 600 SVGA or 1024x768 XGA 11 Select the Apply button 7 Select the Monitor tab 8 Under Monitor Settings verify the Screen Refresh Rate is between 60 and 75Hz If so select the Cancel button and go to step 9 If not select a setting within the 60 75Hz range Select the Apply button ...

Страница 17: ...um image if proper wiring practices are followed Install the cable properly and keep it away from sources of EMI such as electric motors or unshielded RF sources such as radar and microwaves Splitting the video signal also splits the strength of the signal If your installation requires more than one Monitor to be driven from a single video source it is highly recommended that a video signal booste...

Страница 18: ...ents to the lowest setting which is just above total black and suit able in very subdued light as in night time operations and The Monitor shall revert to a mid range setting when the unit is powered off Select Button The Select Button is the access point to the On Screen Display OSD Source Screen Menu See On Screen Display Up Button The Up Button is an adjustment tool in the OSD Source Screen Men...

Страница 19: ...s highlighted its related Functions Menu appears in a drop down box To activate a Display Parameter Category move the highlight box over its icon and single press the SELECT button In the Functions Menu a highlight bar is superimposed over the first function Press the UP or DOWN buttons to move the highlight bar through the related Functions Menu Single press the SELECT button to choose a Related ...

Страница 20: ... the light and dark areas of the pixels of a picture Open the Contrast function Press the UP or DOWN buttons to set the Display s desired contrast and Predefined minimum to maximum is in the display bar Saturation Saturation is the vividness or intensity of the hue or color Open the Saturation function and Press the UP or DOWN buttons to set the Display s desired saturation Tint Tint is the pinks ...

Страница 21: ...D H Position function and Press the UP or DOWN buttons to adjust the horizontal position for the OSD menu on the Display OSD V Position Open the OSD V Position function and Press the UP or DOWN buttons to adjust the vertical position for the OSD menu on the Display OSD Duration Open the OSD Duration function and Press the UP or DOWN buttons to adjust the time elapse between the last menu activity ...

Страница 22: ...OTE Source Screen Menu Category is enabled when the input signal is VGA H Position Open the H Position function and Press the UP or DOWN buttons to adjust the horizontal position of the screen display V Position Open the V Position function and Press the UP or DOWN buttons to adjust the vertical position for the screen display Phase Open the Phase function and Press the UP or DOWN buttons to adjus...

Страница 23: ...MPC MLR UM A 10 2009 23 NOTES ...

Страница 24: ...nstall Drivers folder Left double mouse click on TSUN10 exe to execute the uninstall utility Follow the instructions Note The dialog box stating it is removing all Touch Screen Drivers from the computer means it is removing all TSHARC drivers Other Touch Screen Drivers must be uninstalled with their manufacturer s uninstall utility From the MarinePC Web Site The TSHARC uninstall utility may be dow...

Страница 25: ...RC driver If installing RS 232 connectors the driver has to be installed for each Touch Screen or If installing USB connectors the driver is installed one time for multiple Touch Screens If the Touch Screen connector is USB Window shall load a temporary USB driver Wait for the driver to load 1 Boot up the computer 2 Insert the TSHARC Controller Driver CD 3 On the desktop left double mouse click on...

Страница 26: ...ntroller interface is not available 2 Select the controller interface matching the cable used to install the MPC MLR 3 Select the Autodetect button if installing the Touch Screen through a RS 232 serial interface 4 There are two options for RS 232 installation Auto detect and Manual Manual instructions are found in section Manual RS 232 Controller Set up 5 If connecting through a USB interface sel...

Страница 27: ...ovides links to tools that can modify the TSHARC Drivers to meet specific needs Touch Screen Display Selection Calibration Click Settings Touch Settings Capacitive Settings Note This feature is disabled MPC AWMVR is a Resistive Touch Screen TSHARC Calibration Program TSHARC Control Panel Screen Selection Note If this is not a Multi monitor installation skip to section Calibration Configuring a Mul...

Страница 28: ...for skew and some edge linearity anomalies Seven Point Calibration More accurate than three point calibration No correction is applied Twenty Point Calibration Provides the highest level of Touch Screen linearization and skew cor rection and Offset Varied linearity exists between Touch Screen types user may want to calibrate the edges of the Touch Screen more precisely Default is 20 Calibration Pr...

Страница 29: ...e to the time necessary to produce a right click event Double Click Area This step sets the area that shall allow for a double click event Limit this to areas that can be accurately touched several times 4 Use the slide bar to set the double click area the box displays the activator size Double Click Speed 5 Use the slide bar to set sufficient time to perform a double touch in the specified area 6...

Страница 30: ... display in the toolbar tray go to step 3 or 2 If you want a Touch Screen Controller Icon to display in the toolbar tray select the box and 3 Select the Finish button the TSHARC drivers shall be installed Installation Complete 1 At the dialog box Setup is now complete select OK exiting the TSHARC Touch Screen Controller installation 2 Congratulations The MPC MLR Touch Screen is ready to go to work...

Страница 31: ... AC power outlet Verify the Monitor is powered on Reverse Polarity Check polarity of the power connection Symptom Light behind button LEDs no display or No Signal error message and or no image on the display Possible Problem Solution Power on no video signal Verify the video cable is plugged into the VGA video connector Verify a video signal is coming out of the computer i e plug into a known good...

Страница 32: ...to auto adjust the display Verify the video display settings match the monitor and 60 75Hz refresh rate Proper cable grounding and shielding Verify the use of a proper video cable with suitable grounding and shielding Keep the video cable away from sources of EMI and RF Improper video display settings Check signal source for proper signal Check for proper display properties selection of the displa...

Страница 33: ...er COM port If using a laptop verify the COM port s is enabled T S controller driver has not been installed Install the TSHARC controller driver Hardware failure Contact a MarinePC Technical Support Techni cian 480 515 1838 Symptom Touch Screen T S does not respond Symptom T S moves but does not follow a finger or stylus Possible Problem Solution Controller is not calibrated Run the calibration in...

Страница 34: ...0 1 Video Input RGB Connectors Video Input Amphenol MIL DTL 38999 Series I Power Input Amphenol MIL C 26482 Series I Housing Milled AL Black Hard Anodized SAE AMS 2469 E Other Coatings MIL C 22750 Mounting RAM Mount Standard Flush Panel 19 Rack Optional Wide Range DC Power Input 8 36 VDC 12 24 28 VDC nominal MIL STD 1275D Power Consumption 6 Watts Min 20 Watts Max Power Conditioning Internal Short...

Страница 35: ...mperature 40 C to 70 C 40 F to 158 F MIL STD 810F 501 4 502 4 II Op Storage Tem perature 40 C to 75 C 40 F to 167 F Shock 50 G Vibration 5 8 G 5 500 Hz Altitude 45 000 ft IP Rating IP67 NEMA 6 Submersible Humidity 0 100 EMI MIL STD 461E MIL PRF 22885G Sunlight Readability for Buttons ...

Страница 36: ...order Cancellations Once an order is placed by the purchaser and accepted by MarinePC cancellation charges will apply to any and all unshipped items Partial credit may be extended if products are returned unused in original packaging within 30 days of shipment No credit will be issued on any returns or cancellations after 30 days from date of shipment Returns Once a product has been shipped no ret...

Отзывы: