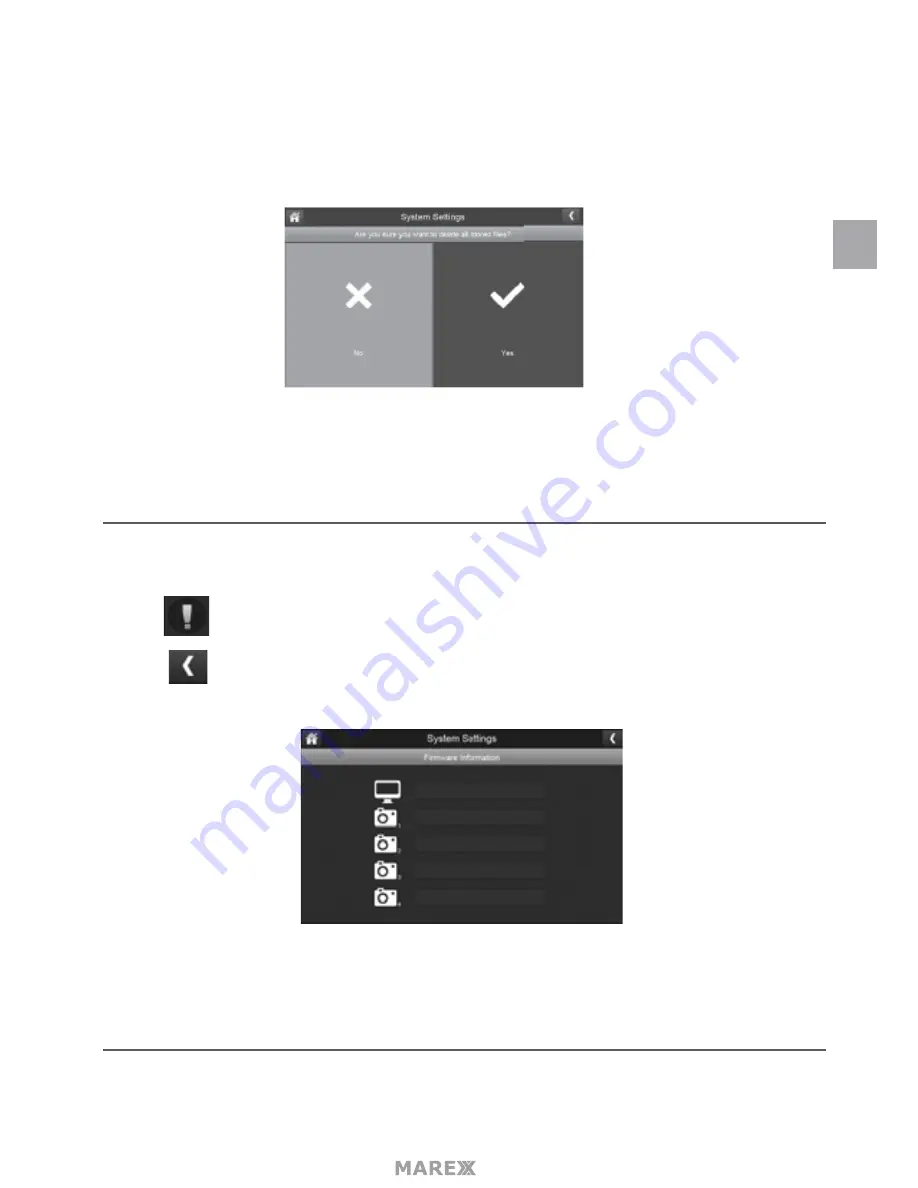
MAREX MX755 Скачать руководство пользователя страница 25

- 25

2. 

Tap 

YES

 on the 

All stored files will be deleted! 

screen (Default = 

NO

). A confirmation screen appears. Tap 

YES

 to it.  


3. 

A progress bar displays on the screen. After formating is complete, a 

Format OK 

message will appear.

SYSTEM SETTINGS

This screen lists the firmware information of the montior and all cameras paired to it.

1. 

tap 

 to display the screen.

2. 

Tap  

  to return to the previous screen. 

MOTION DETECTION SETTINGS MENU

Motion detection settings control how strong the motion needs to be to trigger recording. This settings 

en

Содержание MX755

Страница 1: ...HANDLEIDING INSTRUCTION MANUAL...

Страница 2: ......

Страница 3: ...3 english 4 NEDERLANDS 37...

Страница 4: ...em operation 10 Screen Descriptions Here you will find detailed descriptions of each screen and how it is used playback 13 alarm 14 brightness 15 general settings 16 camera setup menu 18 file overwrit...

Страница 5: ...rding indicator Memory card full indicator Quad view z PIR trigger and Video motion detect alert Night vision up to 40 feet Direct connection to router for remote access to live and recorded video Cam...

Страница 6: ...e Android smartphone QR code Rechargeable li ion batterij Touchscreen Two way audio Adapter DC 5V 1 5 A Power consumption 4W max Dimensions 191 x 133 x 19 mm Weight 572 gram Getting Started The system...

Страница 7: ...5 Speaker 6 Power Port Connect to a local power outlet using the included power adapter 7 Ethernet Port RJ45 Connect the receiver to your router using the included Ethernet cable to enable smartphone...

Страница 8: ...nd transmitted from the receiver 9 Adjustment screws Adjusts the camera up down and clockwise counterclockwise SET UP THE HARDWARE MONITOR 1 Flip out the stand on the back of the monitor and position...

Страница 9: ...cluding street lights ceiling or floor lamps spotlights in the driveway etc Rainfall pool water ripples reflections tree shrub leaves blowing in the wind and the shadows they create can generate motio...

Страница 10: ...n sequence in full screen display The system defaults to Auto Sequence mode when Scan mode is turned off Tap SEQ to turn Auto Sequence mode off and return to Quad mode SYSTEM OPERATION Your monitor op...

Страница 11: ...gs are saved on the SD card When this icon flashes red it indicates that recording is in progress Green system is connected to the internet and the monitor is connected with internet mode Yellow syste...

Страница 12: ...r the volume Displays when TALK is pressed Press and hold TALK on the side of the monitor to talk back through the camera Release TALK to wait for a reply Displays if new firmware is available Display...

Страница 13: ...13 Tap and the pop up menu will appear PLAYBACK Manage recorded files with this screen You can see what recorded files you have play them and delete them 1 Tap The following menu displays EN...

Страница 14: ...with a control bar across the bottom of the screen When the file finishes the monitor displays the Recording File List screen again Tap the icon to delete the record if desired Alarm When motion trig...

Страница 15: ...alarm volume Tap when you are finished BRIGHTNESS This feature allows you to set each camera s brightness level Tap The following menu will appear Tap or to increase or decrease the monitor screen br...

Страница 16: ...rd set the date and time and motion detection sensitivity among other features The rest of this section provides details using these menus Main Screen Sub Screen What it Does Camera Setup Paring This...

Страница 17: ...Lanuage Changes languages setting for the montior English French or Spanish Default Settings Restores the system to default settings Format SD Card Reformats the SD card and de letes all existing data...

Страница 18: ...system you have to introduce the camera and monitor to each other so they can communicate If a camera is already assigned to the selected channel the pairing operation overwrites that camera link wit...

Страница 19: ...video 3 seconds after the camera is successfully paired On Off When you add a camera to your system pair up the camera with the monitor and the system will automati cally turn it on 1 Tap the switch b...

Страница 20: ...up file retention requirements duration You can set how long the camera keeps recording after motion detection triggers it The options are 15 sec onds 30 seconds or 1 minute Default 15 seconds 1 Tap t...

Страница 21: ...the recording period indicated 6 Top Modify again to set up another recording seesion to schedule Scheduled recordings are broken into 10 minute file sizes For example if you record a 25 minute event...

Страница 22: ...ow to set the month day and date 3 Tap the up or down arrow to set the time Tap the AM PM block to toggle between them Tap the up or down arrows to set the correct hour and minute 4 Tap synchronize wi...

Страница 23: ...d files Your sysem will know that your request refers to the time zone the monitor is in Default GMT 5 00 Eastern Time USA Canada 1 Tap The Time Zone screen will appear 2 Scroll up and down to your ca...

Страница 24: ...ver to the requested language no reboot is necessary Default settings 1 Tap to return your system to the originial default settings 2 Tap YES on the Restore Default Settings screen 3 Tap OK to confirm...

Страница 25: ...formating is complete a Format OK message will appear system settings This screen lists the firmware information of the montior and all cameras paired to it 1 tap to display the screen 2 Tap to retur...

Страница 26: ...on detection sensitivity levels to High Low or Off 1 Tap The following screen displays 2 Tap High Low or Off to set sensitivity 3 3 Tap to return to the previous screen Mask area Use this selection to...

Страница 27: ...e finished tap to return to the Motion Detection Settings screen network setup SCREEN This selection lets you determine your network connection type reset the APP password and review your network deta...

Страница 28: ...n Your routerwill automatically assign an IP address to your Marex System Static IP is for those that have the ability to specify an IP address for their system 4 Reboot the monitor when prompted Rese...

Страница 29: ...n when the system is connected to the internet Tap to display the Information screen tap to return to the previous screen Firmware upgrade screen Upgrade from SD Card 1 Tap to upgrade the firmware thr...

Страница 30: ...ly reboot Upgrade from Server 1 Use the Ethernet cable provided to connect your monitor to your router 2 Tap to upgrade the firmware through the Server 3 A confirmation screen displays Tap YES 4 The s...

Страница 31: ...p from the App Store or the Google player store on your smart phone or tablet Make sure your phone is connected to internet 2 Connect the 7 monitor to your home router with the RJ45 cable 3 Add camera...

Страница 32: ...UID printed below the QRcode for example D7ETGG7YPUUZUNPYWM4J as it is shown on the back of the monitor Option B Tap the Scan button to scan the QRcode on the back of the monitor Name Tap to rename th...

Страница 33: ...e device list to view the live video from this camera in either portrait or landscape mode View icon Tap this icon to view Snapshot photos already taken Snapshot icon Tap this icon to make a snapshot...

Страница 34: ...hone or tablet CH Icon Tap this icon to switch to the channel which you want to watch Online Displays the number of current visitors the Marex system supports up to 4 remote visitors at the same time...

Страница 35: ...d setting default 000000 video quality default Min and Alert interval default 3 MIN under Advance setting View Event Select it to playback the video on your phone You can tap icon to view live video b...

Страница 36: ...Audio problems 1 Increase the volume when there is no sound 2 Make sure that there is sound within range of the camera microphone 3 If the monitor emits a loud screeching noise audio feedback move the...

Страница 37: ...chrijvingen van ieder sub menu en hoe het wordt gebruikt opnames bekijken 46 alarm 48 helderheid 48 algemene instellingen 49 camera instellingen menu 51 Opname instellingen 53 File overwrite 54 system...

Страница 38: ...uik 9v DC 600mA 5 Bereik 250m in open veld Nieuwe opname indicatie Volle geheugenkaart indicatie Quad view PIR trigger en Video bewegingsdetectie waarschuwing Nachtzicht tot 15m Eigenschappen van de c...

Страница 39: ...l Touchscreen Audio in twee richtingen terugspreek functie Adapter DC 5V 1 5 A Energieverbruik 4W max Afmetingen 191 x 133 x 19 mm Gewicht 572 gram Wat is inbegrepen De Marex set wordt geleverd met de...

Страница 40: ...n stopcontact aan te sluiten 7 Ethernetkabel aansluiting 8 Resetknop gebruik een paperclip of een ander dun object om de resetknop in te drukken waardoor het systeem terug gaat naar de fabrieksinstell...

Страница 41: ...verstel de camera om hoog omlaag en met de klok mee tegen de klok in KLAARMAKEN VOOR GEBRUIK MONITOR 1 Klap het standaard achterop de monitor uit en positioneer de antenne 2 Sluit de adapter aan op de...

Страница 42: ...staande lampen buitenverlichting etc Regen rimpels of reflectie in plassen water boomtakken struiken die door de wind bewogen worden en de schaduwen die ze werpen kunnen ook valse bewegingsdetectie al...

Страница 43: ...eeldvullend weergeven worden met het geluid aan tot er gedurende 15 seconden geen beweging meer wordt waargenomen Daarna wordt het beeldscherm en geluid weer uitgeschakeld Druk kort op de power knop o...

Страница 44: ...hoe sterk het camera signaal is Signaal varieert van 4 balkjes tot 0 balkjes buiten bereik Dit icoon laat zien of de monitor is voorzien van een sd kaart Als dit icoon blauw is is er nog ruimte op de...

Страница 45: ...ting Druk nogmaals op het icoon om de zoom mode te verlaten Geeft het huidige volume weer U kunt het volume alleen wijzigen in de 1 kanaals mode Druk op en om het volume te verhogen of verlagen Wordt...

Страница 46: ...instellen De helderheid instellen per aangesloten camera alleen in 1 kanaals weergave Camera s instellen voor opname en bewegingsdetectie Andere systeem en netwerk instellingen wijzigen Druk op om het...

Страница 47: ...en voor een overzicht van opnames van die dag Druk op de opname die u wil bekijken de opname zal worden afgespeeld met de video controle knoppen aan de onderkant van het scherm Zodra de video is afges...

Страница 48: ...naal afgeven In dit menu kunt u het volume instellen van deze geluidstoon Druk op het volgende menu zal verschijnen Druk op of om het volume te verhogen of verlagen Druk op om het menu weer te sluiten...

Страница 49: ...voor opnames door specifieke camera s De datum en tijd instellen de bewegingsdetectie gevoeligheid instellen Druk op de volgende iconen om het General Settings Algemene Instellingen menu te openen Hoo...

Страница 50: ...lt Settings Herstelt de fabrieksinstellingen Format SD Card Formatteert de SD kaart en verwi jderd alle opnames Information Geeft de ge nstalleerde firmware weer voor de monitor en iedere camera Motio...

Страница 51: ...ze met elkaar kunnen communiceren Als er al een camera is toegewezen aan het geselecteerde kanaal zal pairen met een andere camera de bestaande link met een camera overschrijven met de link met de ni...

Страница 52: ...or succesvol gekoppeld zijn On Off Zodra u een camera toevoegt aan uw systeem zal de camera automatisch ingeschakeld worden U kunt een gekoppelde camera ook uitschakelen Druk op de volgende iconen het...

Страница 53: ...conen het volgende menu wordt weergegeven duration U kunt hier instellen hoe lang de camera op blijft nemen na waarnemen van beweging De opties zijn 15 seconden 30 seconden of 1 minuut Standaard is 15...

Страница 54: ...hedule Recording Overview menu met de opname periode aangegeven 6 Druk opnieuw op Modify om een andere opname sessie in te plannen Ingeplande opnames worden opgesplitst in opnames van 10 minuten Bijvo...

Страница 55: ...llingen aan te passen Datum en tijd Tijdszone Taal Fabrieksinstellingen SD kaart formateren Informatie Druk op de volgende iconen het volgende menu wordt weergegeven Date and Time 1 Druk op om naar he...

Страница 56: ...Zone kunt u de plaatselijke tijdszone instellen Dit is met name praktisch als u de app in een andere tijdszone gebruikt en u op afstand toegang bij uw opnames wil hebben Uw Marex systeem zal begrijpe...

Страница 57: ...rug naar het vorige menu dat nu automatisch wordt weergegeven in de door u gewenste taal u hoeft de monitor niet opnieuw op te starten Default settings 1 Druk op om terug te keren naar de originele fa...

Страница 58: ...n verwijderd scherm Druk nogmaals op YES om te bevestigen 3 De voortgang wordt weergegeven in een balk op het scherm Nadat de SD kaart is geformatteerd wordt er een Format OK melding weergegeven syste...

Страница 59: ...gelaten Als u bijvoorbeeld een rij bomen links boven in beeld heeft die door de wind bewogen worden kunt u de bewegingsdetectie voor het gedeelte links boven van het scherm uit zetten Druk op de volg...

Страница 60: ...deze functie om gebieden te markeren waarvan u NIET wil dat ze deel uit maken van het bewegings detectie gebied 1 Druk op Het Mask Area menu verschijnt over het beeld van de camera 2 Druk op de vierka...

Страница 61: ...werk connectie type het App password instellen en de netwerk instellingen bekijken Druk op om het Network Setup menu te openen Advanced Setup 1 Druk op om het geavanceerde instellingen menu weer te ge...

Страница 62: ...is bedoeld voor diegene die de mogelijkheid hebben om een IP adres te specificeren voor hun systeem 4 Herstart de monitor zodra hierom gevraagd wordt Reset Password De Reset password functie zet het...

Страница 63: ...x set is aangesloten op het internet Druk op om het informatie scherm weer te geven druk op om terug te keren naar het vorige menu Firmware upgrade menu Upgrade van SD kaart 1 Druk op om de firmware u...

Страница 64: ...1 Gebruik de ethernet kabel meegeleverd om uw monitor te verbinden met uw router 2 Druk op om de firmware te upgraden via de server 3 Een bevestigingsscherm wordt weergegeven druk op YES 4 Uw Marex m...

Страница 65: ...uw smartphone of tablet Zorg ervoor dat uw smartphone of tablet is verbonden met internet 2 Sluit uw Marex monitor aan op uw router met de meegeleverde ethernetkabel 3 Uw Marex systeem koppelen met de...

Страница 66: ...de Scan knop en scan de QRcode achterop de monitor Optie B Vul de UID code die onder de QRcode aan de achterzijde van uw monitor staat in bijvoorbeeld D7ETGG7YPUUZUNPYWM4J Name Druk op naam om de cam...

Страница 67: ...eft toegevoegd aan uw MyCam View App U kunt nu de live beelden van uw camera bekijken in portrait staand of landscape liggend mode View Druk hierop om eerder genomen Snapshot foto s te bekijken Snapsh...

Страница 68: ...het aantal bezoekers aan die op dit moment via de MyCam View app dit Marex systeem bekijken het Marex systeem staat tot 4 bezoeken op afstand via de App op hetzelfde tijdstip toe Quality Geeft de kwa...

Страница 69: ...Device settings U kunt het password wijzigen standaard 000000 de video kwaliteit aanpassen standaard Min en de Waarschuwingsinterval standaard 3 min aanpassen in het Advanced Settings Geavanceerde ins...

Страница 70: ...amera 2 Probeer de camera monitor of beiden te herpositioneren om de ontvangst te verbeteren Problemen met het geluid 1 Verhoog het volume als er geen geluid is 2 Controleer of er binnen het bereik va...

Страница 71: ......

Страница 72: ......

Отзывы: