
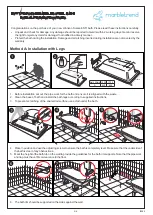

1. F ind the desired height of the bath on the wall . A minimum clearance of 10mm is req uired under the floor of the bath
to allow free flex ing of the entire bottom of the bath including the trap)
Note use 40x4 0mm timber when constructing a frame with vertical studs at 300- 350mm centers. Suggested frame
height is 500mm.
2. Set up the desired support structure. The waste pipe and flexi ble coupling should be wrapped with suitable material
to be protected if exp osed to debris or immersed in cement.
28
70
65
385
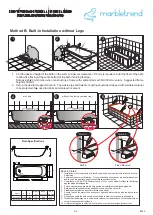
Model
A
B
Capacity
( L )
Max H
with L egs
Min H
with L egs
Esti 1700
1700
1305
170
565
525
Esti 1500
1500
1105
150
565
525
A
B
Ø 52
285
570 700
Bath Sp ec if ic ations
Method B: Bu ilt- in Installation withou t Legs
Special notes:
1.
Installation must comply with all State By- L aws and any req uirements imposed by L ocal
Authorities.
2.
All dimensions are in millimetres. Gemini undertake a continuous product improvement
and reserve the right to change the specifications without notice.
3.
Compliance with AS: 3740 Waterproofing of Wet Areas within R esidential Buildings
applies when installing baths.
4.
F orces must not be applied to the bath by exce ssively rigid or misaligned pipework.
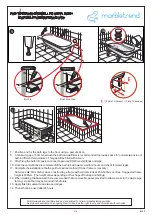
5.
Bath must be supported continuously and evenly under the entire rim.
6.
F lexi ble sealant must be applied to the exp osed edges.
7.
Ensure that all the water connections are tight and water sealed and the bath drains
properly.
8.
Air space beneath the bath should be ventilated to meet the local code req uirements.
9.
Wash with mild detergent or non- abrasive cleanser to clean the bath. R inse the bath clean
to remove any chemical residues.
10. Avoid contacting sharp objects. Do not drop heavy or hard objects onto the surface.
1
2
3
4
5
6
4/4
with trap
without trap ( using common trap)
F lush Mounted
Built- in
ESTI VITREOUS ENAMELLED STEEL BATH
INSTALLATION INSTRUCTIONS
I0089


