background image

Réglage automatique de l’horloge : Réception RCC WWVB :

REMARQUE : Assurez-vous que l’interrupteur 

RCC

 est réglé sur ON, pour 

activer le réglage automatique de l’horloge.

Lorsque la fonction RC est réglée sur ON :

Après démarrer, si l’interrupteur 

RCC

 est réglé sur ON l’horloge commence 

à se synchroniser automatiquement avec le signal d’ondes radio WWVB. 
L’icône de radiocommande   clignotera sur l’écran LCD. 

L’horloge peut être réglée pour balayer le signal horaire manuellement en 
maintenant le bouton 

WAVE


 enfoncé pendant 3 secondes.

Rappel : 

• 

La réception peut prendre jusqu’à 10 minutes.

• 

Si le signal est faible, l’obtention d’un signal peut prendre jusqu’à 24  

 heures. 

• 

L’horloge se synchronise automatiquement avec le signal des ondes radio  

  à 3h00 du matin tous les jours pour assurer une synchronisation précise.  
  En cas d’échec de la réception, l’icône   disparaîtra de l’écran LCD.

• 

Vous pouvez empêcher l’horloge de se synchroniser automatiquement en  

  maintenant le bouton 

WAVE


 enfoncé pendant 2 secondes.

Configuration manuelle de l’horloge : la fonction RCC est réglée sur 

OFF

REMARQUE : Assurez-vous que l’interrupteur 

RCC

 est réglé sur OFF, pour 

désactiver la configuration automatique de l’horloge.

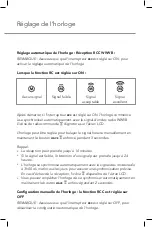
Réglage de l’horloge

Signal faible 

Signal 

acceptable

Signal 

excellent

Aucun signal

Содержание CL030027-FD-NA

Страница 1: ...EN FR ES Atomic Clock with Indoor Outdoor Temperature Horloge atomique avec temp rature int rieure ext rieure Reloj at mico con temperatura interior exterior SKU CL030027 FD NA...

Страница 2: ...EN...

Страница 3: ...EN Table of Contents English 1 What s in the box 2 Battery installation 3 Getting started 4 Clock set up 5 Alarm set up 6 Thermometer...

Страница 4: ...nction icon A6 Main unit batteries voltage is low A7 Day of week A8 ice alert icon A9 Indoor temperature A10 outdoor temperature sync icon A11 Outdoor temperature A12 Month A13 Day A14 Remote sensor b...

Страница 5: ...n B3 button B4 button B5 OUTDOOR TEMP SYNC button B6 button B7 RESET button B8 C F button B9 WAVE button B10 DST switch B11 RCC ON OFF switch B12 Wall mount hole B13 Battery compartment B14 Stand B5 B...

Страница 6: ...Outdoor remote sensor C1 Wall mount hole C2 LED Transmission indicator C3 RESET button C4 Battery compartment C3 C1 C4 C2...

Страница 7: ...four AA size batteries according to the polarity and marks inside the compartments Outdoor Remote Sensor Open the cover of the battery compartment on the remote sensor Insert two AA batteries accordin...

Страница 8: ...re is also a pullout stand that can be used to place the outdoor remote sensor on a flat surface It is recommended to place the unit in a dry shaded area to protect it from direct elements Low Battery...

Страница 9: ...and interferences You may need to experiment with various locations to get the best results When the batteries are replaced in the outdoor remote sensor or the reset button of outdoor remote sensor is...

Страница 10: ...AVE button for 3 seconds Reminder Reception can take up to 10 minutes If the signal is weak it can take up to 24 hours to get a valid signal The clock automatically synchronizes with the radio wave si...

Страница 11: ...SET HOUR Press or to set hours Press 2x SET MINUTE Press or to set minutes Press 3x SET SECONDS Press or to reset seconds to zero Press 4x SET YEAR Press or to set a year Press 5x SET MONTH Press or t...

Страница 12: ...tivated the alarm icon will appear on the display and the alarm time displays for 3 seconds Alarm set up Steps To enter Alarm Set Up Hold the for 3 seconds NOTE Press and hold or to speed up the digit...

Страница 13: ...h to interfere with the time signal Press the RESET button on the outdoor remote sensor if the readout is incorrect or does not respond Precautions The clock loses its time information when the batter...

Страница 14: ...F Temperature Checking Interval Main Unit Every 60 seconds Outdoor Remote Sensor Approx every 60 seconds Outdoor Remote Sensor RF Transmission Frequency 433MHz Range Up to 70meters open area Transmiss...

Страница 15: ...EN...

Страница 16: ...FR...

Страница 17: ...FR 1 Apparence de l unit principale 2 Installation des piles 3 Commencer 4 R glage de l horloge 5 Configuration de l alarme 6 Thermom tre Table des mati res Fran ais...

Страница 18: ...s de l unit principale est faible A7 Jour de la semaine A8 ic ne d alerte de glace A9 Temp rature int rieure A10 ic ne de synchronisation de la temp rature ext rieure A11 Temp rature ext rieure A12 Mo...

Страница 19: ...ton B4 Bouton B5 Bouton OUTDOOR TEMP SYNC B6 Bouton B7 Bouton RESET B8 Bouton C F B9 Bouton WAVE B10 Interrupteur glissi re DST B11 Interrupteur glissi re RCC ON OFF B12 Trou de fixation murale B13 Co...

Страница 20: ...T l commande ext rieure C1 Trou de fixation murale C2 Indicateur de transmission LED C3 Bouton RESET C4 Compartiment piles C3 C1 C4 C2...

Страница 21: ...z 4 piles AA en respectant les marques de polarit et l int rieure des compartiments T l commande ext rieure Ouvrez le couvercle du compartiment piles de la t l commande Ins rez 2 piles AA en respectan...

Страница 22: ...Il existe galement un support amovible qui peut tre utilis pour placer la t l commande ext rieure sur une surface plane Il est recommand de placer l unit dans un endroit sec et ombrag pour la prot ge...

Страница 23: ...xp rimenter diff rents emplacements pour obtenir les meilleurs r sultats Lorsque vous remplacez les piles du t l commande ext rieur ou que vous appuyez sur le bouton de r initialisation du t l command...

Страница 24: ...l La r ception peut prendre jusqu 10 minutes Si le signal est faible l obtention d un signal peut prendre jusqu 24 heures L horloge se synchronise automatiquement avec le signal des ondes radio 3h00 d...

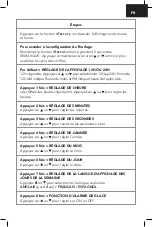
Страница 25: ...Les chiffres des heures clignoteront Appuyez sur ou pour r gler les heures Appuyez 2 fois R GLAGE DES MINUTES Appuyez sur ou pour r gler les minutes Appuyez 3 fois R GLAGE DES SECONDES Appuyez sur ou...

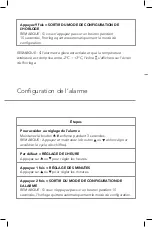
Страница 26: ...e Configuration de l alarme tapes Pour acc der au r glage de l alarme Maintenez le bouton enfonc pendant 3 secondes REMARQUE Appuyez et maintenez le bouton ou enfonc pour acc l rer le cycle des chiffr...

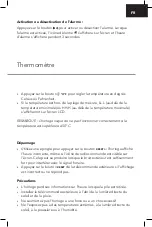
Страница 27: ...e est sup rieure 50 C Thermom tre D pannage Utilisez une pingle pour appuyer sur le bouton RESET si l horloge affiche l heure incorrecte m me si l ic ne de radiocommande est visible sur l cran Cela pe...

Страница 28: ...ages aux composants Sp cifications Plage de mesure de la temp rature Temp rature int rieure 9 9 C 60 C 14 2 F 140 F Temp rature ext rieure 20 C 50 C 4 F 122 F Intervalle de v rification de la temp rat...

Страница 29: ...FR...

Страница 30: ...ES...

Страница 31: ...Tabla de contenido Espa ol 1 Qu hay en la caja 2 Instalaci n de la bater a 3 Primeros pasos 4 Ajuste del reloj 5 Ajuste de la Alarma 6 Term metro ES...

Страница 32: ...alarma A6 El voltaje de las bater as de la unidad principal es bajo A7 D a de la semana A8 Icono de alerta de hielo A9 Temperatura interior A10 icono de sincronizaci n de la temperatura exterior A11 T...

Страница 33: ...t n B4 Bot n B5 Bot n de OUTDOOR TEMP SYNC B6 Bot n B7 Bot n RESET B8 Bot n C F B9 Bot n WAVE B10 Interruptor DST B11 Interruptor RCC ON OFF B12 Orificio de montaje en la pared B13 Compartimiento de l...

Страница 34: ...C3 C1 C4 Sensor remoto para exteriores C1 Orificio para montaje en pared C2 Indicador de transmisi n LED C3 Bot n de RESET C4 Compartimiento de la bater a C2...

Страница 35: ...o pilas de tama o AA de acuerdo con las marcas de polaridad y dentro de los compartimentos Sensor remoto exterior Abra la tapa del compartimiento de la bater a en el sensor remoto Inserte dos pilas AA...

Страница 36: ...situado en la parte posterior Tambi n hay un soporte extra ble que puede utilizarse para colocar el sensor remoto de exterior en una superficie plana Se recomienda colocar la unidad en una zona seca y...

Страница 37: ...ga que experimentar con varias ubicaciones para obtener los mejores resultados Cuando se cambien las bater as del sensor remoto exterior o se pulse el bot n de reinicio del sensor remoto exterior debe...

Страница 38: ...el bot n WAVE durante 3 segundos Recordatorio La recepci n puede tardar hasta 10 minutos Si la se al es d bil puede tardar hasta 24 horas en obtener una se al v lida El reloj se sincroniza autom ticam...

Страница 39: ...A Pulse o para ajustar las horas Pulse 2x FIJAR MINUTO Pulse o para ajustar los minutos Pulse 3x FIJAR SEGUNDOS Pulse o para restablecer los segundos a cero Pulse 4x FIJAR A O Pulse o para fijar un a...

Страница 40: ...la y la hora de la alarma se mostrar durante 3 segundos Ajuste de la Alarma Pasos Para entrar en el ajuste de la alarma Mantenga pulsada la tecla por 3 segundos NOTA Mantenga pulsada la tecla o para a...

Страница 41: ...te fuerte como para interferir con la se al horaria Pulse el bot n RESET del sensor remoto exterior si la lectura es incorrecta o no responde Precauciones El reloj pierde la informaci n de la hora cua...

Страница 42: ...n de la temperatura Unidad principal Cada 60 segundos Sensor remoto exterior Aproximadamente cada 60 segundos Transmisi n RF del sensor remoto exterior Frecuencia 433MHz Alcance Hasta 70 metros rea ab...

Страница 43: ...ES...

Страница 44: ...Customer Service Service Clients Servicio al cliente www MarathonWatch com Made in China Fabriqu en Chine Hencho en China Designed in Canada Con u au Canada Dise ado en Canad 2 year warranty Garantie...

Страница 45: ...nect the equipment into an outlet on a circuit different from that to which the receiver is connected Consult the dealer or an experienced radio TV technician for help Changes or modifications not exp...

Отзывы: