background image


21 


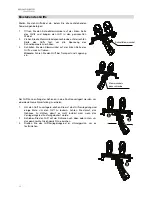
Einsetzen Ihres Mikrofons 

 
1.


Lösen und entfernen Sie die hintere 
Kuppel. 

2.


Lösen Sie die Klemmhebel der vorderen 
und hinteren Schienen. 

3.


Schieben Sie den Federungskörper aus 
dem Hauptgehäuse. Um eine optimale 
Balance und Isolation zu erreichen, 
müssen Sie die Position der 
Schwinghalterungsbänder einstellen. 

4.


Platzieren Sie das Mikrofon oberhalb der 
Schwinghalterungsbänder und bringen 
den Mikrofonkörper sanft in die 
Schwinghalterungsbänder. Sorgen Sie 
dafür, dass das Mikrofon sicher ist.  


Содержание ZP-1

Страница 1: ...ZP 1 User Guide English 3 6 Gu a del usuario Espa ol 7 10 Guide d utilisation Fran ais 11 14 Guida per l uso Italiano 15 18 Benutzerhandbuch Deutsch 19 22 Appendix English 23...

Страница 2: ......

Страница 3: ...d product registration visit marantzpro com For additional product support visit marantzpro com support Features Windscreen Diagrams Main housing Handle locking dial Front dome Front rail clamping lev...

Страница 4: ...e handle to lock it in place Note Collapse the handle during transportation and storage The handle can be relocated along the rails to a position that gives the best weight balance 1 To relocate the h...

Страница 5: ...s 3 Slide the suspension body out of the main housing To achieve optimum balance and isolation you may need to adjust the location of the shock mount bands 4 Place your microphone above the shock moun...

Страница 6: ...d with ZP 1 secure it in place using the cable grommet ensuring there is enough room to connect the rear dome Note Connect the cable to the microphone and adjust the handle to the desired angle for us...

Страница 7: ...antzpro com Para obtener soporte adicional del producto visite marantzpro com support Caracter sticas Diagramas del paraviento Carcasa principal Cuadrante de bloqueo del mango Domo delantero Palanca d...

Страница 8: ...el mango durante el transporte y almacenamiento El mango puede reubicarse a lo largo de los rieles hasta encontrar la posici n que brinda el mejor equilibrio del peso 1 Para reubicar el mango primero...

Страница 9: ...uera de la carcasa principal Para lograr el equilibrio y aislamiento ptimo puede que tenga que ajustar la ubicaci n de los soportes para montaje a prueba de impactos 4 Coloque su micr fono encima de l...

Страница 10: ...lizando el ojal para cables asegur ndose de que quede suficiente espacio para conectar el domo trasero Nota Conecte el cable al micr fono y ajuste el mango en el ngulo deseado para el uso Ajuste de lo...

Страница 11: ...t veuillez visiter marantzpro com Pour de l assistance suppl mentaire veuillez visiter le site marantzpro com support Caract ristiques Sch mas de l cran Logement principal Vis de verrouillage de la po...

Страница 12: ...a poign e lors du transport et le remisage La poign e peut tre plac e le long des glissi res dans la position qui offre la meilleure r partition de poids 1 Pour d placer la poign e tournez d abord la...

Страница 13: ...e la suspension hors du logement principal Pour obtenir un quilibre et un isolement optimaux vous devrez peut tre ajuster l emplacement des bandes de suspension antichoc 4 Placez le microphone au dess...

Страница 14: ...lisant le passe c ble l arri re des glissi res en vous assurant de laisser assez d espace pour connecter le d me arri re Remarque Reliez le c ble au microphone et ajustez la poign e sur l angle d sir...

Страница 15: ...marantzpro com Per ulteriore assistenza sul prodotto recarsi alla pagina marantzpro com support Caratteristiche Schemi antivento Alloggiamento principale Manopola di bloccaggio maniglia Cupola anterio...

Страница 16: ...l trasporto e quando il prodotto viene riposto Il manico pu essere riposizionato lungo le guide in una posizione che offre il miglior equilibrio di peso 1 Per riposizionare il manico innanzitutto gira...

Страница 17: ...l corpo in sospensione facendolo uscire dall alloggiamento principale Per ottenere un equilibrio e un isolamento ottimali potrebbe essere necessario regolare l ubicazione delle bande di montaggio anti...

Страница 18: ...uello fornito con lo ZP 1 fissarlo servendosi del passacavo assicurandosi che ci sia spazio a sufficienza per collegare la cupola posteriore Nota bene collegare il cavo nel microfono e regolare il man...

Страница 19: ...ur Produktregistrierung besuchen Sie marantzpro com F r zus tzlichen Produkt Support besuchen Sie marantzpro com support Funktionen Windschutzdiagramm Hauptgeh use Griffverriegelungsrad Vordere Kuppel...

Страница 20: ...inweis Fahren Sie den Griff bei Transport und Lagerung ein Der Griff kann entlang der Schienen in eine Position verlagert werden um eine ideale Gewichtsverteilung zu erzielen 1 Um den Griff zu verlage...

Страница 21: ...en Sie den Federungsk rper aus dem Hauptgeh use Um eine optimale Balance und Isolation zu erreichen m ssen Sie die Position der Schwinghalterungsb nder einstellen 4 Platzieren Sie das Mikrofon oberhal...

Страница 22: ...n befestigen Sie es mit einer Kabelt lle um sicherzustellen dass gen gend Platz f r den Anschluss der hinteren Kuppel bleibt Hinweis Schlie en Sie das Kabel an das Mikrofon an und bringen Sie den Grif...

Страница 23: ...60 kg ZP 1 1 63 lbs 0 74 kg ZP 1 with synthetic fur windscreen Specifications are subject to change without notice Trademarks Licenses Marantz is a trademark of D M Holdings Inc registered in the U S...

Страница 24: ...marantzpro com Manual Version 1 0...

Отзывы: