background image

3

Precautions

Please read this manual carefully before using your plasma monitor and
keep the manual handy for future reference.


    CAUTION

RISK OF ELECTRIC SHOCK

DO NOT OPEN

CAUTION:

TO REDUCE THE RISK OF ELECTRIC SHOCK, DO
NOT REMOVE COVER. NO USER-SERVICEABLE
PARTS INSIDE.
REFER SERVICING TO QUALIFIED SERVICE
PERSONNEL.

This symbol warns the user that uninsulated voltage
within the unit may have sufficient magnitude to cause
electric shock. Therefore, it is dangerous to make any
kind of contact with any part inside of this unit.

This symbol alerts the user that important literature
concerning the operation and maintenance of this unit
has been included.
Therefore, it should be read carefully in order to avoid
any problems.

WARNING

TO PREVENT FIRE OR SHOCK HAZARDS, DO NOT EXPOSE THIS
UNIT TO RAIN OR MOISTURE. ALSO DO NOT USE THIS UNIT’S
POLARIZED PLUG WITH AN EXTENSION CORD RECEPTACLE OR
OTHER OUTLETS, UNLESS THE PRONGS CAN BE FULLY
INSERTED. REFRAIN FROM OPENING THE CABINET AS THERE
ARE HIGH-VOLTAGE COMPONENTS INSIDE. REFER SERVICING
TO QUALIFIED SERVICE PERSONNEL.

Warnings and Safety Precaution

This plasma monitor is designed and  manufactured to provide
long, trouble-free service. No maintenance other than cleaning
is required. Please see the section “Plasma monitor cleaning
procedure”.
T h e   p l a s m a   d i s p l a y   p a n e l   c o n s i s t s   o f   f i n e   p i c t u r e
elements (cells) with more than 99.99 percent active cells. There
may be some cells that do not produce light or remain lit.
For operating safety and to avoid damage to the unit, read
carefully and observe the following instructions.
To avoid shock and fire hazards:

1. Provide adequate space for ventilation to avoid internal heat build-

up. Do not cover rear vents or install the unit in a closed cabinet or
shelves.
 If you install the unit in an enclosure, make sure there is adequate
space at the top of the unit to allow hot air to rise and escape. If the
monitor becomes too hot, the overheat protector will be activated and
the monitor will be turned off. If this happens, turn off the power to the
monitor and unplug the power cord. If the room where the monitor is
installed is particularly hot, move the monitor to a cooler location, and
wait for  60 minutes to cool the monitor. If the problem persists, contact
your dealer for service.

2. Do not use this unit’s polarized plug with extension cords or outlets

unless the prongs can be completely inserted.

3. Do not expose the unit to water or moisture.
4. Avoid damage to the power cord, and do not attempt to modify the

power cord.

5. Unplug the power cord during electrical storms or if the unit will

not be used over a long period.

6. Do not open the cabinet which has potentially dangerous high voltage

components inside. If the unit is damaged in this way the warranty will
be void. Moreover, there is a serious risk of electric shock.

7. Do not attempt to service or repair the unit. The manufacturer is not

liable for any bodily harm or damage caused if unqualified persons
attempt service or open the back cover. Refer all service to authorized
Service Centers.

8. This equipment shall be connected to a MAIN outlet with a protective

earth-ground connection.

9. The outlet shall be installed near the equipment and shall be easily

accessible.

To avoid damage and prolong operating life:

1. Use only with 100 V to 240 V 50 Hz/60 Hz AC power supply. Continued

operation at line voltages greater than 100 V to 240 V AC will shorten
the life of the unit, and might even cause a fire hazard.

2. Handle the unit carefully when installing it and do not drop.
3. Set the unit away from heat, excessive dust, and direct sunlight.
4. Protect the inside of the unit from liquids and small metal objects. In

case of accident, unplug the power cord and have it serviced by an
authorized Service Center.

5. Do not hit or scratch the panel surface as this causes flaws on the surface

of the screen.

6. For correct installation and mounting it is strongly recommended to

use a trained, authorized dealer.

7. As is the case with any phosphor-based display (like a CRT monitor,

for example) light output will gradually decrease over the life of a Plasma
Display Panel.

8. To avoid sulfurization it is strongly recommended not to place the unit

in a dressing room in a public bath or hot spring bath.

9. Do not use in a moving vehicle, as the unit could drop or topple over

and cause injuries.

10. Do not place the unit on its side, upside-down or with the screen facing

up or down, to avoid combustion or electric shock.

11. To prevent a fire hazard, do not place any naked flame sources (such as

a lighted candle) on the equipment.

Plasma monitor cleaning procedure:

1. Use a soft dry cloth to clean the front panel and bezel area. Never use

solvents such as alcohol or thinner to clean these surfaces.

2. Clean plasma ventilation areas with a vacuum cleaner with a soft brush

nozzle attachment.

3. To ensure proper ventilation, cleaning of the ventilation areas must be

carried out monthly. More frequent cleaning may be necessary
depending on the environment in which the plasma monitor is installed.

Recommendations to avoid or minimize image retention:

Like all phosphor-based display devices and all other gas plasma displays,
plasma monitors can be susceptible to image retention under certain
circumstances. Certain operating conditions, such as the continuous
display of a static image over a prolonged period of time, can result in
image retention if proper precautions are not taken. To protect your
investment in this plasma monitor, please adhere to the following
guidelines and recommendations for minimizing the occurrence of image
retention:
* Always enable and use your computer’s screen saver function

during use with a computer input source.

* Display a moving image whenever possible.
* Change the position of the menu display from time to time.
* Always power down the monitor when you are finished using it.
If the plasma monitor is in long term use or continuous operation take the
following measures to reduce the likelihood of image retention:
* Lower the Brightness and Contrast levels as much as possible without

impairing image readability.

* Display an image with many colors and color gradations (i.e.

photographic or photo-realistic images).

* Create image content with minimal contrast between light and dark

areas, for example white characters on black backgrounds. Use
complementary or pastel color whenever possible.

* Avoid displaying images with few colors and distinct, sharply defined

borders between colors.

Plasma monitor driving sound

The panel of the Plasma monitor is composed of extremely fine pixels and
these pixels emit light according to received video signals. This principle
may cause you to hear a buzz or electrical hum coming from the Plasma
monitor. Also note that the rotation speed of the cooling fan motor increases
when the ambient temperature of the Plasma monitor becomes high. You
may hear the sound of the motor at that time.

Note:

The following items are not coverd by the warranty.
• Image retention
• Panel generated sound, examples: Fan motor noise, and electrical

circuit humming /glass panel buzzing.

Contact your dealer for other recommended procedures that will best
suit your particular application needs.

Important Information

PD4201̲01-07

06.9.7, 4:23 PM

Page 3

Adobe PageMaker 6.5J/PPC

Содержание PD5001

Страница 1: ...Model PD5001 User Guide Plasma Monitor ...

Страница 2: ...uthorities or the Electronic Industries Alliance www eiae org 16 Damage Requiring Service The appliance should be serviced by qualified service personnel when A The power supply cord or the plug has been damaged or B Objects have fallen or liquid has been spilled into the appliance or C The appliance has been exposed to rain or D The appliance does not appear to operate normally or exhibits a mark...

Страница 3: ... Industries Alliance www eiae org 16 Dommages qu il faut faire réparer Il faut faire réparer l appareil par un technicien qualifié lorsque A Le cordon d alimentation en électricité ou la fiche a été endommagé ou B On a laissé tomber des objets ou du liquide dans l appareil C On a exposé l appareil a la pluie ou D L appareil ne paraît pas marcher normalement ou présente de grands changements d opér...

Страница 4: ...y when installing it and do not drop 3 Set the unit away from heat excessive dust and direct sunlight 4 Protect the inside of the unit from liquids and small metal objects In case of accident unplug the power cord and have it serviced by an authorized Service Center 5 Do not hit or scratch the panel surface as this causes flaws on the surface of the screen 6 For correct installation and mounting i...

Страница 5: ...installer loin de toute source de chaleur ou de poussière Ne pas l exposer au soleil 4 Eviter la pénétration de liquides ou petits objets métalliques l intérieur de l appareil En cas d incident de ce genre débrancher le câble d alimentation électrique et confier le moniteur à un service après vente agréé 5 Ne pas cogner ou rayer la surface de l écran des déformations de l image en résulteraient 6 ...

Страница 6: ...iver is connected Consult the dealer or an experienced radio TV technician for help This Class B digital apparatus complies with Canadian ICES 003 Important Information A NOTE ABOUT RECYCLING This product s packaging materials are recyclable and can be reused This product and the accessories packed together are the applicable product to the WEEE directive except batteries Please dispose of any mat...

Страница 7: ...nnecté Consultez votre revendeur ou un technicien radio télévision expérimenté Cet appareil numérique de la classe B est conforme à la norme NMB 003 du Canada REMARQUE Lorsque vous utilisez le câble d alimentation fourni utilisez les âmes en ferrite fournies Placez les âmes en ferrite fournies aux deux extrémités du câble d alimentation fournir puis utilisez les colliers fournis pour fixer les âme...

Страница 8: ...the Position Size Fine Picture Picture Adj and Underscan 26 SET UP Settings Menu 27 Setting the language for the menus 27 Checking the signal being transmitted to DVD HD1 terminal 27 Contents of the Package 䡺 Plasma monitor 1 䡺 Power cord 1 3 m 9 8 feet 䡺 Remote control 1 䡺AAABatteries 2 Manganese battery for remote control 䡺 User guide 䡺 Ferrite cores for power cord 2 bands for power cord 2 䡺 Fer...

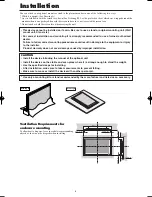
Страница 9: ...ed to use a trained authorized dealer Failure to follow correct mounting procedures could result in damage to the equipment or injury to the installer Product warranty does not cover damage caused by improper installation Use only a mounting kit or stand recommended by the manufacturer and listed as an accessory Drawing B Drawing A Ventilation Requirements for enclosure mounting To allow heat to d...

Страница 10: ...horizontal and vertical angles of up to approximately 30 The remote control operation may not function if the monitor s remote control sensor is exposed to direct sunlight or strong artificial light or if there is an obstacle between the sensor and the remote control Cable Management Using the cable clampers and beads bands provided with the plasma display Bundle the signal and audio cables at the...

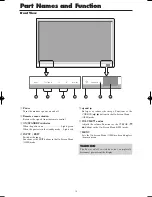
Страница 11: ...mode Lights red r INPUT EXIT Switches the input Functions as the EXIT buttons in the On Screen Menu OSM mode Front View t and Enlarges or reduces the image Functions as the CURSOR buttons in the On Screen Menu OSM mode y VOLUME and Adjusts the volume Functions as the CURSOR buttons in the On Screen Menu OSM mode u MENU Sets the On Screen Menu OSM mode and displays the main menu WARNING The Power o...

Страница 12: ... an analog RGB signal from a computer etc here H DVD HD3 DVD HD4 HDMI Connect a digital signal from a source with a HDMI output See Specifications on Model Information I EXTERNAL CONTROL D Sub This terminal is used when operating and controlling the monitor externally with a control system by RS 232C J REMOTE IN K REMOTE OUT Use these terminals to control external equipment L Handles Use when inst...

Страница 13: ...duces the image 1 SINGLE Cancels the split screen mode 2 SIDE BY SIDE Press this button to show a couple of pictures in the side by side mode 3 PICTURE IN PICTURE Press this button to show a couple of pictures in the picture in picture mode 4 ACTIVE SELECT Press this button to make the desired picture activate during split screen mode When the PICTURE FREEZE function is operating this button can b...

Страница 14: ...TAL ZOOM Digital zoom specifies the picture position and enlarges the picture 1 Be sure ZOOM NAV is off Press the ZOOM or button to display magnifying glass To change the size of the picture Press the ZOOM button and enlarge the picture A press of the ZOOM button will reduce the picture and return it to its original size To change the picture position Select the position with the buttons 2 Press t...

Страница 15: ...r size wide movies etc 2 35 1 size screen The squeezed film image is expanded to fulfill the entire screen at a ratio of 2 35 1 Black bands do not appear at the top and bottom but information is lost on the left and right margins This feature is available when the input signal is video component 480I 480P 576I 576P 720P 1080I or RGB 525P or 625P signal from a scan converter If black bands appear o...

Страница 16: ...t allow 4 3 content to be displayed for extended periods of time without using gray bars This can cause image retention Wide Screen Operation with Computer Signals Switch to the wide screen mode to expand the 4 3 image to fill the entire screen 1 Press the WIDE button on the remote control 2 Within 3 seconds Press the WIDE button again The screen size switches as follows NORMAL ANAMORPHIC ZOOM Whe...

Страница 17: ...right and the left press the cursor 5 button VIDEO1 PC RGB A B VIDEO1 PC RGB B A To make the desired picture active press the ACTIVE SELECT button VIDEO1 PC RGB A B VIDEO1 PC RGB A B ACTIVE SELECT button 5 button VIDEO1 PC RGB A B VIDEO1 PC RGB A B VIDEO1 PC RGB B A VIDEO1 PC RGB A B VIDEO1 PC RGB A B VIDEO1 PC RGB B A Side by Side2 R Side by Side1 Side by Side2 L Side by Side4 R Side by Side3 Sid...

Страница 18: ... signals to be displayed 1 Press the ACTIVE SELECT button to make the desired picture active 2 Press the PC RGB VIDEO1 2 or DVD HD1 2 3 4 button to change the selection of the input signal The INPUT EXIT button on the monitor can also be used to change the selection Zooming in on a specific input 1 Press the ACTIVE SELECT button to make the desired picture active 2 Use the ZOOM or button to enlage...

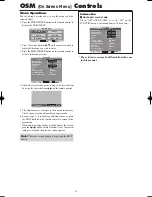
Страница 19: ...te control CONTRAST 10 5 The adjustments or settings are then stored in memory The change is stored until another change is made 6 Repeat steps 2 5 to adjust an additional item or press the EXIT button on the remote control to return to the main menu When adjusting using the bar at the bottom of the screen press the or button within 5 seconds If not the current setting is stored and the previous s...

Страница 20: ...INPUT2 VIDEO 1 2 DVD HD 1 4 PC RGB YES 26 AUDIO INPUT3 VIDEO 1 2 DVD HD 1 4 PC RGB YES 26 DVD HD3 INPUT INPUT 1 3 HDMI YES 26 DVD HD4 INPUT INPUT 1 3 HDMI YES 26 Main menu Sub menu Sub menu 2 Sub menu 3 Sub menu 4 RESET REFERENCE IMAGE ADJ ASPECT MODE ZOOM NORMAL ANAMORPHIC STADIUM 14 9 2 35 1 UNDERSCAN 26 V POSITION 64 0 64 YES 26 H POSITION 128 0 127 YES 26 V HEIGHT 0 64 YES 26 H WIDTH 0 64 YES ...

Страница 21: ... TOP LEFT YES 31 PDP SAVER MANUAL AUTO PEAK BRIGHT 100 75 50 25 YES 32 ORBITER OFF AUTO1 AUTO2 YES 32 INVERSE WHITE OFF INVERSE WHITE YES 33 SCREEN WIPER ON OFF YES 33 SOFT FOCUS OFF LEVEL1 4 YES 33 OSM ORBITER ON OFF YES 33 OSM CONTRAST LOW NORMAL YES 33 CLOSED CAPTION OFF CAPTION1 4 TEXT1 4 YES 33 CAPTION CONT LOW NORMAL YES 34 PWR ON MODE INPUT LAST VIDEO 1 2 DVD HD 1 4 PC RGB MULTI YES 34 VOLU...

Страница 22: ... note press the MENU ENTER button Adjusting the picture The contrast brightness sharpness color and tint can be adjusted as desired Example Adjusting the contrast On CONTRAST of PICTURE menu adjust the contrast SEL ADJ RETURN PICTURE PICTURE MEMORY CONTRAST BRIGHTNESS SHARPNESS COLOR TINT NR COLOR TEMP CINEMA MODE PICTURE MODE GAMMA LOW TONE SET UP LEVEL COLOR TUNE OFF OFF MIDDLE ON NORMAL 2 2 MOD...

Страница 23: ...ted to the picture NTSC PAL PAL60 480I 60 Hz 525I 60 Hz 576I 50 Hz 625I 50 Hz 1035I 60 Hz 1080I 60 Hz only Example Setting the CINEMA MODE to OFF On CINEMA MODE of PICTURE menu select OFF SEL ADJ RETURN PICTURE PICTURE MEMORY CONTRAST BRIGHTNESS SHARPNESS COLOR TINT NR COLOR TEMP CINEMA MODE PICTURE MODE GAMMA LOW TONE SET UP LEVEL COLOR TUNE OFF OFF MIDDLE OFF NORMAL 2 2 MODE1 0 52 32 16 32 32 G ...

Страница 24: ...OR TINT NR COLOR TEMP CINEMA MODE PICTURE MODE GAMMA LOW TONE SET UP LEVEL COLOR TUNE OFF OFF MIDDLE ON NORMAL 2 2 MODE1 3 75 52 32 16 32 32 G R EXIT Information SET UP LEVEL settings 0 Normal status 3 75 3 75 lower than normal 7 5 7 5 lower than normal Changing the Gamma Curve This feature adjusts the brightness of the midtone areas while keeping shadows and highlights unchanged Example Setting 2...

Страница 25: ...hed by pressing the WIDE button on the remote control The settings on the IMAGEADJUST menu are not preset at the factory SEL ADJ RETURN EXIT IMAGE ADJUST ASPECT MODE V POSITION H POSITION V HEIGHT H WIDTH AUTO PICTURE FINE PICTURE PICTURE ADJ UNDERSCAN NORMAL OFF OFF 0 0 0 0 0 0 V POSITION 30 Information When AUTO PICTURE is OFF SEL ADJ RETURN EXIT IMAGE ADJUST ASPECT MODE V POSITION H POSITION V ...

Страница 26: ...n HD SELECT of SET UP menu select 1035I SEL ADJ RETURN SET UP LANGUAGE DVD HD1 INPUT D SUB INPUT HD SELECT RGB SELECT HDMI SET UP COLOR SYSTEM BACK GROUND GRAY LEVEL S1 S2 DISPLAY OSM OSM ADJ REMOTE ID ALL RESET ENGLISH COMPONENT RGB 1035I AUTO HIGH AUTO GRAY 3 OFF ON TOP LEFT ALL OFF EXIT Information HD SELECT modes These 3 modes are not displayed in correct image automatically 1080I Standard dig...

Страница 27: ...Y LEVEL S1 S2 DISPLAY OSM OSM ADJ REMOTE ID ALL RESET ENGLISH COMPONENT RGB 1080I AUTO HIGH 3 58NTSC GRAY 3 OFF ON TOP LEFT ALL OFF EXIT Information Video signal formats Different countries use different formats for video signals Set to the color system used in your current country AUTO The color systems are automatically identified and the format is set accordingly PAL This is the standard format...

Страница 28: ...black The level can be adjusted from 0 to 15 The factory setting is 3 dark gray Turning on off the menu display When this is set to OFF the menu will not displayed even if you press the MENU ENTER button Example Turning the DISPLAY OSM off Set ADVANCED OSM to ON in the FUNCTION menu On DISPLAY OSM of SET UP menu select OFF Setting the position of the menu Adjusts the position of the menu when it a...

Страница 29: ...connected the system is set to the off state For instructions on using the computer s power management function refer to the computer s operating instructions Power management settings ON In this mode the power management function is turned on OFF In this mode the power management function is turned off Power management function and ON STANDBY indicator The ON STANDBY indicator indicates the statu...

Страница 30: ... screen of picture in picture mode PC RGB PC RGB Side by Side Picture in Picture Zoom button SINGLE button ON STANDBY indicator Power management mode On Off Turning the picture back on Picture already on Operate the keyboard or mouse The picture reappears ON STANDBY indicator Green Red Power management operating status Not activated Activated Description Horizontal and vertical synchronizing signa...

Страница 31: ...PEAKBRIGHT of PDPSAVER menu select 75 SEL ADJ RETURN EXIT PDP SAVER PEAK BRIGHT ORBITER INVERSE WHITE SCREEN WIPER SOFT FOCUS OSM ORBITER OSM CONTRAST 75 AUTO1 OFF OFF OFF ON LOW Information PEAK BRIGHT settings 100 The brightness of the screen is adjusted automatically to suit the picture quality 75 50 25 Sets maximum brightness The brightness level decreases in the order of 75 50 25 25 provides ...

Страница 32: ...select OFF SEL ADJ RETURN EXIT PDP SAVER PEAK BRIGHT ORBITER INVERSE WHITE SCREEN WIPER SOFT FOCUS OSM ORBITER OSM CONTRAST 100 AUTO1 OFF OFF OFF OFF LOW Information OSM ORBITER settings ON The position of the menu will be shifted by eight dots each time OSM is displayed OFF OSM will be displayed at the same position OSM CONTRAST Use this to reduce the brightness of OSM menu Example Setting OSM CO...

Страница 33: ...AST Last mode the volume that was last selected at the time the power was switched off 0 to 42 The level of sound volume Signal Information Menu Checking the frequencies polarities of input signals and resolution Use this function to check the frequencies and polarities of the signals currently being input from a computer etc On MAIN MENU select SIGNAL INFO then press the MENU ENTER button The SIG...

Страница 34: ... CEH BRIGHT DFH 80H 60H OAH 01H 05H CFH Screen Mode STADIUM DFH 80H 60H 51H 01H 02H 13H ZOOM DFH 80H 60H 51H 01H 03H 14H NORMAL DFH 80H 60H 51H 01H 04H 15H ANAMORPHIC DFH 80H 60H 51H 01H 05H 16H UNDERSCAN DFH 80H 60H 51H 01H 08H 19H 14 9 DFH 80H 60H 51H 01H 09H 1AH 2 35 1 DFH 80H 60H 51H 01H 0AH 1BH Auto Picture ON DFH 80H 60H 7FH 03H 03H 09H 00H 4DH OFF DFH 80H 60H 7FH 03H 03H 09H 01H 4EH Cinema ...

Страница 35: ...The pin assignment of the REMOTE IN connector of STB is same as that of 1 8 stereo mini cable connected to the REMOTE OUT connector Page 35 The transmit frequency of the remote control of STB is 37 9 kHz Typical The 1 8 Stereo Mini cable must be purchased separately Connection with STB PLASMA DISPLAY Connection Example Connecting an STB IN OUT OUT STB IN STB Remote Control Carrier fHz 37 9 kHz Typ...

Страница 36: ...t the side of the display Are the remote control s batteries worn out Is the monitor s power cord plugged into a power outlet Are all the monitor s indicators off Are the remote control s batteries worn out Is the remote control pointed at the monitor or is there an obstacle between the remote control and the monitor Is direct sunlight or strong artificial light shining on the monitor s remote con...

Страница 37: ...PAL 576I 625I NTSC 480I 525I Digital Zooming 100 to 900 Selectable Self Diagnosis via RS232C PDP Saver PEAK BRIGHT ORBITER INVERSE WHITE SCREEN WIPER SOFT FOCUS etc Color Temperature Select high middle middle low low user has 4 memories Auto Picture Adjust Input Skip Color Tune Gamma Correction 4 modes Plug and play DDC1 DDC2b HDMI E DDC Enhanced Split Screen etc Accessories Power cord 1 Remote co...

Страница 38: ... YES YES YES YES YES YES YES YES YES YES YES YES YES YES YES YES YES YES YES YES YES YES YES YES YES 2 YES 2 YES YES YES YES YES YES YES YES YES YES YES YES YES YES YES YES YES YES YES YES YES RGB select 4 720 400 640 480 848 480 852 480 800 600 1024 768 1024 768 1024 768 1152 864 1152 864 1280 768 1280 768 1280 768 1280 800 1280 854 1360 765 1360 768 1376 768 1280 1024 1400 1050 1680 1050 1600 12...

Страница 39: ...egistered trademarks of International Business Machines Inc of the United States Apple Macintosh is a registered trademark of Apple Computer Inc of the United States Dots lines 1280 1024 1280 1024 1152 900 1280 1024 1024 768 1280 1024 768 576 640 480 Vertical frequency Hz 60 0 71 2 72 0 66 0 76 0 76 1 60 0 60 0 50 0 59 9 Horizontal frequency kHz 64 6 75 1 78 1 61 8 71 7 81 1 49 7 63 9 31 4 31 5 NO...

Страница 40: ...09 2006 00M25AV851250 mzh g Printed in Japan www marantz com You can find your nearest authorized distributor or dealer on our website is a registered trademark ...

Отзывы: