background image

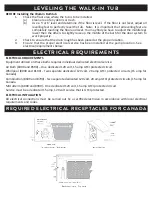
LEVELING THE WALK-IN TUB

BEFORE Installing the Walk-in Bathtub

1.  

Check the floor area where the tub is to be installed. 


(a) 

Clean area of any debris or trash. 

(b) 

Use a 5’ or 6’ level and determine if the floor is level.  If the floor is not level, adjust all 

levelling feet to perfectly level the tub.  Note:  It is important that all levelling feet are 

completely touching the floor and level.  You may find you have to adjust the middle legs 

lower then the others to slightly raise up the middle of the bath for the door system to 

work properly. 

2.  

Check to ensure that the drain rough has been placed at the proper location. 

3.  

Ensure that the proper electrical service has been installed at the pump location. See  

electrical requirements below. 

ELECTRICAL REQUIREMENTS

ELECTRICAL REQUIREMENTS 

Equipment utilized on these baths requires individual dedicated electrical service. 
Air Bath (8490 and 8590) – One dedicated 120 volt, 15 amp GFCI protected circuit.
Whirlpool (8090 and 8190) - Two separate dedicated 120 volt, 20 amp GFCI protected circuits (15 amp for 

Canada).

Combination (8690 and 8790) - Two separate dedicated 120 volt, 20 amp GFCI protected circuits (15 amp for 

Canada.

MicroDerm (8890 and 8990) - One dedicated 120 volt, 15 amp GFCI protected circuit.
Service must be a dedicated 15 amp, 120 volt service that is GFCI protected. 

ELECTRICAL INSTALLATION 

All electrical connections must be carried out by a certified electrician in accordance with local electrical 

requirements and codes. 

REQUIRED ELECTRICAL RECEPTACLES FOR CANADA

Содержание Restore ACR 8090

Страница 1: ...I M P O R TA N T H O M E O W N E R I N F O R M AT I O N Installation Use and Care Guide RESTORE ACR LUXURY WALK IN BATHTUB...

Страница 2: ...OUTES MUNIES D UNE GRILLE 6 WARNING TO AVOID INJURY EXERCISE CARE WHEN ENTERING OR EXITING THE HYDROMASSAGE BATHTUB and AVERTISSEMENT POUR EVITER LES BLESSURES USER DE PRUDENCE EN ENTRANT DANS LA CUVE...

Страница 3: ...N CLEAN TO MINIMIZE SLIPPAGE 20 SOAKING TOO LONG MAKES SOME PEOPLE NAUSEOUS DIZZY LIGHT HEADED OR FAINT DON T SOAK FOR MORE THAN 15 MINUTES IN 104 FAHRENHEIT WATER IF YOU WISH TO SOAK FOR A LONGER PER...

Страница 4: ...nnections as appropriate Do not alter the door fittings tamper with the hinge or try to get a closer fit on the seal DO NOT OVERTIGHTEN ANY BOLTS The baths are completely water tested prior to leaving...

Страница 5: ...ice has been installed at the pump location See electrical requirements below ELECTRICAL REQUIREMENTS ELECTRICAL REQUIREMENTS Equipment utilized on these baths requires individual dedicated electrical...

Страница 6: ...ng the ground 5 If the product is a whirlpool or an air bath carry out any electrical work that may be required Make the electrical connections per current regulations per aforementioned electrical re...

Страница 7: ...ke sure your plumber installs a thermostatic mixing valve TMV Not Supplied Connect the hot and cold water supplies to the thermostatic mixing valve Next connect the mixed hot water outlet from the hot...

Страница 8: ...or silicone sealant 3 ETL CSA IAPMO and UL require a tile flange to be installed in accordance with local building codes The tile flange kit is sold as an option 1 The extension box is cosmetic and is...

Страница 9: ...ELECTRICAL WIRING DIAGRAMS DUAL LOAD CONTROL MODELS 8090 8190 8490 8590 8690 and 8790 WITHOUT SURFACE HEATERS...

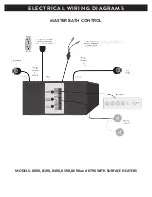
Страница 10: ...ELECTRICAL WIRING DIAGRAMS MASTER BATH CONTROL MODELS 8090 8190 8490 8590 8690 and 8790 WITH SURFACE HEATERS...

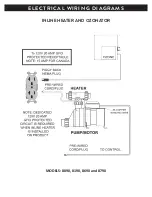
Страница 11: ...EN INLINE HEATER IS INSTALLED ON PRODUC ON PRODUCT TO CONTROL To 120V 20 AMP GFCI PROTECTED RECEPTACLE NOTE 15 AMP FOR CANADA OZONE PUMP MOTOR 8 COPPER BONDING WIRE HEATER PRE WIRED CORD PLUG PRE WIRE...

Страница 12: ...ELECTRICAL WIRING DIAGRAMS MICRODERM THERAPEUTIC BATH MODELS 8890 and 8990...

Страница 13: ...the bath to a depth to best suit your needs When the bather is done drain the bath by turning the handle clockwise After the bath is fully drained open the door by pulling backward on the door handle...

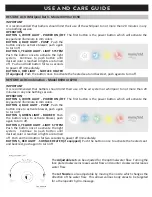
Страница 14: ...e bathing session OPERATION BUTTON 1 WHITE LIGHT POWER ON OFF The first button is the power button which will activate the keypad and illuminate in dim colors BUTTON 2 BLUE LIGHT PUMP Push the button...

Страница 15: ...nd air bath systems require routine cleaning to sanitize the system Twice per month or more depending on usage clean the whirlpool by following the directions below a Fill the tub with hot water b Add...

Страница 16: ...such delays or failure is due directly or indirectly to acts of God war including civil war riots embargoes acts whether sovereign or contractual of civil or military authorities acts of any governme...

Отзывы: