1
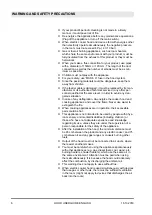
Technical Drawing
53
0
295
237
32
501
27
260
24
7
510
275
Fig. 1
16.10.2018
HOOD USER GUIDE ENGLISH
4
Страница 1: ...USER MANUAL BUILT IN HOOD Model K1153 Read this manual prior to performing any task c k h ng d n s d ng n y tr c khi th c hi n...
Страница 2: ...279 Nguyen Van Troi Street Ward 10 Phu Nhuan Dist HCM City Telephone 84 28 39975 893 94 Fax 84 28 38447 102 84 28 38633 882 E mail info malloca com Customer Care Hotline 1800 12 12 E mail chamsockh m...
Страница 3: ...7 CLEANING AND PREVENTIVE MAINTENANCE 16 7 1 Installation and Unpacking of the Appliance 16 7 2 Recommendations for Energy Saving 16 8 CONTENT OF PACKAGE 17 9 OVERVIEW OF hood 18 10 ASSEMBLY OF PRODU...
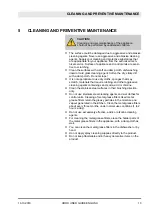
Страница 4: ...1 Technical Drawing 530 295 237 32 501 270 260 247 510 275 Fig 1 Technical Drawing 16 10 2018 HOOD USER GUIDE ENGLISH 4...
Страница 5: ...ps when they work for a long time The lamps may burn your hand as they will be hot n Kitchen hoods are manufactured for household use in normal home cooking There is a risk of malfunction in other typ...
Страница 6: ...ood and cooking appliances and cover the flame Never use water to extinguish the fire n When cooking appliances are in operation their accessible parts could be hot n This appliance is not intended to...
Страница 7: ...ng heaters shower heaters water heaters etc Fig 2 Ventilated goods e g gas oil wood or coal burning heaters shower heaters water heaters take combustion air from the instal lation location and dischar...
Страница 8: ...eason Operate gas cookers only when there is a cooking pot on them Operating multiple gas cookers simultaneously creates high heat A ventilation device placed over the cookers can be damaged or burned...
Страница 9: ...ge due to ingress of mois ture in the electronics Do not clean the control components with a wet cloth The surface could be damaged due to a wrong cleaning process Clean stainless steel sur faces only...
Страница 10: ...CAUTION Damage hazard due to corrosion Always run the appliance to prevent condensate formation while cooking Condensates may cause corrosion damage Replace the malfunctioning lamp right away to preve...
Страница 11: ...through the external wall a tele scopic wall safe must be used Ventilated air mode Absorbed air is cleaned by the grease filters and an active carbon filter and then it is transferred back to the kitc...
Страница 12: ...wise ensure that it is com pletely fit Fig 6 If carbon filter does not fit in completely it might drop and damage your product DANGER Never wash the carbon filters Keep carbon filters away from childr...
Страница 13: ...ssive cleaning agents containing sand soda acid or chlorine n Clean the stainless steel surfaces in their brushing direction only n Do not use stainless steel cleaning agents and wet clothes for contr...
Страница 14: ...colour This has no effect on the function of the metal grease filter n Do not clean too dirty metal grease filters together with utensils in the dishwasher n Place the metal grease filters loosely and...
Страница 15: ...DIMENSIONS After completing the installation of hood the minimum distance must be 65 cm between the product and any electric cooker and 75 cm between it and any gas ranges or cookers burning other fu...
Страница 16: ...the with packaging materials 7 2 Recommendations for Energy Saving n Replace the carbon filters on a regular basis n Regularly clean your aluminium filters Since dirty filters would block the air pass...
Страница 17: ...NT OF PACKAGE 1 2 3 4 5 Fig 9 Current Content of Package 1 Product 2 Hanger Screws 3 150 120 mm Flue Adapter Optional 4 User Manual 5 Assembly Pattern CONTENT OF PACKAGE 16 10 2018 HOOD USER GUIDE ENG...
Страница 18: ...9 OVERVIEW OF hood 1 Body 2 Aluminium Filter 3 Cooker Lighting 1 2 3 Fig 10 OVERVIEW OF hood 16 10 2018 HOOD USER GUIDE ENGLISH 18...
Страница 19: ...aluminium pipe to the air outlet of the product Mount the other end of the aluminium pipe to the kitchen flue make sure that both connections are tight enough to avoid removal during operation of the...
Страница 20: ...lly after 15 minutes Fig 14 Filters should be cleaned when C signal appears on the Display or due to usage every 2 or 3 weeks To delete C signal after the filters are cleaned and replaced press and ho...
Страница 21: ...s off Letter E will appear on the Dis play and it will switch to normal operation If operation before deleting the C signal is required active motor speed will appear for 1 sec when you press button a...
Страница 22: ...d For replacing the lamps push downwards on the lamp holder from its behind turn it a little bit counter clockwise and take it out downwards Fig 18 Fig 18 Lamp Replacement 12 2 Plug Lamp Replacement W...
Страница 23: ...aluminium cartridge filter Remove the faulty bulb and replace with a new one with the same rating Fig 19 Fig 19 Lamp Replacement REPLACING THE LAMPS Plug Lamp Replacement 16 10 2018 HOOD USER GUIDE E...
Страница 24: ...ower connection Mains voltage must be 220 240 V and product must be plugged into a grounded socket Illumination lamp does not operate Check the power connection Mains voltage must be 220 240 V and pro...
Страница 25: ...cartridge filter should be washed once a month under normal conditions It Does Not Discharge Air in flueless use Check The Carbon Filter In products that work with carbon filters carbon filter must b...
Страница 26: ...gulation on Electro magnetic Compliance and 2014 35 EC Regulation on Low Voltage Devices LVD Directives This device complies with the Directive on the Control of Waste Electrical and Electronic Equipm...
Страница 27: ...2 Email chamsockh malloca com Trung t m ch nh 279 ng Nguy n V n Tr i Ph ng 10 Qu n Ph Nhu n TP HCM S T 028 39975 893 94 028 39975 294 95 Khu v c B R a V ng T u 258 260A L H ng Phong Ph ng 4 TP V ng T...