background image

9

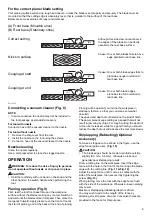
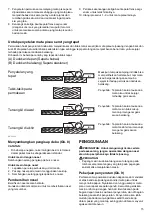
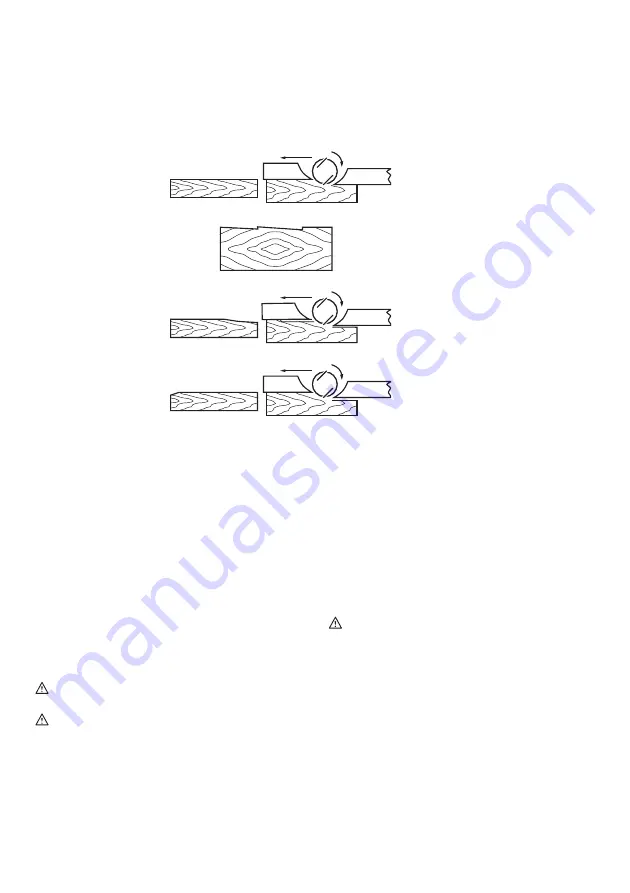
For the correct planer blade setting

Your planing surface will end up rough and uneven, unless the blade is set properly and securely. The blade must be 
mounted so that the cutting edge is absolutely level, that is, parallel to the surface of the rear base.
Below are some examples of proper and improper .

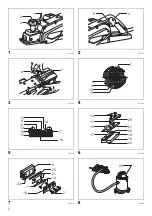
Connecting a vacuum cleaner (Fig. 8)

NOTE:

• In some countries, the nozzle may not be included in 

the tool package as standard accessory.

For tool with nozzle

Connect a hose of the vacuum cleaner to the nozzle.

For tool without nozzle

1. Remove the chip cover from the tool.
2. Install the nozzle on the tool using the screws.
3. Connect a hose of the vacuum cleaner to the nozzle.

Nozzle cleaning

Clean the nozzle regularly.
Use a compressed air to clean the clogged nozzle.

OPERATION

WARNING: To reduce the risk of injury to persons, 

do not operate without nozzle or chip cover in place.

CAUTION:

• Hold the tool firmly with one hand on the knob and the 

other hand on the switch handle when performing the 
tool.

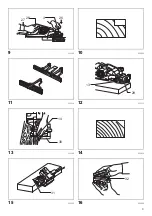
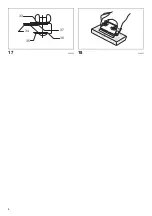
Planing operation (Fig. 9)

First, rest the tool front base flat upon the workpiece 
surface without the blades making any contact. Switch on 
and wait until the blades attain full speed. Then move the 
tool gently forward. Apply pressure on the front of tool at 
the start of planing, and at the back at the end of planing. 

Planing will be easier if you incline the workpiece in 
stationary fashion, so that you can plane somewhat 
downhill.
The speed and depth of cut determine the kind of finish. 
The power planer keeps cutting at a speed that will not 
result in jamming by chips. For rough cutting, the depth of 
cut can be increased, while for a good finish you should 
reduce the depth of cut and advance the tool more slowly.

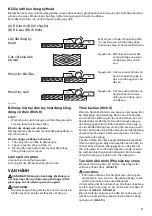
Shiplapping (Rabbeting) (Optional 
accessory)

To make a stepped cut as shown in the figure, use the 
edge fence (guide rule).  

(Fig. 10)

CAUTION:

• The blade edge should be made to protrude outside 

slightly (0.3 mm - 0.6 mm). Otherwise, nicks and 
generally poor shiplapping results.

Draw a cutting line on the workpiece. Insert the edge 
fence into the hole in the front of the tool. Align the blade 
edge with the cutting line. 

(Fig. 11 & Fig. 12)

Adjust the edge fence until it comes in contact with the 
side of the workpiece, then secure it by tightening the 
screw. 

(Fig. 13)

When planing, move the tool with the edge fence flush 
with the side of the workpiece. Otherwise uneven planing 
may result.
Maximum shiplapping (rabbeting) depth is 20 mm.
You may wish to add to the length of the fence by 
attaching an extra piece of wood. Convenient holes are 
provided in the fence for this purpose.

(A) Front base (Movable shoe)

(B) Rear base (Stationary shoe)

Correct setting

Nicks in surface

Gouging at start

Gouging at end

Although this side view cannot show it, 
the edges of the blades run perfectly 
parallel to the rear base surface.

Cause: One or both blades fails to have 

edge parallel to rear base line.

Cause: One or both blade edges fails to 

protrude enough in relation to 
rear base line.

Cause: One or both blade edges 

protrudes too far in relation to 
rear base line.

EN0004-1

(A)

(B)

(B)

(A)

(B)

(A)

Содержание MT111

Страница 1: ...GB Power Planer Instruction manual ID Mesin Serut Listrik Petunjuk penggunaan M y B o C m Tay Ho t ng B ng ng C i n VI T i li u h ng d n TH MT111...

Страница 2: ...2 1 013190 2 013191 3 013192 4 013185 5 002556 6 013186 7 013312 8 013194 1 2 3 5 4 6 7 7 8 9 10 11 12 13 9 11 14 15 16 17 18 14 11 19 17 20 21 22 18 16 23 8 23 21 11 7 10 14 24 25...

Страница 3: ...3 9 013196 10 002580 11 013314 12 013313 13 013198 14 003634 15 013203 16 002588 26 27 3 28 13 29 14 30 31 32...

Страница 4: ...4 17 004952 18 004953 33 34 35 37 36...

Страница 5: ...ectric shock fire and or serious injury Save all warnings and instructions for future reference The term power tool in the warnings refers to your mains operated corded power tool or battery operated...

Страница 6: ...ting Ensure the switch is in the off position before connecting to power source and or battery pack picking up or carrying the tool Carrying power tools with your finger on the switch or energising po...

Страница 7: ...8 Hold the tool firmly with both hands 9 Keep hands away from rotating parts 10 Before using the tool on an actual workpiece let it run for a while Watch for vibration or wobbling that could indicate...

Страница 8: ...ly clean the drum surfaces and the drum cover To remove the blades on the drum unscrew the three installation bolts with the socket wrench The drum cover comes off together with the blades 2 To instal...

Страница 9: ...The speed and depth of cut determine the kind of finish The power planer keeps cutting at a speed that will not result in jamming by chips For rough cutting the depth of cut can be increased while fo...

Страница 10: ...y other maintenance or adjustment should be performed by Makita Authorized or Factory Service Centers always using Makita replacement parts Sharpening the planer blades only for tool with conventional...

Страница 11: ...k yang tercantum di bawah ini dapat menyebabkan sengatan listrik kebakaran dan atau cedera serius Simpanlah semua peringatan dan petunjuk untuk acuan di masa depan Istilah mesin listrik dalam semua pe...

Страница 12: ...aspadaan perhatikan pekerjaan Anda dan gunakan akal sehat bila menggunakan mesin listrik Jangan menggunakan mesin listrik saat Anda lelah atau di bawah pengaruh obat bius alkohol atau obat Sekejap saj...

Страница 13: ...nya suku cadang pengganti yang serupa Hal ini akan menjamin terjaganya keamanan mesin listrik 2 Patuhi petunjuk pelumasan dan penggantian aksesori GEB167 1 Peringatan Keselamatan Mesin Serut 1 Tunggu...

Страница 14: ...teromol lepas ketiga baut pengikat dengan menggunakan kunci sok Pelat teromol akan terlepas bersama mata pisaunya Untuk memasang mata pisau pertama tama bersihkan semua sepihan kayu atau benda asing y...

Страница 15: ...ara berkala Gunakan udara terkompresi untuk membersihkan nosel yang tersumbat PENGGUNAAN PERINGATAN Untuk mengurangi risiko cedera pada seseorang jangan operasikan dengan nosel atau tutup serpihan kay...

Страница 16: ...panjang penahan tepi dengan memasang potongan kayu tambahan Lubang lubang yang sesuai untuk tujuan ini tersedia pada penahan tepi Memotong miring Gb 14 Gb 15 Untuk membuat potongan miring seperti ditu...

Страница 17: ...m y n y Vi c kh ng tu n theo c c h ng d n c li t k d i y c th d n n i n gi t h a ho n v ho c th ng t ch nghi m tr ng L u gi t t c c nh b o v h ng d n tham kh o sau n y Thu t ng d ng c m y trong c c c...

Страница 18: ...u c Ch m t kho nh kh c kh ng t p trung khi ang v n h nh d ng c m y c ng c th d n n th ng t ch c nh n nghi m tr ng 2 S d ng thi t b b o h c nh n Lu n eo thi t b b o v m t C c thi t b b o h nh m t n ch...

Страница 19: ...o i b h c a d ng c m y c i n v l m cho ng i v n h nh b i n gi t 3 S d ng c c ch t k p ho c nh ng c ch th c t kh c gi ch t v l y ph i gia c ng tr n b c v ng ch c N m gi ph i gia c ng b ng tay ho c t a...

Страница 20: ...p trong c a t m c t t m i u ch nh tr n l i b o sau ch c n nh n ph n g y c a t m i u ch nh cho n m ngang v i m t sau c a c v v n ch t hai v t tr n t m i u ch nh B y gi m i tr t ph n g y c a t m i u ch...

Страница 21: ...n tr c d ng c v o l c b t u ng b o v l n ph n sau d ng c khi k t th c ng b o S d b o h n n u b n t nghi ng v t gia c ng theo ki u c nh sao cho b n c th b o theo h ng d c xu ng T c v chi u s u c t s q...

Страница 22: ...a ch t t ng t C th x y ra hi n t ng m t m u bi n d ng ho c n t v m b o AN TO N v TIN C Y c a s n ph m vi c s a ch a vi c ki m tra v thay th ch i c c bon ho c b t c thao t c b o tr i u ch nh n o u ph i...

Страница 23: ...23 EPTA 01 2014 END201 7 ENE001 1 ENF002 2 1 2 3 4 5 6 7 8 9 10 11 12 13 14 15 16 17 18 19 20 21 22 23 24 25 26 27 28 29 30 31 V 32 33 34 A 35 B 36 D 37 C MT111 82 3 20 18 000 390 4 5 4 6 II...

Страница 24: ...24 GEA012 2 1 2 3 1 2 3 4 5 6 RCD RCD 7 RCD 30 mA 8 EMF 9 10 1 2 3 4 5 6 7...

Страница 25: ...25 8 9 ANSI Z87 1 EN 166 AS NZS 1336 1 2 3 4 5 6 7 8 9 1 2 GEB167 1 1 2 3 4 5 6...

Страница 26: ...26 7 8 9 10 11 12 13 14 15 16 17 Makita 18 1 2 OFF Makita 3 4 5...

Страница 27: ...27 3 6 7 1 2 3 4 5 6 7 8 9 10 1 9 A B EN0004 1 A B B A B A...

Страница 28: ...28 8 1 2 3 9 10 0 3 0 6 11 12 13 20 14 15 V Makita Makita 16 A B C D 17 2 3 18...

Страница 29: ...29...

Страница 30: ...30...

Страница 31: ...31...

Страница 32: ...885156B375 TRD Makita Corporation 3 11 8 Sumiyoshi cho Anjo Aichi 446 8502 Japan www makita com...

Отзывы: