background image

36 ESPAÑOL

3.

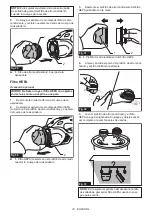
  Desmonte el filtro de malla en tres componentes: 

prefiltro, filtro de esponja tubular y tubo de malla.

Apriete juntos los topes de guía de la parte supe

-

rior del tubo de malla.

ii 

Pase los topes de guía hacia abajo a través del 

orificio guía de la parte superior del prefiltro.
iii 

Tire del prefiltro a lo largo del filtro de esponja 

tubular y el tubo de malla.

iv 

Retire el filtro de esponja tubular del tubo de 

malla.

1

2

3

4

5

Fig.44

►    

1.

 Prefiltro 

2.

 Filtro de esponja tubular 

3.

 Tubo de 

malla 

4.

 Topes de guía 

5.

 Orificio guía

4.

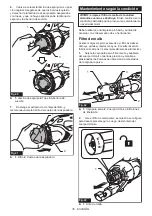
  Limpie y sacuda el polvo de los filtros y del tubo 

de malla con la mano.

Fig.45

5.

  Lave los filtros y el tubo de malla con agua enja

-

bonada cuando estén obstruidos con polvo y suciedad. 

Déjelos secar por completo a la sombra antes de 

usarlos.

Fig.46

6.

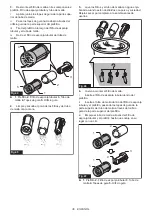
  Vuelva a montar el filtro de malla.

Inserte el filtro de esponja tubular dentro del 

prefiltro.
ii 

Inserte el tubo de malla dentro del filtro de esponja 

tubular y el prefiltro, pasando los topes de guía de la 

parte superior del tubo de malla a través del orificio 

guía de la parte superior del prefiltro.
iii 

Empuje el tubo de malla a través del filtro de 

esponja tubular y el prefiltro hasta que encaje en su 

lugar con un clic.

1

4

5

1

3

2

Fig.47

►    

1.

 Prefiltro 

2.

 Filtro de esponja tubular 

3.

 Tubo de 

malla 

4.

 Topes de guía 

5.

 Orificio guía

Содержание XLC11

Страница 1: ...INSTRUCTION MANUAL MANUAL DE INSTRUCCIONES Cordless Cleaner Aspiradora Inalámbrica XLC11 IMPORTANT Read Before Using IMPORTANTE Lea antes de usar ...

Страница 2: ...8SF DC18SH DC18WC Some of the battery cartridges and chargers listed above may not be available depending on your region of residence WARNING Only use the battery cartridges and chargers listed above Use of any other battery cartridges and chargers may cause injury and or fire SAFETY WARNINGS IMPORTANT SAFETY INSTRUCTIONS When using an electrical appliance basic precautions should always be fol lo...

Страница 3: ...her battery packs may create a risk of injury and fire 19 When battery pack is not in use keep it away from other metal objects like paper clips coins keys nails screws or other small metal objects that can make a connection from one terminal to another Shorting the battery terminals together may cause burns or a fire 20 Under abusive conditions liquid may be ejected from the battery avoid contact...

Страница 4: ...otection such as dust masks that are specially designed to filter out micro scopic particles Direct the exhaust air away from your face and body 3 Stop operation immediately if you notice anything abnormal 4 If you drop or strike the cleaner check it carefully for cracks or dam age before operation 5 Do not bring close to stoves or other heat sources 6 Do not block the intake hole or vent holes SA...

Страница 5: ...ttery must be removed from the tool 14 During and after use the battery cartridge may take on heat which can cause burns or low temperature burns Pay attention to the handling of hot battery cartridges 15 Do not touch the terminal of the tool immediately after use as it may get hot enough to cause burns 16 Do not allow chips dust or soil stuck into the terminals holes and grooves of the battery ca...

Страница 6: ... it is not being inserted correctly Tool battery protection system The tool is equipped with tool battery protection system This system automatically cuts off power to the motor to extend tool and battery life The tool will automatically stop during operation if the tool or battery is placed under one of the following conditions Overloaded The tool battery is operated in a manner that causes it to...

Страница 7: ...n repeats the Quiet Normal High Max mode in a cycle Level Indication Mode 1 Quiet mode 2 Normal speed mode 3 High speed mode 4 Max speed mode NOTE You can change the suction power before turning on the cleaner NOTE The cleaner starts the operation with the same suction power as the last operation Lighting up the lamp CAUTION Do not look in the light or see the source of light directly To turn on t...

Страница 8: ...N After installing attachments check if they are securely installed If the attachments are installed imperfectly they may come off and cause personal injury CAUTION Be careful not to hit your hand on the wall etc when removing the attachments When using attachment with lock function To install attachment insert it to the suction inlet of the cleaner until it clicks Make sure that the attachment is...

Страница 9: ... in a horizontal or upward facing position It may otherwise cause the mesh filter to become clogged NOTICE Always use the cleaner with filters installed Using the cleaner without filters may result in a motor malfunction NOTICE Empty the dust case in the cyclone unit when dust has accumulated Continuing use will result in weakened suction force The cyclone unit helps reduce the amount of dust that...

Страница 10: ...ut nozzle Fig 15 For picking up dust on a floor in a standing position it is convenient to attach the extension wand to the cleaner 1 Fig 16 1 Extension wand Straight pipe Disposing of dust CAUTION Empty the dust case before it becomes too full or the suction force weakens CAUTION Be careful not to trap finger s between the dust case and cyclone body when reassembling Dispose of accumulated dust a...

Страница 11: ...oved before attempt ing to perform inspection or maintenance NOTICE Never use gasoline benzine thinner alcohol or the like Discoloration deformation or cracks may result To maintain product SAFETY and RELIABILITY repairs any other maintenance or adjustment should be performed by Makita Authorized or Factory Service Centers always using Makita replacement parts After use CAUTION Putting the cleaner...

Страница 12: ... adhering to the inner surface of the cyclone unit and filter 1 Fig 22 1 Cyclone unit 2 With the suction inlet pointing downwards turn the cyclone unit as shown in the figure aligning the pointer on the cyclone unit with that on the cleaner body to disengage the lock Then detach the cyclone unit from the cleaner body slowly and straightly 1 2 3 4 Fig 23 1 Cyclone unit 2 Suction inlet 3 Pointers 4 ...

Страница 13: ...gh performance filter when hanging it up for drying 5 Hold the mounting end of high performance filter and squeeze it back into the cleaner body 1 2 Fig 29 1 High performance filter 2 Cleaner body HEPA filter Optional accessory NOTICE Do not rub or scratch the HEPA filter with hard objects such as a brush and a paddle 1 Disassemble the cyclone unit from the cleaner body 2 Hold the mounting end of ...

Страница 14: ...e prefilter onto the HEPA filter 1 2 Fig 34 1 High performance prefilter 2 HEPA filter 7 Hold the mounting end of HEPA filter covered with high performance prefilter and squeeze it back into the cleaner body 1 2 Fig 35 1 HEPA filter covered with the high performance prefilter 2 Cleaner body Sponge sheet 1 Disassemble the cyclone unit from the cleaner body 2 Hold the mounting end of filter and pull...

Страница 15: ... before use Fig 39 6 Place the sponge sheet back in the original position Make sure that the left and right edges of the sponge sheet are secured with stoppers and no gap between the sponge sheet and suction opening 1 3 2 Fig 40 1 Sponge sheet 2 Stopper 3 Suction opening 7 Hold the mounting end of filter and squeeze it back into the cleaner body 1 2 Fig 41 1 Filter 2 Cleaner body ...

Страница 16: ...se buttons on both sides of the dust case 3 2 1 Fig 42 1 Dust case 2 Cyclone body 3 Release buttons 2 Turn the mesh filter as shown in the figure to dis engage the lock Then detach it from the cyclone body 1 Fig 43 1 Mesh filter 3 Disassemble the mesh filter into three compo nents prefilter tubular sponge filter and mesh pipe i Squeeze the guide stoppers on top of the mesh pipe together ii Pass th...

Страница 17: ...er 3 Mesh pipe 4 Guide stoppers 5 Guide hole 7 Attach the mesh filter back into the cyclone body aligning the hooks on the mesh filter with the ports on the suction outlet of the cyclone body Turn the mesh filter as shown in the figure until the hooks are locked with a click Make sure that the mesh filter is installed securely 1 2 3 4 Fig 48 1 Mesh filter 2 Cyclone body 3 Hook 4 Port Air channels ...

Страница 18: ...annels Foreign substance is likely to get stuck around an incoming air port 1 2 Fig 51 1 Suction inlet 2 Incoming air port 4 Insert the inlet pipe back in place until it is securely locked 1 2 4 3 Fig 52 1 Inlet pipe 2 Cyclone body 3 O ring 4 Flap valve NOTICE Be sure that the O ring and flap valve are securely in place before reassembly Suction performance can be affected if the cyclone unit is o...

Страница 19: ...aner by yourself OPTIONAL ACCESSORIES CAUTION These accessories or attachments are recommended for use with your Makita tool specified in this manual The use of any other accessories or attachments might present a risk of injury to persons Only use accessory or attachment for its stated purpose If you need any assistance for more details regard ing these accessories ask your local Makita Service C...

Страница 20: ...RE DC18SD DC18SE DC18SF DC18SH DC18WC Algunos de los cartuchos de batería y cargadores enumerados arriba podrían no estar disponibles depen diendo de su área de residencia ADVERTENCIA Use únicamente los cartuchos de batería y los cargadores indicados arriba El uso de cualquier otro cartucho de batería y cargador podría ocasionar una lesión y o un incendio ADVERTENCIAS DE SEGURIDAD INSTRUCCIONES IM...

Страница 21: ...marcha el aparato accidentalmente 17 Recargue sólo con el cargador especificado por el fabricante Un cargador que es adecuado para un solo tipo de paquete de baterías puede generar riesgo de incendio al ser utili zado con otro paquete de baterías 18 Use los aparatos únicamente con los paquetes de baterías designados específicamente para ellos El uso de otros paquetes de baterías puede generar ries...

Страница 22: ...alfile res navajas o cuchillería Polvo fino conductor y solidi ficante polvo metálico o de carbono Espumas como limpiadores de alfombras etc pueden causar explosiones o incendios Grandes cantidades de polvo harina polvo de extintor de incendios etc Sustancias que causan sínto mas tóxicos Productos químicos agresivos ácidos alcalinos etc Polvo aglutinante fino como el cemento Partículas diminutas c...

Страница 23: ...ito en la batería puede causar un flujo grande de corriente sobrecalentamiento posibles quema duras e incluso una descompostura 6 No guarde ni utilice la herramienta y el cartucho de batería en lugares donde la temperatura pueda alcan zar o exceder los 50 C 122 F 7 Nunca incinere el cartucho de bate ría incluso en el caso de que esté dañado seriamente o ya no sirva en absoluto El cartucho de bater...

Страница 24: ... un incendio lesiones personales y daños Asimismo esto inva lidará la garantía de Makita para la herramienta y el cargador Makita Consejos para alargar al máximo la vida útil de la batería 1 Cargue el cartucho de batería antes de que se descargue completamente Pare siempre la operación y cargue el cartucho de batería cuando note menos potencia en la herramienta 2 No cargue nunca un cartucho de bat...

Страница 25: ...almente alta En este caso apague la herramienta y detenga la apli cación que causó que la herramienta se sobrecargara Luego encienda la herramienta para reiniciarla Sobrecalentada La herramienta batería se sobrecalientan En este caso permita que la herramienta batería se enfríen antes de volver a encender la herramienta Bajo voltaje de la batería La capacidad restante de la batería es demasiado ba...

Страница 26: ...ción Modo 1 Modo silencioso 2 Modo velocidad normal 3 Modo velocidad alta 4 Modo velocidad máxima NOTA Puede cambiar la potencia de succión antes de encender la aspiradora NOTA La aspiradora inicia la operación con la misma potencia de succión que la última operación Encendido de la lámpara PRECAUCIÓN No mire a la luz ni vea a la fuente de luz directamente Para encender la lámpara oprima el botón ...

Страница 27: ...piradora PRECAUCIÓN Después de instalar los adi tamentos verifique si están bien instalados Si los aditamentos no están instalados perfectamente bien estos podrían salirse y ocasionar una lesión PRECAUCIÓN Cuando extraiga los adita mentos tenga cuidado de no golpear su mano contra el muro etc Cuando se utiliza el aditamento con la función de bloqueo Para instalar el aditamento insértelo en la entr...

Страница 28: ...os podrían causar lesiones AVISO Evite usar la aspiradora en posición horizontal o hacia arriba De lo contrario podría ocasionar que el filtro de malla se obstruya AVISO Utilice siempre la aspiradora con los fil tros instalados Si se utiliza la aspiradora sin filtros se podría ocasionar una avería del motor AVISO Vacíe la caja para polvo en la unidad cicló nica cuando se haya acumulado polvo El us...

Страница 29: ...ores tubo de extensión tubo recto Utilice esta modalidad para espacios estrechos donde la misma aspiradora no quepa o en lugares elevados difíciles de alcanzar 1 2 3 Fig 14 1 Boquilla para bastidores 2 Tubo de extensión tubo recto 3 Cuerpo de la aspiradora Aspirado sin boquilla Puede aspirar el polvo sin el uso de la boquilla Fig 15 Para recoger polvo en un piso en posición de pie es conveniente c...

Страница 30: ...Seque bien la caja para polvo antes de volver a montarla y utilizarla AVISO Asegúrese de que todos los accesorios y componentes estén asegurados en su lugar correctamente antes de usarlos AVISO Si la fuerza de succión no se recupera incluso después de desechar el polvo y de lim piar el filtro de malla verifique si se ha acumu lado polvo dentro del cuerpo ciclónico o si hay obstrucción MANTENIMIENT...

Страница 31: ...mente antes de usarlos Si los filtros no están completamente secos la succión podría ser deficiente y la vida útil del motor podría reducirse AVISO Después de limpiar los filtros y el filtro de esponja asegúrese de volver a instalarlos antes del uso Si utiliza la aspiradora sin los filtros y la lámina de esponja el polvo entrará a la carcasa del motor y causará daños en el mismo Unidad ciclónica 1...

Страница 32: ...d ciclónica 2 Cuerpo de la aspiradora 3 Indicadores Filtro de alto rendimiento 1 Desmonte la unidad ciclónica del cuerpo de la aspiradora 2 Sostenga el extremo de montaje del filtro de alto rendimiento y sepárelo del cuerpo de la aspiradora 1 2 Fig 26 1 Filtro de alto rendimiento 2 Cuerpo de la aspiradora 3 Limpie y sacuda el polvo del filtro de alto rendi miento manualmente Fig 27 4 Lave el filtr...

Страница 33: ...extremo de montaje del filtro HEPA cubierto con el prefiltro de alto rendimiento y sepárelo del cuerpo de la aspiradora 1 2 Fig 30 1 Filtro HEPA cubierto con el prefiltro de alto rendi miento 2 Cuerpo de la aspiradora 3 Desmonte el prefiltro de alto rendimiento del filtro HEPA girándolo con la mano 1 2 Fig 31 1 Prefiltro de alto rendimiento 2 Filtro HEPA 4 Limpie y sacuda el polvo del prefiltro de...

Страница 34: ...o de la aspiradora Lámina de esponja 1 Desmonte la unidad ciclónica del cuerpo de la aspiradora 2 Sostenga el extremo de montaje del filtro y sepá relo del cuerpo de la aspiradora 1 2 Fig 36 1 Filtro 2 Cuerpo de la aspiradora 3 Retire la lámina de esponja de la abertura de succión 1 2 Fig 37 1 Lámina de esponja 2 Abertura de succión 4 Limpie y sacuda el polvo de la lámina de esponja con la mano Fi...

Страница 35: ...so continuo en la condición obstruida podría provocar su calentamiento o avería del motor Debe realizarse una limpieza profunda y puntual de acuerdo con el desempeño de su herramienta Filtro de malla Cuando la caja para polvo se ensucia o el filtro de malla se obstruye quítelos y lávelos con agua Consulte la sección Eliminación del polvo para el procedimiento de eliminación 1 Sujete la caja para p...

Страница 36: ...lvo de los filtros y del tubo de malla con la mano Fig 45 5 Lave los filtros y el tubo de malla con agua enja bonada cuando estén obstruidos con polvo y suciedad Déjelos secar por completo a la sombra antes de usarlos Fig 46 6 Vuelva a montar el filtro de malla i Inserte el filtro de esponja tubular dentro del prefiltro ii Inserte el tubo de malla dentro del filtro de esponja tubular y el prefiltr...

Страница 37: ...ectoria del aire si el desempeño de succión se ve afectado de manera marcada 1 Desmonte la unidad ciclónica en tres componen tes caja para polvo filtro de malla y cuerpo ciclónico 1 2 3 4 Fig 49 1 Caja para polvo 2 Filtro de malla 3 Cuerpo ciclónico 4 Cuerpo de la aspiradora 2 Presione y mantenga presionado el tope de guía del tubo de entrada hacia abajo a través del orificio de bloqueo del cuerpo...

Страница 38: ... ha descargado Cargue el cartucho de batería Ruido y vibración Los filtros están obstruidos Sacuda o lave el filtro de alto rendimiento filtro HEPA lámina de esponja filtro de malla Algo bloquea las aberturas u orificios Limpie el polvo y los objetos de las boquillas tubos y aberturas de aire La entrada de succión de la boquilla o el tubo está cerrada Destape y abra la entrada de succión de la boq...

Страница 39: ...os más vigentes de la garantía aplicable a este producto En caso de no disponer de esta hoja de garantía anexa consulte los detalles sobre la garantía descritos en el sitio web de su país respectivo indicado a continuación Estados Unidos de América www makitatools com Canadá www makita ca Otros países www makita com ESPAÑOL ...

Страница 40: ...ados por el lijado aserrado esmerilado taladrado y otras actividades de la construcción contienen sustancias químicas reconocidas por el Estado de California como causantes de cáncer defectos de nacimiento y otros peligros de reproducción Algunos ejemplos de estos productos químicos son plomo de pinturas a base de plomo sílice cristalino de ladrillos y cemento y otros productos de albañilería y ar...

Отзывы: