Makita XCV18 Скачать руководство пользователя страница 31

31 ESPAÑOL

Sistema de protección del aparato/

batería

El aparato está equipado con un sistema de protección 

del aparato/batería. Este sistema corta automática

-

mente la alimentación al motor para prolongar la vida 

del aparato y la batería. El aparato se detendrá automá

-

ticamente durante la operación si el aparato o la batería 

se someten a una de las siguientes condiciones.

Protección contra sobrecarga

Cuando el aparato se está utilizando de manera que 

causa que consuma una cantidad de corriente inusual-

mente alta, el aparato se detiene automáticamente sin 

que haya indicación alguna. En esta situación, apague 

el aparato y detenga la aplicación que haya causado 

que el aparato se sobrecargara. Luego encienda el 

aparato para volver a arrancarlo.

Protección contra 

sobrecalentamiento

Cuando el aparato se sobrecaliente, el aparato se 

detiene automáticamente. Deje que el aparato se enfríe 

antes de volverlo a encender.

Protección contra sobredescarga

Cuando la capacidad de la batería es baja, el aparato 

se detiene automáticamente. Si el producto no funciona 

incluso cuando los interruptores están siendo operados, 

retire las baterías del aparato y cárguelas.

Indicación de la capacidad restante 

de la batería

Únicamente para cartuchos de batería con el 

indicador

1

2

►    

1.

 Luces indicadoras 

2.

 Botón de verificación

Oprima el botón de verificación en el cartucho de la 

batería para que indique la capacidad restante de la 

batería. Las luces indicadoras se iluminarán por algu

-

nos segundos.

Luces indicadoras

Capacidad 

restante

Iluminadas

Apagadas

Parpadeando

75% a 100%

50% a 75%

25% a 50%

0% a 25%

Cargar la 

batería.

La batería 

pudo haber 

funcionado 

mal.

NOTA:

 Dependiendo de las condiciones de uso y 

la temperatura ambiente, la indicación podrá diferir 

ligeramente de la capacidad real.

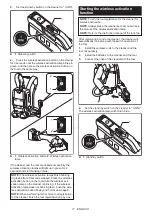
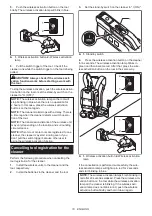
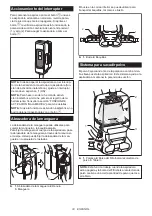
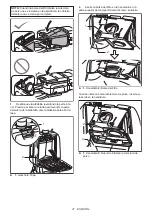
Posición de la caja del interruptor

La caja del interruptor puede engancharse en cual

-

quiera de los lados de la correa inferior. Coloque el 

cable de manera que la caja del interruptor quede del 

lado que desee. Para evitar daños al cable, haga que 

éste pase a través de la muesca tal como se muestra 

en la ilustración.

2

1

2

1

►    

1.

 Ranura 

2.

 Cable

Содержание XCV18

Страница 1: ...INSTRUCTION MANUAL MANUAL DE INSTRUCCIONES Cordless Backpack Vacuum Cleaner Aspiradora de mochila a batería XCV18 Read before use Lea antes de usar ...

Страница 2: ...D DC18SE DC18SF Some of the battery cartridges and chargers listed above may not be available depending on your region of residence WARNING Only use the battery cartridges and chargers listed above Use of any other battery cartridges and chargers may cause injury and or fire SAFETY WARNINGS IMPORTANT SAFETY INSTRUCTIONS When using an electrical appliance basic precautions should always be fol lowe...

Страница 3: ...h specifi cally designated battery packs Use of any other battery packs may create a risk of injury and fire 19 When battery pack is not in use keep it away from other metal objects like paper clips coins keys nails screws or other small metal objects that can make a connection from one terminal to another Shorting the battery terminals together may cause burns or a fire 20 Under abusive condition...

Страница 4: ...o reduce exposure to silica dust at the job site Specific rules apply to the drill ing demolition cutting and grinding materials that contain silica All OSHA requirements regarding reducing silica dust can be found at the OSHA website www osha gov 3 Stop operation immediately if you notice anything abnormal 4 If you drop or strike the cleaner check it carefully for cracks or dam age before operati...

Страница 5: ... all instructions and cautionary mark ings on 1 battery charger 2 bat tery and 3 product using battery 2 Do not disassemble battery cartridge 3 If operating time has become excessively shorter stop operating immediately It may result in a risk of overheating possi ble burns and even an explosion 4 If electrolyte gets into your eyes rinse them out with clear water and seek medical attention right a...

Страница 6: ...unction or error 8 Do not operate the wireless unit in places under high temperature or places where static electricity or electrical noise could be generated 9 The wireless unit can produce electromagnetic fields EMF but they are not harmful to the user 10 The wireless unit is an accurate instrument Be careful not to drop or strike the wireless unit 11 Avoid touching the terminal of the wireless ...

Страница 7: ...e around you CAUTION Do not install the battery cartridge forcibly If the cartridge does not slide in easily it is not being inserted correctly Appliance battery protection system The appliance is equipped with a appliance battery protection system This system automatically cuts off power to the motor to extend appliance and battery life The appliance will automatically stop during operation if th...

Страница 8: ...r belt Arrange the cord so that the switch box comes to your desired side To prevent the cord from being damaged pass the cord through the groove as illustrated 2 1 2 1 1 Groove 2 Cord Adjusting belts The tightness of the shoulder belts upper and lower belts can be adjusted Put your arms through the shoul der belts first then fasten the lower and upper belts To tighten pull the end of the strap as...

Страница 9: ...n power when you turned it off previously When you press button while the vacuum cleaner is running the suction power switches between normal 1 and higher 2 suction power To turn off the vacuum cleaner press button NOTE If you want to run the vacuum cleaner along with the switch operation of the tool connected to the vacuum cleaner wireless activation function set the stand by switch to I ON NOTE ...

Страница 10: ...ays be sure that the appli ance is switched off and the battery cartridge is removed before carrying out any work on the appliance Assembling hose Insert the hose cuff into the vacuum cleaner body and turn it clockwise 1 2 1 Hose cuff 2 Vacuum cleaner body Connecting the tool If the bent pipe assembly is attached to the hose loosen the sleeve of bent pipe assembly and remove it 1 2 3 1 Hose 2 Bent...

Страница 11: ...2 Bent pipe assembly 3 Sleeve To remove the bent pipe assembly loosen the sleeve of bent pipe assembly from the hose 2 Twist and insert the nozzle to the extension wand 1 2 3 4 1 Extension wand 2 Free nozzle 3 T shape nozzle 4 T shape nozzle slim NOTE By twisting the nozzle while inserting the noz zle can be attached to the extension wand securely 3 Follow the procedures below depending on the typ...

Страница 12: ...particles may be exhausted from the cleaner and they may cause respiratory disease to the operator Install either dust bag or filter bag before using cleaner Dust bag are usable many times repeatedly by cleaning it out Filter bag is a throw away type Throw away the entire filter bag without emptying when it has become full NOTICE When the filter bag is already full replace with new one When the du...

Страница 13: ...lift the front latching side Pull the latch to open the lid 1 2 1 Hook 2 Lid 2 Insert the filter bag into the slit on the upper side of the room as illustrated 1 2 1 Slit 2 Filter bag When using the dust bag insert the brim of the dust bag into the slit 2 1 3 1 Slit 2 Brim 3 Dust bag ...

Страница 14: ...place If you can see the red indicator on the upper side of the button it is not locked completely Insert it fully until the red indicator cannot be seen If not it may accidentally fall out of the appliance causing injury to you or someone around you CAUTION During operation be conscious of the vacuum cleaner on your back You may lose your balance if the vacuum cleaner body bumps against a wall or...

Страница 15: ...l when using the cleaner with wireless activation function NOTICE Do not disassemble or tamper with the wireless unit NOTICE To prevent dust coming into the slot of the wireless unit always close the lid securely during operation and storage NOTICE Do not remove the wireless unit while the power is being supplied Doing so may cause a malfunction of the wireless unit NOTICE Do not press the wireles...

Страница 16: ... removing the wireless unit open the lid slowly The hooks on the back of the lid will lift the wireless unit as you pull up the lid 2 3 1 1 Wireless unit 2 Hook 3 Lid After removing the wireless unit keep it in the supplied case or a static free container NOTICE Always use the hooks on the back of the lid when removing the wireless unit If the hooks do not catch the wireless unit close the lid com...

Страница 17: ...reless activation lamp does not blink in green push the wire less activation button briefly and hold it down again NOTE When performing two or more tool registration for the cleaner finish the tool registration one by one Starting the wireless activation function NOTE Finish the tool registration for the cleaner for wireless activation NOTE Always place the cleaner so that you can see the status o...

Страница 18: ...e cleaner the cleaner may start running even if you don t pull the switch trigger because other user is using the wireless activation function Cancelling tool registration for the cleaner Perform the following procedure when cancelling the tool registration for the cleaner 1 Install the wireless units to the cleaner and the tool respectively 2 Install the batteries to the cleaner and the tool 3 Se...

Страница 19: ...inks in red about twice per one second 5 When the wireless activation lamp starts blinking in red release your finger from the wireless activation button Thereafter hold down the wireless activation button again for about 6 seconds 6 When the wireless activation lamp starts blinking fast about 5 times per one second in red release your finger from the wireless activation button When the wireless a...

Страница 20: ...eration is performed for 2 hours When the tool is running The wireless activation of the cleaner is available and the tool is running Tool registration Green 20 seconds Ready for the tool registration Searching the tool to be registered 2 seconds The tool registration has been finished The wireless activation lamp will start blinking in blue Cancelling erasing tool registration Red slow 2 times se...

Страница 21: ...tance is approximately 10 m however it may vary according to the circumstances Before finishing the tool registration cancellation the switch trigger on the tool is pulled or the cleaner s switch to start vacuuming is pushed Push the wireless activation button briefly and perform the tool registration cancellation procedures again The tool registration procedures for the tool or the cleaner has no...

Страница 22: ...ting to perform inspection or maintenance NOTICE Never use gasoline benzine thinner alcohol or the like Discoloration deformation or cracks may result To maintain product SAFETY and RELIABILITY repairs any other maintenance or adjustment should be performed by Makita Authorized or Factory Service Centers always using Makita replacement parts Cleaning the HEPA filter CAUTION Do not use the vacuum c...

Страница 23: ...e well with water Dry completely before installing to the vacuum cleaner NOTICE Wet dust bag lowers the vacuuming per formance as well as the life of the motor Cleaning the room for filter bag dust bag When cleaning the room for filter bag dust bag remove and wipe the board inside 1 1 Board Removing the board 1 Remove the HEPA filter Refer to the section for cleaning the HEPA filter for how to rem...

Страница 24: ...ns Only use accessory or attachment for its stated purpose If you need any assistance for more details regard ing these accessories ask your local Makita Service Center Hose for dust extraction type Hose for vacuum cleaner type Extension wand Free nozzle T shape nozzle Seat nozzle Corner nozzle Shelf brush Round brush Filter bag Dust bag Front cuff HEPA filter Wireless unit Makita genuine battery ...

Страница 25: ...argadores enumerados arriba podrían no estar disponibles dependiendo de su área de residencia ADVERTENCIA Use únicamente los cartuchos de batería y los cargadores indicados arriba El uso de cualquier otro cartucho de batería y cargador podría ocasionar una lesión y o un incendio ADVERTENCIAS DE SEGURIDAD INSTRUCCIONES IMPORTANTES DE SEGURIDAD Al usar cualquier aparato eléctrico siempre deben segui...

Страница 26: ...os específicamente para ellos El uso de otros paquetes de baterías puede generar riesgo de lesiones e incendio 19 Cuando no se esté usando el paquete de baterías guárdelo lejos de otros objetos metálicos tales como sujetapapeles clips monedas llaves clavos torni llos u otros objetos metálicos pequeños que puedan crear una conexión entre una terminal y otra Ocasionar un cortocir cuito en las termin...

Страница 27: ...ente diseñadas para fil trar partículas microscópicas No apunte la salida de aire a la cara y al cuerpo NOTA Lea el reglamento OSHA en lo refe rente a polvo de sílice a fin de entender los requisitos necesarios para reducir la exposición al polvo de sílice en el puesto de trabajo Contiene normas específicas sobre el taladrado la demolición el corte y el lijado de materiales que contienen sílice To...

Страница 28: ...plosión o riesgo de lesión 8 No exponga un paquete de baterías o aparato al fuego o a una tempe ratura excesiva La exposición al fuego o una temperatura superior a 130 C podría causar una explosión 9 Siga todas las instrucciones rela tivas a la carga y no cargue el paquete de baterías o el aparato fuera del rango de temperatura especificado en las instrucciones Cargar de manera inapropiada o a tem...

Страница 29: ...s requi sitos podría ocasionar un incendio un calentamiento excesivo una explosión o una fuga de electrolito 14 Siga las regulaciones locales rela cionadas al desecho de las baterías GUARDE ESTAS INSTRUCCIONES PRECAUCIÓN Utilice únicamente baterías originales de Makita El uso de baterías no origina les de Makita o de baterías alteradas puede ocasio nar que las baterías exploten causando un incendi...

Страница 30: ...ando vaya a almacenar la unidad inalám brica guárdela en el estuche suministrado o en un contenedor libre de electricidad estática 26 No inserte ningún otro dispositivo que no sea la unidad inalámbrica de Makita en la ranura de la herramienta 27 No utilice la herramienta si la tapa de la ranura está dañada La entrada de agua polvo o sucie dad en la ranura podría causar una avería 28 No jale ni tue...

Страница 31: ...o la capacidad de la batería es baja el aparato se detiene automáticamente Si el producto no funciona incluso cuando los interruptores están siendo operados retire las baterías del aparato y cárguelas Indicación de la capacidad restante de la batería Únicamente para cartuchos de batería con el indicador 1 2 1 Luces indicadoras 2 Botón de verificación Oprima el botón de verificación en el cartucho ...

Страница 32: ...jeción Siempre agarre el gancho de sujeción cuando manipule el cuerpo de la aspiradora 1 1 Gancho de sujeción Interruptor de modo en espera El interruptor de modo en espera es el que sirve para encender apagar la función de activación inalámbrica La aspiradora está en el estado de modo de espera con independencia de la posición del interruptor y funciona cuando se oprime el botón 1 1 Interruptor d...

Страница 33: ...a no podrá detener la aspiradora con el botón Abrazadera de la manguera La abrazadera de la manguera puede utilizarse para sujetar la manguera o la boquilla amplia Para fijar la manguera al cuerpo de la aspiradora pase la abrazadera de la manguera a través de la ranura en el cuerpo Usted puede fijar la abrazadera de la man guera en cualquiera de los lados 1 2 3 1 Abrazadera de la manguera 2 Ranura...

Страница 34: ... ción de la herramienta 1 2 3 1 Boca delantera 2 Salida de extracción 3 Manguera La boca delantera puede desconectarse girándola en sentido inverso al de las manecillas del reloj mientras sostiene la manguera NOTA Utilice siempre una boca delantera adecuada Cuando utilice la boca delantera 24 acóplela a la boca delantera 22 que se encuentra conectada a la manguera 1 2 1 Boca delantera 22 2 Boca de...

Страница 35: ...nsión de tipo anillo no son compatibles entre sí Si desea cambiar el tubo de extensión de tipo corredera por el tubo de extensión de tipo anillo o viceversa cambie todo el conjunto de tubo curvo NOTA La boquilla amplia puede fijarse directamente al conjunto de tubo curvo Para el tubo de extensión de tipo corredera Cárguese al hombro el cuerpo de la aspiradora y a continuación inserte el tubo de ex...

Страница 36: ...ale ya sea una bolsa recolectora de polvo o bolsa del filtro antes de utilizar la aspiradora La bolsa recolectora de polvo se puede utilizar varias veces de manera repetida si ésta se limpia La bolsa del filtro es de tipo desechable Deseche por completo la bolsa del filtro sin vaciarlo cuando ésta se haya llenado AVISO Cuando la bolsa del filtro ya esté llena reemplácela con una nueva Cuando la bo...

Страница 37: ...resione el área ranurada para levantar la parte delantera de la aldabilla Jale la aldabilla para abrir la tapa 1 2 1 Gancho 2 Tapa 2 Inserte la bolsa del filtro en la hendidura en la parte superior del compartimiento tal como se ilustra 1 2 1 Hendidura 2 Bolsa del filtro Cuando utilice la bolsa recolectora de polvo inserte su reborde en la hendidura 2 1 3 1 Hendidura 2 Reborde 3 Bolsa recolectora ...

Страница 38: ...asegurado en su lugar Si puede ver el indicador rojo del lado superior del botón esto indica que no ha quedado completamente asegurado Insértelo por completo hasta que el indicador rojo no pueda verse De no hacerlo éste podría salirse accidentalmente del aparato ocasionándole lesiones a usted o a alguien cerca de usted PRECAUCIÓN Durante la operación tenga siempre en mente que lleva la aspiradora ...

Страница 39: ...tro y daños a la aspiradora Si desea utilizar la bolsa repetidamente utilice una bolsa recolectora de polvo FUNCIÓN DE ACTIVACIÓN INALÁMBRICA Lo que puede hacer con la función de activación inalámbrica La función de activación inalámbrica permite una ope ración limpia y cómoda Si conecta a la aspiradora una herramienta compatible podrá hacer que la aspiradora funcione automáticamente al activar el...

Страница 40: ...n la aspi radora antes de instalar la unidad inalámbrica El polvo o la suciedad podrían causar una avería si llegan a introducirse en la ranura de la unidad inalámbrica AVISO Para evitar una avería a causa de la elec tricidad estática toque un material de descarga de electricidad estática tal como una pieza metá lica antes de levantar la unidad inalámbrica AVISO Cuando vaya a instalar la unidad in...

Страница 41: ... Y luego oprima el botón de activación inalámbrica en la herramienta de la misma manera 1 2 2 1 1 Botón de activación inalámbrica 2 Luz indica dora de activación inalámbrica Si la aspiradora y la herramienta han sido conectadas exitosamente las luces indicadoras de activación ina lámbrica se encenderán en verde durante 2 segundos y comenzarán a parpadear en azul NOTA Las luces indicadoras de activ...

Страница 42: ...botón de activación inalámbrica en la herramienta o ajuste el interruptor de modo en espera en la aspiradora en O OFF NOTA La luz indicadora de activación inalámbrica en la herramienta dejará de parpadear en azul cuando no haya operación durante 2 horas En este caso oprima de nuevo los botones de activación inalám brica en la herramienta NOTA La aspiradora se pondrá en marcha deten drá con un retr...

Страница 43: ...s registros de herramientas de la aspiradora como se indica a continuación 3 1 2 1 Interruptor de modo en espera 2 Botón de acti vación inalámbrica 3 Luz indicadora de activación inalámbrica 1 Instale la unidad inalámbrica en la aspiradora 2 Instale las baterías en la aspiradora 3 Ajuste el interruptor de modo en espera en I ON 4 Mantenga oprimido el botón de activación inalám brica durante aproxi...

Страница 44: ...aliza ninguna operación durante 2 horas Cuando la herra mienta está funcionando La activación inalámbrica de la aspiradora está disponible y la herramienta está funcionando Registro de la herramienta Verde 20 segundos Ya se puede realizar el registro de la herramienta Se está bus cando la herramienta que se va a registrar 2 segundos El registro de la herramienta ha terminado La luz indicadora de a...

Страница 45: ...rramienta La unidad inalámbrica está instalada incorrectamente en la aspiradora y o la herramienta Instale la unidad inalámbrica correctamente La terminal de la unidad inalámbrica y o la ranura está sucia Retire con cuidado el polvo y la suciedad en la terminal de la unidad inalámbrica y limpie la ranura de la aspiradora y o de la herramienta El interruptor de modo en espera en la aspiradora no es...

Страница 46: ...a herramienta y la aspiradora lejos de aparatos tales como dispositivos Wi Fi y hornos de microondas La aspiradora funciona aun cuando el gatillo interruptor de la herra mienta no ha sido jalado Otros usuarios están usando la activa ción inalámbrica de la aspiradora con sus herramientas Realice una de las siguientes operaciones ajuste el interruptor de modo en espera en la aspiradora en la posició...

Страница 47: ...olvo Libere el gancho en el filtro y retírelo del cuerpo de la aspiradora 1 1 Gancho 2 Golpee el polvo del filtro El filtro puede ser lavado con agua Limpie con agua el polvo y las partículas en el filtro cada 1 o 2 meses Después de eso seque por completo el filtro en un lugar a la sombra y bien ventilado para evitar un olor desagradable o un funcio namiento defectuoso 3 Para instalar el filtro in...

Страница 48: ...a pared 3 Levante el lado derecho del tablero hacia arriba y sáquelo hacia afuera 1 1 Tablero El tablero está sostenido mediante tres resortes Si los resortes se desprendieron del tablero o de la palanca vuelva a colocarlos como se muestra en la ilustración 1 2 3 1 Resorte para tablero 2 Resorte para palanca 3 Protuberancia NOTA Fije los resortes de forma segura de modo que los resortes toquen la ...

Страница 49: ...la para asientos Boquilla para esquinas Cepillo para estantes Cepillo redondo Bolsa del filtro Bolsa recolectora de polvo Boca delantera Filtro HEPA Unidad inalámbrica Batería y cargador originales de Makita NOTA Algunos de los artículos en la lista pueden incluirse en el paquete de la herramienta como acce sorios estándar Éstos pueden variar de país a país GARANTÍA LIMITADA DE MAKITA Ésta Garantí...

Страница 50: ...50 ...

Страница 51: ...51 ...

Страница 52: ...ados por el lijado aserrado esmerilado taladrado y otras actividades de la construcción contienen sustancias químicas reconocidas por el Estado de California como causantes de cáncer defectos de nacimiento y otros peligros de reproducción Algunos ejemplos de estos productos químicos son plomo de pinturas a base de plomo sílice cristalino de ladrillos y cemento y otros productos de albañilería y ar...

Отзывы: