background image

8

ENGLISH

FUNCTIONAL 
DESCRIPTION

CAUTION:


Always be sure that the tool is 

VZLWFKHGRႇDQGWKHEDWWHU\FDUWULGJHLVUHPRYHG

before adjusting or checking function on the tool.

Installing or removing battery 
cartridge

CAUTION:


$OZD\VVZLWFKRႇWKHWRROEHIRUH

installing or removing of the battery cartridge.

CAUTION:


Hold the tool and the battery car-

WULGJH¿UPO\ZKHQLQVWDOOLQJRUUHPRYLQJEDWWHU\

cartridge.

 Failure to hold the tool and the battery 

FDUWULGJH¿UPO\PD\FDXVHWKHPWRVOLSRႇ\RXUKDQGV

and result in damage to the tool and battery cartridge 

DQGDSHUVRQDOLQMXU\

1

2

3

Fig.3

Ź

1.

 Red indicator 

2.

 Button 

3.

 Battery cartridge

To remove the battery cartridge, slide it from the tool 
while sliding the button on the front of the cartridge.

To install the battery cartridge, align the tongue on the 
battery cartridge with the groove in the housing and slip 
it into place. Insert it all the way until it locks in place 
with a little click. If you can see the red indicator as 

VKRZQLQWKH¿JXUHLWLVQRWORFNHGFRPSOHWHO\

CAUTION:


Always install the battery cartridge 

fully until the red indicator cannot be seen.

 If not, 

LWPD\DFFLGHQWDOO\IDOORXWRIWKHWRROFDXVLQJLQMXU\WR

you or someone around you.

CAUTION:


Do not install the battery cartridge 

forcibly.

 If the cartridge does not slide in easily, it is 

not being inserted correctly.

Indicating the remaining battery capacity

Only for battery cartridges with the indicator

1

2

Fig.4

Ź

1.

 Indicator lamps 

2.

 Check button

Press the check button on the battery cartridge to indi-
cate the remaining battery capacity. The indicator lamps 
light up for a few seconds.

Indicator lamps

Remaining 

capacity

Lighted

2ႇ

Blinking

75% to 100%

50% to 75%

25% to 50%

0% to 25%

Charge the 

battery.

The battery 

may have

malfunctioned.

NOTE:

 Depending on the conditions of use and the 

DPELHQWWHPSHUDWXUHWKHLQGLFDWLRQPD\GLႇHUVOLJKWO\

from the actual capacity.

NOTE:

7KH¿UVWIDUOHIWLQGLFDWRUODPSZLOOEOLQNZKHQ

the battery protection system works.

Tool / battery protection system

The tool is equipped with a tool/battery protection sys-

WHP7KLVV\VWHPDXWRPDWLFDOO\FXWVRႇSRZHUWRWKH

motor to extend tool and battery life. The tool will auto-
matically stop during operation if the tool or battery is 
placed under one of the following conditions:

Overload protection

When the tool or battery is operated in a manner that 
causes it to draw an abnormally high current, the tool 

DXWRPDWLFDOO\VWRSV,QWKLVVLWXDWLRQWXUQWKHWRRORႇ

and stop the application that caused the tool to become 
overloaded. Then turn the tool on to restart.

Содержание XCU11

Страница 1: ...INSTRUCTION MANUAL MANUAL DE INSTRUCCIONES Cordless Chain Saw Electrosierra Inalámbrica XCU11 IMPORTANT Read Before Using IMPORTANTE Lea antes de usar ...

Страница 2: ...idge s Saw chain guide bar and sprocket combination Saw chain type 90PX Number of drive links 52 Guide bar Guide bar length PP Ǝ Cutting length PP Ǝ Part No 165246 6 Pitch Ǝ Gauge PP Ǝ Type Sprocket nose bar Sprocket Number of teeth 6 Pitch Ǝ WARNING 8VH DSSURSULDWH FRPELQDWLRQ RI WKH JXLGH EDU DQG VDZ FKDLQ 2WKHUZLVH SHUVRQDO LQMXU PD result Applicable battery cartridge and charger Battery cartri...

Страница 3: ...ipment such as dust mask non skid safety shoes hard hat or hearing protection used for appropriate conditions ZLOO UHGXFH SHUVRQDO LQMXULHV 3 Prevent unintentional starting Ensure the VZLWFK LV LQ WKH Rႇ SRVLWLRQ EHIRUH FRQQHFWLQJ to power source and or battery pack picking up or carrying the tool Carrying power tools with RXU QJHU RQ WKH VZLWFK RU HQHUJLVLQJ SRZHU WRROV that have the switch on in...

Страница 4: ...in the instructions for use and care General chain saw safety warnings 1 Keep all parts of the body away from the saw chain when the chain saw is operating Before you start the chain saw make sure the saw chain is not contacting anything A moment of inattention while operating chain saws may cause entanglement of your clothing or body with the saw chain 2 Always hold the chain saw with your right ...

Страница 5: ...ing order and that its condition complies with the safety regulations Check in particular that The chain brake is working properly The run down brake is working properly 7KH EDU DQG WKH VSURFNHW FRYHU DUH WWHG correctly The chain has been sharpened and ten sioned in accordance with the regulations 2 Do not start the chain saw with the chain cover being installed on it Starting the chain saw with t...

Страница 6: ...ling must be observed For preparation of the item being shipped consult LQJ DQ H SHUW IRU KD DUGRXV PDWHULDO LV UHTXLUHG Please also observe possibly more detailed national regulations 7DSH RU PDVN Rႇ RSHQ FRQWDFWV DQG SDFN XS WKH battery in such a manner that it cannot move around in the packaging 11 When disposing the battery cartridge remove it from the tool and dispose of it in a safe place Fo...

Страница 7: ... 9 10 11 13 14 2 12 Fig 2 1 Front hand guard 2 Lever 3 Guide bar 4 Saw chain 5 Guide bar cover 6 RFN Rႇ EXWWRQ 7 Rear handle 8 Switch trigger 9 Battery cartridge 10 Front handle 11 Oil tank cap 12 Spike bumper 13 Chain catcher 14 GMXVWLQJ GLDO ...

Страница 8: ...ou or someone around you CAUTION Do not install the battery cartridge forcibly If the cartridge does not slide in easily it is not being inserted correctly Indicating the remaining battery capacity Only for battery cartridges with the indicator 1 2 Fig 4 Ź 1 Indicator lamps 2 Check button Press the check button on the battery cartridge to indi cate the remaining battery capacity The indicator lamp...

Страница 9: ...ter for repairs WARNING Never disable the lock function or WDSH GRZQ WKH ORFN Rႇ EXWWRQ CAUTION Before installing the battery car tridge into the tool always check to see that the switch trigger actuates properly and returns to the OFF position when released NOTICE Do not pull the switch trigger forcibly with RXW SUHVVLQJ WKH ORFN Rႇ EXWWRQ The switch may break 1 2 Fig 5 Ź 1 RFN Rႇ EXWWRQ 2 Switch...

Страница 10: ...tall the saw chain perform the following steps 1 Release the chain brake by pulling the front hand guard 2 Pull the lever up while pressing its edge 1 Fig 7 Ź 1 Lever 3 Turn the lever counterclockwise until the sprocket FRYHU FRPHV Rႇ 1 2 Fig 8 Ź 1 Lever 2 Sprocket cover 4 Remove the sprocket cover 5 Check the direction of the saw chain Match the direction of the saw chain with that of the mark on...

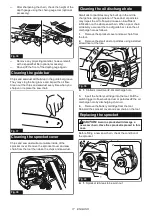
Страница 11: ...ckwise until the sprocket cover is secured then return it to the original position 1 2 Fig 13 Ź 1 Lever 2 Sprocket cover Removing the saw chain To remove the saw chain perform the following steps 1 Release the chain brake by pulling the front hand guard 2 7XUQ WKH DGMXVWLQJ GLDO WR GLUHFWLRQ WR UHOHDVH the saw chain tension 1 Fig 14 Ź 1 GMXVWLQJ GLDO 3 Pull the lever up while pressing its edge 1 F...

Страница 12: ...ginal position 0DNH VXUH WKH VDZ FKDLQ WV VQXJO DJDLQVW WKH ORZHU side of the bar OPERATION Lubrication CAUTION Do not operate the chain saw when the tank is empty Replenish the oil in due time before the tank is empty CAUTION Prevent the oil from coming into con tact with the skin and eyes Contact with the eyes causes LUULWDWLRQ Q WKH HYHQW RI H H FRQWDFW ÀXVK WKH DႇHFWHG H H immediately with cle...

Страница 13: ...ts of the body away from the saw chain when the motor is operating CAUTION ROG WKH FKDLQ VDZ UPO ZLWK both hands when the motor is running CAUTION Do not overreach Keep proper footing and balance at all times CAUTION When you use the upper side of the guide bar for cutting be careful since the chain saw may be pushed in your direction if the saw chain is trapped NOTICE Never toss or drop the tool ...

Страница 14: ...s close to the hinge the tree should begin to fall If there is any chance that the tree may not fall in desired direction or it may rock back and bind the saw chain stop cutting before the felling back cut is complete and use wedges of wood plastic or aluminium to open the cut and drop the tree along the desired line of fall When the tree begins to fall remove the chain saw from the cut stop the m...

Страница 15: ...ng from tree to tree Fig 29 Parallel to grain cut CAUTION Parallel to grain cut may only be performed by trained persons The possibility of NLFNEDFN SUHVHQWV D ULVN RI LQMXU Perform the parallel to grain cut at as shallow an angle as possible Fig 30 Carrying tool Before carrying the tool always apply the chain brake and remove the battery cartridge from the tool Then attach the guide bar cover Als...

Страница 16: ...ess is determined by the distance between the depth gauge round nose and the cutting edge The best cutting results are obtained with following distance between cutting edge and depth gauge KDLQ EODGH 3 PP Ǝ 30 30 55 55 Fig 33 The sharpening angle of 30 must be the same on DOO FXWWHUV LႇHUHQW FXWWHU DQJOHV FDXVH WKH FKDLQ to run roughly and unevenly accelerate wear and lead to chain breaks 8VH D VX...

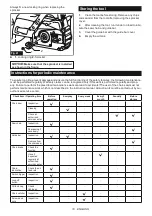
Страница 17: ...ilt up in the oil dis charge hole during operation These dust or particles PD LPSDLU WKH RLO WR ÀRZ DQG FDXVH DQ LQVXႈFLHQW lubrication on the whole saw chain When a poor chain oil delivery occurs at the top of guide bar clean the oil discharge hole as follows 1 Remove the sprocket cover and saw chain from the tool 2 Remove the small dust or particles using a slotted screwdriver or the like 2 1 Fi...

Страница 18: ...FODLPV FDQ EH UHFRJQL HG RQO LI WKLV ZRUN LV SHUIRUPHG UHJXODUO DQG SURS erly Failure to perform the prescribed maintenance work can lead to accidents The user of the chain saw must not perform maintenance work which is not described in the instruction manual All such work must be carried out by our DXWKRUL HG VHUYLFH FHQWHU Check item Operating time Before operation Everyday Every week Every 3 mo...

Страница 19: ...U LQ RXU region for repair Abnormal vibration Stop the tool immediately Loose guide bar or saw chain GMXVW WKH JXLGH EDU DQG VDZ FKDLQ WHQVLRQ Tool malfunction VN WKH DXWKRUL HG VHUYLFH FHQWHU LQ RXU region for repair The saw chain cannot be installed The combination of saw chain and sprocket is not correct Use the correct combination of saw chain and sprocket by referring to the section for VSHFL...

Страница 20: ...ás pesado conforme al procedimiento 01 2014 de EPTA El peso puede variar en función de los accesorios incluido el o los cartuchos de batería Combinación de cadena de la sierra barra de guía y pieza dentada Tipo de cadena de sierra 90PX Número de eslabones motorices 52 Barra de guía Longitud de la barra de guía PP Ǝ Longitud de corte PP Ǝ 1R GH SLH D 165246 6 Paso Ǝ Calibre PP Ǝ Tipo Barra dentada ...

Страница 21: ...exponga las herramientas eléctricas a la lluvia ni a condiciones húmedas La entrada de agua en una herramienta eléctrica aumentará el ULHVJR GH TXH VH SURGX FD XQD GHVFDUJD HOpFWULFD 4 No maltrate el cable Nunca utilice el cable para transportar jalar o desconectar la herra mienta eléctrica Mantenga el cable alejado del calor aceite objetos cortantes o piezas móvi les Los cables dañados o enredado...

Страница 22: ...ca está dañada haga que la reparen antes de utilizarla Muchos de los accidentes son ocasio nados por no dar un mantenimiento adecuado a las herramientas eléctricas 6 Mantenga las herramientas de corte limpias ORVDV Si recibe un mantenimiento adecuado WLHQH ORV ERUGHV D ODGRV HV SUREDEOH TXH OD herramienta se atasque menos y sea más fácil controlarla 7 Utilice la herramienta eléctrica los accesorio...

Страница 23: ...nada puede golpear al operador y o provocar la pérdida de control de la sierra eléctrica 9 Tenga extrema precaución al cortar matorra les y árboles jóvenes El material tierno puede quedar atascado en la cadena de la sierra y ser ODQ DGR KDFLD XVWHG R KDFHUOH SHUGHU HO HTXLOLEULR 10 Cargue la sierra eléctrica del mango delan tero estando apagada y lejos de su cuerpo Cuando vaya a transportar o alma...

Страница 24: ... resbalosas tenga cuidado al pisar 5 No sumerja la herramienta en los charcos 6 No deje la herramienta desatendida a la intem perie bajo la lluvia Seguridad eléctrica y de la batería 1 Evite los entornos peligrosos No utilice la herramienta en lugares húmedos o mojados ni la exponga a la lluvia El agua que ingrese a la herramienta incrementará el riesgo de descarga eléctrica 2 No deseche la s bate...

Страница 25: ...ben tomar en cuenta los requisitos especiales relativos al empaque y el etiquetado Para efectuar los preparativos del artículo que se va a enviar se requiere consultar a un experto en materiales peligrosos Si es posible consulte además otras regulaciones nacionales más deta lladas Pegue o cubra con cinta adhesiva los contactos abiertos y empaque la batería de manera que ésta no pueda moverse dentr...

Страница 26: ... C 40 C 50 F 104 F Si un cartucho de batería está caliente déjelo enfriar antes de cargarlo 4 Cuando no utilice el cartucho de batería sáquelo de la herramienta o del cargador 5 Cargue el cartucho de batería si no va a utili zarlo durante un período prolongado más de seis meses DESCRIPCIÓN DE LAS PIEZAS 1 3 4 5 6 7 8 9 10 11 13 14 2 12 Fig 2 1 Protector de mano delantero 2 Palanca 3 Barra de guía ...

Страница 27: ...XQ SHTXHxR FOLF 6L SXHGH YHU HO LQGLFDGRU URMR FRPR VH PXHVWUD HQ OD LOXVWUDFLyQ este no ha quedado asegurado por completo PRECAUCIÓN Introduzca siempre com pletamente el cartucho de batería hasta que el indicador rojo no pueda verse Si no podría accidentalmente salirse de la herramienta y caer al suelo causando una lesión a usted o alguien a su alrededor PRECAUCIÓN No instale el cartucho de bater...

Страница 28: ...cela s con batería s recargada s HMH TXH OD PiTXLQD OD V EDWHUtD V VH HQIUtHQ 6L QR KD QLQJXQD PHMRUD DO UHVWDXUDU HO VLVWHPD GH protección comuníquese con su centro local de servi cio Makita AVISO Si la herramienta se detiene debido a una causa no descrita anteriormente consulte la sección de detección y solución de problemas Accionamiento del interruptor ADVERTENCIA Por su seguridad esta herrami...

Страница 29: ...CIÓN No toque la cadena de la sierra con las manos descubiertas Siempre use guantes al manipular la cadena de la sierra Instalación o extracción de la cadena de la sierra PRECAUCIÓN La cadena de la sierra y la barra de guía siguen estando calientes justo después de la operación Permita que se enfríen OR VX FLHQWH DQWHV GH UHDOL DU FXDOTXLHU WUDEDMR HQ la herramienta PRECAUCIÓN Realice el procedimi...

Страница 30: ...3DVDGRU GH DMXVWH 9 RORTXH OD FXELHUWD GH OD SLH D GHQWDGD HQ OD VLHUUD HOpFWULFD GH WDO IRUPD TXH HO SDVDGRU GH DMXVWH TXHGH SRVLFLRQDGR HQ HO RUL FLR SHTXHxR HQ OD EDUUD GH guía 3 1 2 Fig 12 Ź 1 XELHUWD GH OD SLH D GHQWDGD 2 Barra de guía 3 2UL FLR 10 Dé un giro completo a la palanca en el sentido GH ODV PDQHFLOODV GHO UHORM OXHJR JtUHOD XQ SRFR HQ OD GLUHFFLyQ RSXHVWD SDUD PDQWHQHU DÀRMDGD OD W...

Страница 31: ...juste de la tensión de la cadena de la sierra PRECAUCIÓN Realice el procedimiento de instalación o extracción de la cadena de la sierra en un lugar limpio libre de aserrín y residuos similares PRECAUCIÓN No apriete demasiado la cadena de la sierra Una tensión excesiva de la cadena de la sierra puede causar que ésta se rompa que la barra de guía se desgaste y que el dial de DMXVWH VH GDxH PRECAUCIÓ...

Страница 32: ...uando se usa la sierra eléctrica por primera vez puede tomar hasta dos minutos para que el aceite de la cadena de la sierra comience a lubricar el mecanismo de la sierra Haga girar la sierra sin carga hasta que se lubrique AVISO Cuando llene el aceite para la cadena por primera vez o al reabastecer el tanque después de haberse vaciado por completo añada el aceite hasta el borde inferior del cuello...

Страница 33: ...RU esté en marcha PRECAUCIÓN No utilice la herramienta GRQGH QR DOFDQFH 3LVH UPHPHQWH PDQWHQJD HO equilibrio en todo momento PRECAUCIÓN Cuando use el lado superior de la barra de guía para cortar tenga cuidado ya que la sierra eléctrica podría ser empujada en su dirección si la cadena de la sierra queda atrapada AVISO Nunca tire ni deje caer la herramienta AVISO No cubra las rejillas de ventilació...

Страница 34: ...tra en la ilustración Mantenga el corte trasero SDUD WDODGR SDUDOHOR DO FRUWH GH PXHVFD KRUL RQWDO DJD HO FRUWH WUDVHUR SDUD WDODGR SDUD TXH TXHGH VX ciente madera para actuar como parte articulante La madera que funciona como parte articulante evita que HO iUERO VH WXHU D FDLJD HQ OD GLUHFFLyQ HTXLYRFDGD No corte a través de la parte articulante A medida que la acción de tala se acerca a la parte...

Страница 35: ... en la ilustración corte 1 3 del diáme tro desde la parte superior leñado superior Luego KDJD HO FRUWH QDO PHGLDQWH XQ FRUWH LQIHULRU HQ HO segundo tercio inferior para llegar al primer corte 1 2 Fig 28 Ź 1 Primer corte 2 Segundo corte Cuando haga un corte transversal leñado en una pen diente párese siempre sobre el lado hacia arriba del tronco tal y como se ilustra Al atravesar con el corte para ...

Страница 36: ...GH OD VLHUUD FRQ IUHFXHQFLD SHUR VyOR XQ SRFR FDGD YH 3RU OR JHQHUDO VyOR GRV R WUHV SDVDGDV FRQ XQD OLPD VRQ VX FLHQWHV SDUD XQ UHD ODGR GH UXWLQD XDQGR OD FDGHQD GH OD VLHUUD KD D VLGR UHD ODGD YDULDV YHFHV OOpYHOD D D ODU D QXHVWUR FHQWUR GH VHUYLFLR DXWRUL DGR ULWHULRV GH D ODGR ADVERTENCIA Una distancia excesiva entre el borde de corte y el calibrador de profun didad aumenta el riesgo de un r...

Страница 37: ...JXOR GH D ODGR FRUUHFWR GH DOLQHH las marcas paralelas a la cadena de la sierra y limita la profundidad de penetración a 4 5 del diámetro de la lima 30 1 5 1 Fig 35 Ź 1 6XMHWDGRU GH OLPDV 7UDV HO D ODGR GH OD FDGHQD YHUL TXH OD DOWXUD GHO calibrador de profundidad usando la herramienta de calibración de la cadena accesorio opcional Fig 36 Elimine cualquier material protuberante indepen diente de c...

Страница 38: ...el aceite de la cadena 4 Retire el cartucho de batería de la herramienta 5HLQVWDOH OD FXELHUWD GH OD SLH D GHQWDGD OD FDGHQD GH la sierra en la herramienta Reemplazo de la pieza dentada PRECAUCIÓN Una pieza dentada desgas tada dañará una cadena nueva de la sierra En este caso reemplace la pieza dentada QWHV GH LQVWDODU XQD QXHYD FDGHQD GH OD VLHUUD YHUL TXH OD FRQGLFLyQ GH OD SLH D GHQWDGD 1 2 Fig...

Страница 39: ...RQHV 7RGR HVWH WLSR GH WUDEDMR GHEHUi VHU UHDOL DGR SRU QXHVWUR FHQWUR GH VHUYLFLR DXWRUL DGR Elemento a revisar Tiempo de operación Antes de la operación Diariamente Semanalmente Cada 3 meses Anualmente Antes del almacena miento Sierra eléctrica Inspección LPSLH D Inspección en el centro de servicio DXWRUL DGR Cadena de la sierra Inspección ODPLHQWR en caso necesario Barra de guía Inspección Reti...

Страница 40: ...al Detenga la herramienta inmediatamente La barra de guía o la cadena de la sierra están sueltas MXVWH OD EDUUD GH JXtD R OD WHQVLyQ GH OD cadena de la sierra Avería de la herramienta Solicite la reparación en el centro de VHUYLFLR DXWRUL DGR GH VX UHJLyQ La cadena de la sierra no puede instalarse La combinación de cadena de la sierra y la SLH D GHQWDGD QR HV FRUUHFWD Utilice la combinación correc...

Страница 41: ...41 ...

Страница 42: ...42 ...

Страница 43: ...43 ...

Страница 44: ...ados por el lijado aserrado esmerilado taladrado y otras actividades de la construcción contienen sustancias químicas reconocidas por el Estado de California como causantes de cáncer defectos de nacimiento y otros peligros de reproducción Algunos ejemplos de estos productos químicos son plomo de pinturas a base de plomo sílice cristalino de ladrillos y cemento y otros productos de albañilería y ar...

Отзывы: