background image

5

Always stop tool operation and charge the battery 
cartridge when you notice less tool power.

2.

Never recharge a fully charged battery cartridge.
Overcharging shortens the battery service life.

3.

Charge the battery cartridge with room 
temperature at 10 °C - 40 °C (50 °F - 104 °F). Let a 
hot battery cartridge cool down before charging it.

FUNCTIONAL DESCRIPTION 

CAUTION: 

• Always be sure that the tool is switched off and the 

battery cartridge is removed before adjusting or 
checking function on the tool. 

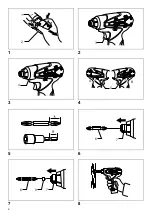
Installing or removing battery cartridge 
(Fig. 1)

• Always switch off the tool before insertion or removal of 

the battery cartridge. 

• To remove the battery cartridge, withdraw it from the 

tool while pressing the buttons on both sides of the 
cartridge. 

• To insert the battery cartridge, hold it so that the battery 

cartridge front shape fits to that of the battery 
installment opening and slip it into place. 
Always insert it all the way until it locks in place with a 
little click. If not, it may accidentally fall out of the tool, 
causing injury to you or someone around you.

• Do not use force when inserting the battery cartridge. If 

the cartridge does not slide in easily, it is not being 
inserted correctly. 

Switch action (Fig. 2)

CAUTION: 

• Before inserting the battery cartridge into the tool, 

always check to see that the switch trigger actuates 
properly and returns to the “OFF” position when 
released. 

To start the tool, simply pull the switch trigger. Tool speed 
is increased by increasing pressure on the switch trigger. 
Release the switch trigger to stop.

Turning on the front lamp (Fig. 3)

CAUTION: 

• Do not look in the light or see the source of the light 

directly. 

Pull the switch trigger to turn on the light. The lamp keeps 
on lighting while the switch trigger is being pulled. The 
lamp turns off 10 -15 seconds after releasing the trigger. 

NOTE: 

• Use a dry cloth to wipe the dirt off the lens of lamp. 

Be careful not to scratch the lens of lamp, or it may 
lower the illumination. 

Reversing switch action (Fig. 4)

This tool has a reversing switch to change the direction of 
rotation. Depress the reversing switch lever from the A 
side for clockwise rotation or from the B side for 
counterclockwise rotation. 
When the reversing switch lever is in the neutral position, 
the switch trigger cannot be pulled.

CAUTION: 

• Always check the direction of rotation before operation. 
• Use the reversing switch only after the tool comes to a 

complete stop. Changing the direction of rotation 
before the tool stops may damage the tool. 

• When not operating the tool, always set the reversing 

switch lever to the neutral position. 

ASSEMBLY 

CAUTION: 

• Always be sure that the tool is switched off and the 

battery cartridge is removed before carrying out any 
work on the tool. 

Installing or removing driver bit or socket 
bit (Fig. 5)

Use only bits that has inserting portion shown in the 
figure. 

For European and North & South American countries, 
Australia and New Zealand 

For other countries 

1. To install the bit, pull the sleeve in the direction of the 

arrow and insert the bit into the sleeve as far as it will 
go. Then release the sleeve to secure the bit. 

(Fig. 6)

2. To install the bit, pull the sleeve in the direction of the 

arrow and insert the bit-piece and bit into the sleeve 
as far as it will go. The bit-piece should be inserted 
into the sleeve with its pointed end facing in. Then 
release the sleeve to secure the bit. 

(Fig. 7)

To remove the bit, pull the sleeve in the direction of the 
arrow and pull the bit out firmly. 

NOTE:

• If the bit is not inserted deep enough into the sleeve, 

the sleeve will not return to its original position and the 
bit will not be secured. In this case, try re-inserting the 
bit according to the instructions above. 

OPERATION (Fig. 8)

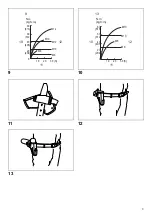
The proper fastening torque may differ depending upon 
the kind or size of the screw/bolt, the material of the 
workpiece to be fastened, etc. The relation between 
fastening torque and fastening time is shown in the 
figures. 

(Fig. 9 & 10)

Hold the tool firmly and place the point of the driver bit in 
the screw head. Apply forward pressure to the tool to the 
extent that the bit will not slip off the screw and turn the 
tool on to start operation.

A=12 mm 
B=9 mm

Use only these type of bit. Follow the 
procedure (1). 
(Note) Bit-piece is not necessary. 

A=17 mm
B=14 mm

To install these types of bits, follow the 
procedure (1). 
(Note) Makita bits are these types. 

A=12 mm
B=9 mm

To install these types of bits, follow the 
procedure (2). 
(Note) Bit-piece is necessary for installing 
the bit.

Содержание td090

Страница 1: ...sanleitung I Avvitatore a massa battente a batteria Istruzioni per l uso NL Accuslagschroevendraaier Gebruiksaanwijzing E Atornillador de impacto a batería Manual de instrucciones P Berbequim de impacto sem fios Manual de instruções DK Akku slagskruetrækker Brugsanvisning GR Κρουστικό κατσαβίδι μπαταρίας Οδηγίες χρήσης TD090D ...

Страница 2: ...2 1 2 3 4 5 6 7 8 1 2 3 4 5 A B 6 7 6 8 7 ...

Страница 3: ...3 9 10 11 12 13 M12 M10 M8 80 60 40 20 0 204 408 816 612 1 0 2 0 3 0 N m kgf cm M12 M10 M8 S 9 10 12 11 0 1 0 2 0 3 0 80 60 40 20 204 408 816 612 N m kgf cm M10 M8 S M10 M8 13 10 12 11 ...

Страница 4: ...attery 2 Do not disassemble battery cartridge 3 If operating time has become excessively shorter stop operating immediately It may result in a risk of overheating possible burns and even an explosion 4 If electrolyte gets into your eyes rinse them out with clear water and seek medical attention right away It may result in loss of your eyesight 5 Do not short the battery cartridge 1 Do not touch th...

Страница 5: ... or from the B side for counterclockwise rotation When the reversing switch lever is in the neutral position the switch trigger cannot be pulled CAUTION Always check the direction of rotation before operation Use the reversing switch only after the tool comes to a complete stop Changing the direction of rotation before the tool stops may damage the tool When not operating the tool always set the r...

Страница 6: ...er Fig 13 MAINTENANCE CAUTION Always be sure that the tool is switched off and the battery cartridge is removed before attempting to perform inspection or maintenance To maintain product SAFETY and RELIABILITY repairs any other maintenance or adjustment should be performed by Makita Authorized Service Centers always using Makita replacement parts ACCESSORIES CAUTION These accessories or attachment...

Страница 7: ...util fermement 4 Portez des protections auditives CONSERVEZ CES INSTRUCTIONS AVERTISSEMENT Une UTILISATION INCORRECTE de l outil ou un non respect des consignes de sécurité indiquées dans ce manuel d instructions peuvent causer des blessures graves CONSIGNES DE SÉCURITÉ IMPORTANTES ENC007 4 POUR LA BATTERIE 1 Avant d utiliser la batterie veuillez lire toutes les instructions et tous les avertissem...

Страница 8: ... n est pas insérée correctement Interrupteur Fig 2 ATTENTION Avant d insérer la batterie dans l outil vérifiez toujours que la gâchette fonctionne bien et revient en position d arrêt lorsqu elle est relâchée Pour mettre l outil en marche appuyez simplement sur la gâchette La vitesse de l outil augmente à mesure que l on accroît la pression exercée sur la gâchette Pour l arrêter relâchez la gâchett...

Страница 9: ... douille Si vous n utilisez pas un embout ou un embout à douille de taille appropriée cela entraînera une diminution du couple de serrage 3 boulon Pour un même coefficient de couple et une même classe de boulon le couple de serrage adéquat varie suivant le diamètre du boulon Bien que les diamètres des boulons soient identiques le couple de serrage approprié différera en fonction du coefficient de ...

Страница 10: ...n de conformité CE ENH101 12 Nous Makita Corporation en tant que fabricant responsable déclarons que les machines Makita suivantes Nom de la machine Visseuse à chocs sans fil N de modèle Type TD090D sont fabriquées en série et sont conformes aux directives européennes suivantes 98 37 CE jusqu au 28 décembre 2009 puis 2006 42 CE à partir du 29 décembre 2009 et sont fabriquées conformément aux norme...

Страница 11: ...EISUNGEN SORGFÄLTIG AUF WARNUNG MISSBRAUCH der Werkzeugs oder Missachtung der in diesem Handbuch enthaltenen Sicherheitshinweise können zu schweren Personenschäden führen WICHTIGE SICHERHEITSREGELN ENC007 4 FÜR AKKUBLOCK 1 Lesen Sie vor der Verwendung des Akkublocks alle Anweisungen und Sicherheitshinweise für das Akkuladegerät 1 den Akku 2 und das Produkt 3 für das der Akku verwendet wird 2 Der A...

Страница 12: ...Akkublocks keine Gewalt an Wenn der Block nicht leicht hineingleitet wird er nicht richtig eingesetzt Bedienung des Schalters Abb 2 ACHTUNG Achten Sie vor dem Einsetzen des Akkublocks in das Werkzeug darauf dass sich der Ein Aus Schalter korrekt bedienen lässt und beim Loslassen in die Position OFF AUS zurückkehrt Betätigen Sie zum Starten des Werkzeugs einfach den Ein Aus Schalter Die Drehzahl de...

Страница 13: ...ie nach dem Festziehen immer das Drehmoment mit einem Drehmomentschlüssel 1 Wurde der Akkublock nahezu vollständig entladen fällt die Spannung ab und das Anzugsmoment verringert sich 2 Drehereinsatz oder Steckaufsätze Wird nicht die richtige Größe für den Drehereinsatz oder den Steckeraufsatz verwendet wird das Anzugsmoment verringert 3 Schraube Auch wenn der Drehmomentkoeffizient und die Klasse f...

Страница 14: ...ngsgesamtwerte Vektorsumme dreier Achsen nach EN60745 2 2 Arbeitsmodus Schlagschrauben von Befestigungsmitteln mit der maximalen Leistung des Werkzeugs Schwingungsbelastung ah 10 m s2 Abweichung K 1 5 m s2 EU Konformitätserklärung ENH101 12 Wir Makita Corporation als verantwortlicher Hersteller erklären dass die folgenden Geräte der Marke Makita Bezeichnung des Geräts Akku Schlagschrauber Nummer T...

Страница 15: ...care lesioni personali gravi ISTRUZIONI IMPORTANTI PER LA SICUREZZA ENC007 4 PER LA BATTERIA 1 Prima di utilizzare la batteria leggere tutte le istruzioni e gli avvisi di sicurezza relativi a 1 caricabatteria 2 batteria e 3 prodotto utilizzato con la batteria 2 Non smontare la batteria 3 Se il tempo di funzionamento è diventato eccessivamente breve non utilizzare l utensile Potrebbero verificarsi ...

Страница 16: ...interruttore La lampadina rimane accesa fino a quando si tiene premuto l interruttore La lampada si spegne automaticamente 10 15 secondi dopo aver rilasciato l interruttore NOTA Utilizzare un panno asciutto per pulire la lente della lampadina Fare attenzione a non graffiare la lente della lampadina per evitare riduzioni dell intensità luminosa Azionamento della leva di inversione della rotazione F...

Страница 17: ...nta a tubo Il non utilizzo della punta a tubo o della punta dell avvitatore di dimensioni corrette provocherà una riduzione nella coppia di serraggio 3 Bullone Anche se il coefficiente di coppia e la classe del bullone sono uguali la coppia di serraggio corretta differisce secondo il diametro del bullone Anche se i diametri dei bulloni sono uguali la coppia di serraggio corretta differisce secondo...

Страница 18: ...akita Corporation in qualità di produttore responsabile dichiara che gli utensili Makita indicati di seguito Denominazione dell utensile Avvitatore a massa battente a batteria N modello Tipo TD090D appartengono a una produzione in serie e sono conformi alle seguenti direttive europee 98 37 CE fino al 28 dicembre 2009 e successivamente alla direttiva 2006 42 CE a partire dal 29 dicembre 2009 e sono...

Страница 19: ...ebruikt 3 Houd het gereedschap stevig vast 4 Draag gehoorbescherming BEWAAR DEZE INSTRUCTIES WAARSCHUWING VERKEERD GEBRUIK of het niet volgen van de veiligheidsinstructies in deze gebruiksaanwijzing kan leiden tot ernstig persoonlijk letsel BELANGRIJKE VEILIGHEIDSINSTRUCTIES ENC007 4 VOOR ACCU S 1 Alvorens de accu in gebruik te nemen leest u eerst alle instructies en waarschuwingsopschriften op 1 ...

Страница 20: ...cu in het gereedschap steekt of de aan uit schakelaar op de juiste manier schakelt en weer terugkeert naar de uit stand nadat deze is losgelaten Om het gereedschap in te schakelen knijpt u gewoon de aan uit schakelaar in De draaisnelheid van het gereedschap neemt toe naarmate u meer druk uitoefent op de aan uit schakelaar Laat de aan uit schakelaar los om het gereedschap te stoppen De lamp op de v...

Страница 21: ...iet de juiste maat schroefbit of dopbit wordt gebruikt zal het draaikoppel lager worden 3 Bout Ondanks dat de koppelcoëfficiënt en de boutklasse hetzelfde zijn zal het juiste draaikoppel verschillen afhankelijk van de diameter van de bout Ondanks dat de diameter van de bouten hetzelfde is zal het juiste draaikoppel verschillen afhankelijk van de koppelcoëfficiënt de boutklasse en de boutlengte 4 D...

Страница 22: ...ekerheid K 1 5 m s2 EU verklaring van conformiteit ENH101 12 Wij Makita Corporation als de verantwoordelijke fabrikant verklaren dat de volgende Makita machine s Aanduiding van de machine Accuslagschroevendraaier Modelnr Type TD090D in serie is geproduceerd en Voldoet aan de volgende Europese richtlijnen 98 37 EC tot en met 28 december 2009 en daarna aan 2006 42 EC vanaf 29 december 2009 En is gef...

Страница 23: ...cciones pueden ocasionar graves daños corporales INSTRUCCIONES DE SEGURIDAD IMPORTANTES ENC007 4 PARA EL CARTUCHO DE LA BATERÍA 1 Antes de utilizar el cartucho de la batería lea todas las instrucciones y referencias de precaución que se encuentran en 1 el cargador de baterías 2 la batería y 3 el producto que utiliza la batería 2 No desmonte el cartucho de la batería 3 Si el tiempo de funcionamient...

Страница 24: ...o de la batería en la herramienta asegúrese siempre de que el interruptor disparador funciona como es debido y que vuelve a la posición OFF apagado al soltarlo Para poner en marcha la herramienta simplemente accione el interruptor disparador La velocidad de la herramienta aumenta al incrementar la presión sobre el interruptor disparador Suelte el interruptor disparador para detener la herramienta ...

Страница 25: ...ente la tensión caerá y el par de apriete se reducirá 2 Punta de atornillado o punta de vaso Si no se utiliza la punta de atornillado o la punta de vaso del tamaño correcto se provocará una reducción del par de apriete 3 Perno Aunque el coeficiente del par de apriete y la clase del perno sean los mismos el par de apriete real diferirá dependiendo del diámetro del perno Aunque los diámetros de los ...

Страница 26: ...n de vibraciones ah 10 m s2 Incertidumbre K 1 5 m s2 Declaración de conformidad de la CE ENH101 12 Nosotros Makita Corporation en calidad de fabricante responsable declaramos que las siguientes máquinas Makita Designación de la máquina Atornillador de impacto a batería Nº de modelo Tipo TD090D son de producción serie y Cumplen con las siguientes Directivas europeas 98 37 EC hasta el 28 de diciembr...

Страница 27: ...ntes de utilizar a bateria leia as instruções e chamadas de atenção de 1 o carregador da bateria 2 a bateria e 3 o produto que utiliza a bateria 2 Não desmonte a bateria 3 Se o tempo de utilização com a bateria se tornar demasiado curto deve parar imediatamente Se continuar pode causar sobreaquecimento incêndio e mesmo explosão 4 Se o electrólito entrar em contacto com os olhos enxagúe os com água...

Страница 28: ...te da lâmpada pois poderia diminuir a intensidade da iluminação Inverter a direcção da rotação Fig 4 Esta ferramenta tem um interruptor que permite inverter a direcção da rotação Rode o interruptor a partir da posição A no sentido dos ponteiros do relógio ou a partir da posição B no sentido contrário ao dos ponteiros do relógio Se o interruptor estiver na posição neutra o gatilho não poderá ser pr...

Страница 29: ...5 Trabalhar com a ferramenta a baixa velocidade provoca uma redução na força de aperto Utilizar o coldre PRECAUÇÃO Não utilize para ferramentas tais como uma perfuradora com uma broca instalada Desligue uma ferramenta e aguarde até que pare totalmente antes de a colocar no coldre Certifique se de que fecha totalmente o coldre para que prenda a ferramenta com firmeza Passe um cinto ou semelhante at...

Страница 30: ...as Europeias seguintes 98 37 EC até 28 de Dezembro de 2009 e de seguida com a 2006 42 EC a partir de 29 de Dezembro de 2009 E são fabricadas de acordo com os documentos de normas ou normalizados seguintes EN60745 A documentação técnica é mantida pelo nosso representante autorizado na Europa que é Makita International Europe Ltd Michigan Drive Tongwell Milton Keynes MK15 8JD Inglaterra 30 de Janeir...

Страница 31: ... FOR BATTERIPAKKEN 1 Før brugen af batteripakken skal du læse alle instruktioner og advarsler på 1 batteriopladeren 2 batteriet og 3 det produkt som batteriet anvendes i 2 Skil ikke batteripakken ad 3 Hvis driftstiden bliver betydeligt kortere skal du straks ophøre med brugen Brug kan medføre risiko for overophedning risiko for forbrændinger eller endog eksplosion 4 Hvis du får elektrolyt i øjnene...

Страница 32: ... kan mindske lysstyrken Betjening af skiftekontakten Fig 4 Værktøjet har en skiftekontakt til at ændre rotationsretningen Tryk skiftekontakten mod A siden for rotation med uret eller mod B siden for rotation mod uret Når skiftekontakthåndtaget er i neutral stilling kan kontaktgrebet ikke trækkes ind FORSIGTIG Kontroller altid rotationsretningen før anvendelsen Betjen ikke skiftekontakten før værkt...

Страница 33: ...t ordentligt sådan at det holder værktøjet fast Før et bælte eller lignende igennem hylsterremmen Placer værktøjet i hylsteret og lås det med hylsterknappen Fig 11 og 12 Der er plads til to bits foran på hylsteret Fig 13 VEDLIGEHOLDELSE FORSIGTIG Sørg altid for at værktøjet er slukket og at batteripakken er taget ud før De forsøger at udføre inspektion eller vedligeholdelse For at holde produktet ...

Страница 34: ...indes hos vores autoriserede repræsentant i Europa Makita International Europe Ltd Michigan Drive Tongwell Milton Keynes MK15 8JD England 30 januar 2009 Tomoyasu Kato Direktør Makita Corporation 3 11 8 Sumiyoshi cho Anjo Aichi JAPAN ...

Страница 35: ...προκαλέσει σοβαρό προσωπικό τραυματισμό ΣΗΜΑΝΤΙΚΕΣ ΟΔΗΓΙΕΣ ΑΣΦΑΛΕΙΑΣ ENC007 4 ΓΙΑ ΤΗΝ ΜΠΑΤΑΡΙΑ 1 Πριν χρησιμοποιήσετε την μπαταρία διαβάστε όλες τις οδηγίες και τις ενδείξεις προφύλαξης στο 1 φορτιστή μπαταρίας 2 την μπαταρία και 3 το προϊόν στο οποίο χρησιμοποιείται η μπαταρία 2 Μην αποσυναρμολογείτε την μπαταρία 3 Αν ο χρόνος λειτουργίας της μπαταρίας είναι υπερβολικά σύντομος διακόψτε αμέσως τη...

Страница 36: ...νδάλη διακόπτη αυξάνεται η ταχύτητα του εργαλείου Για να σταματήσετε αφήστε τη σκανδάλη διακόπτη Άναμμα της μπροστινής λάμπας Εικ 3 ΠΡΟΣΟΧΗ Μην κοιτάτε κατευθείαν μέσα στο φως ή στην πηγή φωτός Πιέστε τη σκανδάλη διακόπτη για να ανάψετε τη λάμπα Η λάμπα εξακολουθεί να είναι αναμμένη όσο πιέζετε τη σκανδάλη διακόπτη Η λάμπα σβήνει 10 έως 15 δευτερόλεπτα αφού αφήσετε τη σκανδάλη ΣΗΜΕΙΩΣΗ Χρησιμοποιή...

Страница 37: ...ιδί ροπής 1 Όταν η μπαταρία αποφορτιστεί σχεδόν εντελώς θα ελαττωθεί η τάση και η ροπή σύσφιξης θα μειωθεί 2 Μύτη τρυπανιού ή μύτη υποδοχής Η μη χρήση της σωστής μύτης τρυπανιού ή της μύτης υποδοχής θα προκαλέσει μια μείωση της ροπής σύσφιξης 3 Μπουλόνι Ακόμα κι αν ο συντελεστής ροπής και η κατηγορία μπουλονιού είναι οι ίδιοι η κατάλληλη ροπή σύσφιξης θα διαφέρει σύμφωνα με τη διάμετρο του μπουλον...

Страница 38: ...ah 10 m s2 Αβεβαιότητα Κ 1 5 m s2 EC Δήλωση Συμμόρφωσης ENH101 12 Η Εταιρία Makita ως υπεύθυνος κατασκευαστής δηλώνει ότι το παρακάτω μηχάνημα ή μηχανήματα της Makita Ονομασία Μηχανήματος Κρουστικό κατσαβίδι μπαταρίας Αρ Μοντέλου Τύπος TD090D αποτελούν παραγωγή σε σειρά και Συμμορφώνονται με τις ακόλουθες Ευρωπαϊκές Οδηγίες 98 37 ΕΚ έως στην 28η Δεκεμβρίου 2009 και επακόλουθα με την 2006 42 ΕΚ από...

Страница 39: ...39 ...

Страница 40: ...Makita Corporation Anjo Aichi Japan 884802A997 ...

Отзывы: