


5
FUNCTIONAL DESCRIPTION
CAUTION:
• Always be sure that the tool is switched off and the bat-
tery cartridge is removed before adjusting or checking
function on the tool.
Installing or removing battery cartridge (Fig. 1)
• Always switch off the tool before insertion or removal of
the battery cartridge.
• To remove the battery cartridge, withdraw it from the
tool while pressing the buttons on both sides of the car-
tridge.
• To insert the battery cartridge, align the tongue on the
battery cartridge with the groove in the housing and slip
it into place. Always insert it all the way until it locks in
place with a little click. If not, it may accidentally fall out
of the tool, causing injury to you or someone around
you.
• Do not use force when inserting the battery cartridge. If
the cartridge does not slide in easily, it is not being
inserted correctly.
Lock button (Fig. 2)
When the lock button is in the locked position
, the
switch cannot be actuated.
When the lock button is in the unlocked position
, the
switch can be actuated.
Switch action (Fig. 3)
CAUTION:
• Before inserting the battery cartridge into the tool,
always check to see that the switch trigger actuates
properly and returns to the “OFF” position when
released.
To start the tool, first move the lock button to the released
position
to release the switch. And then simply push
the switch on the
side for the clockwise rotation and
the
side for the counterclockwise rotation. Release
the switch to stop.
CAUTION:
• Always check the direction of rotation before operation.
• Change the direction only after the tool comes to a
complete stop. Changing the direction of rotation
before the tool stops may damage the tool.
• When not operating the tool, always place the lock but-
ton in the locked position
.
Lighting up the front lamp (Fig. 4 & 5)
CAUTION:
• Do not look in the light or see the source of light
directly.
To put on the light, first slide the lamp switch to the
position and then push the
mark on the lamp switch.
Release it to stop.
NOTE:
• When the lamp switch is in the locked position
,
lamp switch cannot be actuated.
CAUTION:
• Always slide the lamp switch to the locked position
before storing the tool.
NOTE:
• Use a dry cloth to wipe the dirt off the lens of lamp. Be
careful not to scratch the lens of lamp, or it may lower
the illumination.
ASSEMBLY
CAUTION:
• Always be sure that the lock button is in the locked
position
mark and the battery cartridge is removed
before carrying out any work on the tool.
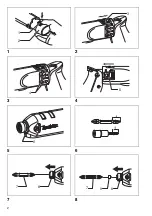
Installing or removing driver bit or socket bit
Use only the driver bit or socket bit shown in the figure.
(Fig. 6)
Do not use any other driver bit or socket bit.
For European and North & South American coun-
tries, Australia and New Zealand
For other countries
1.
To install the bit, pull the sleeve in the direction of the
arrow and insert the bit into the sleeve as far as it will
go. Then release the sleeve to secure the bit.
(Fig. 7)
2.
To install the bit, pull the sleeve in the direction of the
arrow and insert the bit-piece and bit into the sleeve
as far as it will go. The bit-piece should be inserted
into the sleeve with its pointed end facing in. Then
release the sleeve to secure the bit.
(Fig. 8)
To remove the bit, pull the sleeve in the direction of the
arrow and pull the bit out firmly.
NOTE:
• If the bit is not inserted deep enough into the sleeve,
the sleeve will not return to its original position and the
bit will not be secured. In this case, try re-inserting the
bit according to the instructions above.
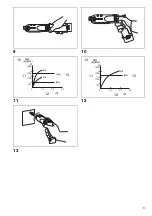
OPERATION
The tool can be used in two ways; a straight type and a
pistol type which is selectable according to the conditions
of workplace and screwdriving.
(Fig. 9 & 10)
CAUTION:
• When bending the tool to use in the pistol type or
straightening to use in the straight type, do not hold the
bendable part of the tool. Failure to do so may cause
your hand and fingers to be pinched and injured by this
part.
Hold the tool firmly and place the point of the driver bit in
the screw head. Apply forward pressure to the tool to the
extent that the bit will not slip off the screw and turn the
tool on to start operation.
The proper fastening torque may differ depending upon
the kind or size of the screw/bolt, the material of the
workpiece to be fastened, etc. The relation between fas-
tening torque and fastening time is shown in the figures.
(Fig. 11 & 12)
A = 12 mm
B = 9 mm
Use only these types of bits. Follow the
procedure (1).
(Note) Bit-piece is not necessary.
A = 17 mm
B = 14 mm
To install these types of bits, follow the
procedure (1).
(Note) Makita bits are these types.
A = 12 mm
B = 9 mm
To install these types of bits, follow the
procedure (2).
(Note) Bit-piece is necessary for install-
ing the bit.
Содержание TD020D
Страница 2: ...2 1 2 3 4 5 6 7 8 5 7 8 6 4 3 1 2 7 9 8 ...