background image

84 

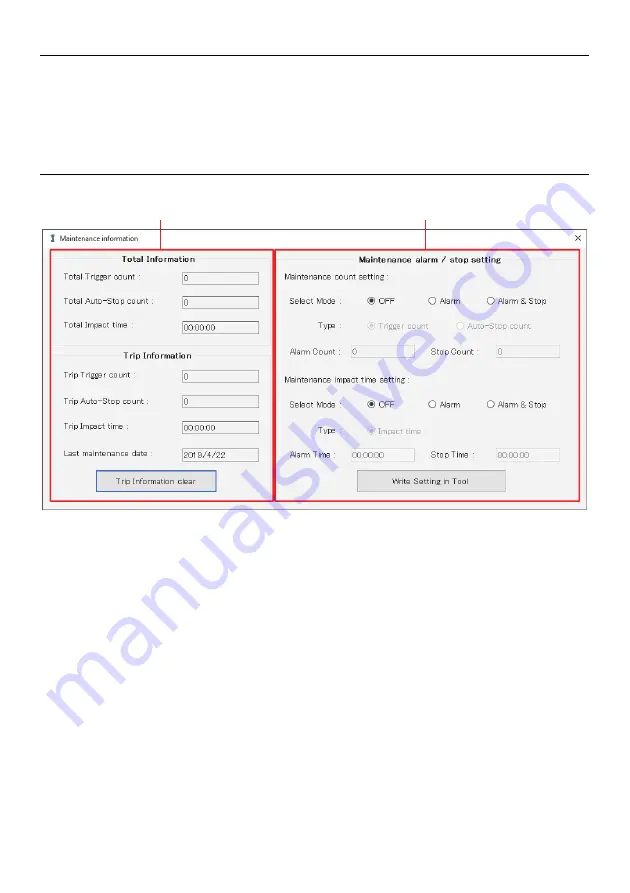
Wichtig!    Klicken Sie auf „Write Setting in Tool“ (Vorgabe im Werkzeug speichern), um die Einstellungen auf 

das Produkt zu übertragen. Wenn Sie nur auf „Trip Information clear“ (Anzeige löschen) klicken, 
werden die Einstellungen nicht auf das Produkt übertragen. 

Wichtig!    Die Einstellungen unter „Maintenance alarm / stop setting“ (Wartungsalarm / Stoppeinstellung) 

können nicht eingegeben werden, bevor Sie auf „Trip Information clear“ (Anzeige löschen) klicken 
und „Trip Trigger count“ (Schalterbetätigung), „Trip Auto-Stop count“ (Anto-Stop Anzahl) und „Trip 
Impact time“ (Schlagzeit) zurücksetzen. 


Содержание TD Series

Страница 1: ...Makita Industry Tool Settings for TD TW series JP ユーザーマニュアル 2 EN User s Manual 23 F Mode d emploi 44 D Gebrauchsanleitung 65 I Manuale d uso 86 NL Gebruikershandleiding 107 E Manual de Usuario 128 ...

Страница 2: ...操作手順 5 3 1 マキタ製品の接続 5 3 2 アプリの立ち上げ 6 3 3 画面の概要 8 3 4 表示言語の変更 8 3 5 製品への設定書き込み時のパスワード設定 9 3 6 Product Information 製品情報 への記録 NOTE1 NOTE2 10 3 7 製品への設定情報の書き込み 設定変更 共通設定 正逆転切り替えレバーの設定 11 3 8 製品からの製品設定情報の読み出し 15 3 9 設定情報の PC への保存 16 3 10 PC に保存した設定情報の読み出し 18 3 11 製品の設定情報の初期化 19 3 12 メンテナンス情報の設定 20 3 13 マキタ製品の取り外し 22 ...

Страница 3: ...2 注意事項 アプリケーションソフト 以下 アプリと記載 を使用する前に 以下の内容をお読みください 本アプリは マキタ製品専用のアプリになります 本アプリの使用 利用に起因してユーザーに生じた損害 直接損害 特別損害 付随的な損害 懲役的な 損 害 罰金 データの損失 逸失利益を含む結果的な損害 又は代替品を調達する費用を含む について 一 切責任を負いません 本アプリの取扱説明書のイラストと お客様の端末に表示されるイラストが異なる場合がありますので ご了承ください 本アプリの取扱説明書の一部 または全部を無断で複写 複製 改変 引用 転載することはしないでく ださい 1 3 利用規約 Makita Industry Tool Settings フォルダ内の利用規約を参照してください USB ケーブル Makita Industry Tool Settings TD TW series...

Страница 4: ...4 2 インストール Makita Industry Tool Settings フォルダ内の Install Manual pdf を参照してください ...

Страница 5: ...とパソコンを接続して 設定及び設定変更を行います まず 製品にバッテリを挿入してください USB 端子の位置は 製品の取扱説明書を参照してください 注意 バッテリは満充電に近いバッテリを使用してください 続いてパソコン アプリは起動していない状態 とマキタ製品を付属の USB ケーブルで接続してください 接続すると 本機 LED 表示ランプ が黄色点滅しますので 次の手順に進んでください 注意 パソコンにアプリをインストールした後で製品と接続してください 本機 USB 端子カバー バッテリ LED 表示ランプ USB ケーブル ...

Страница 6: ...s 用のアプリの選択画面が表示されます TD TW series 用のアイコンをクリックすると下記の画面が立ち上がり 自動で製品の通信がはじまります アプリと製品の接続が完了すると 製品本体の LED 表示ランプ が黄色点滅から緑色点滅に変わります 緑色点滅しているときは 製品と通信可能であることを示します 注意 黄色で点滅しているときは通信ができていない状態ですので 再度 3 1 または Makita Industry Tool Settings フォルダ内の Install Manual pdf の補足を参照してドライバの再インストールを行っ てください それでも通信できない場合は 最寄りのマキタ営業所にご連絡ください ...

Страница 7: ...7 通信完了後 製品に記録されている Product Information 製品情報 が自動で表示されます 注意 PC USB 接続中は 製品はスイッチの引金を操作しても起動しません 注意 アプリと製品の接続が正常に完了した製品本体の LED 表示ランプ の緑色点滅表示は PC USB 接続中は 常に緑色点滅します ...

Страница 8: ...3 3 画面の概要 下図の画面を操作することで 製品の設定変更等が可能となります 3 4 表示言語の変更 画面の文字を以下の言語に変更できます 日本語 英語 フランス語 ドイツ語 イタリア語 オランダ語 スペイン語 ポルトガル語 中国語 タイ語 インドネシア語 製品の設定情報 操作ボタン USB 接続している製品情報 正逆切り替えレバーの設定情報 言語の切替 パスワード設定 バージョン情報 正転時 逆転時 ...

Страница 9: ...と 製品に設定を転送する前にパスワードの入力を要求します また Change Password パスワード変更 をクリックすると パスワードを変更することができます 旧いパスワードと新しいパスワードを入力し OK ボタンをクリックしてください 重要 パスワードの要求はアプリ起動して最初の製品への書き込み時のみ行われます パスワードの入力 をせずに x ボタンをクリックした場合は製品に設定情報は転送されません 重要 パスワードの ON OFF の切り替えには パスワードの入力が必要です 注意 アプリをインストールした初回パスワードは 0000 が設定されています パスワードが分からなくな った場合 添付の Install Manual pdf を参照して一旦アプリをアンインストールし 再度インストー ルしてください ...

Страница 10: ...10 3 6 Product Information 製品情報 への記録 NOTE1 NOTE2 Product Information 製品情報 に ユーザーお好みの任意の文字列を記録できます 所定の欄に文字列を入力し Write NOTE NOTE 書込み ボタンをクリックすることで 製品に記録がで きます 入力する文字列は 半角英数字記号 32 文字までです ...

Страница 11: ...く動かなくなる恐れがあります そのような状態になった場合は 工具を USB ケーブルで接続し 再度設定の書き込みを完了し てください 設定項目 Common Settings 共通設定 1 Initialize 初期化 Common Settings 共通設定 の設定を工場出荷時の状態に初期化したい場合は Initialize 初期化 ボ タンをクリックしてください このとき 製品の設定は変更されていません 2 Lighting 照明ライト 製品の LED 照明の設定が可能です Bright 点灯 明 または Dim 点灯 暗 を選択した場合はトリガ操作に連動して残照機能が動作します Bright 点灯 明 Dim 点灯 暗 OFF 消灯 3 Buzzer ブザー音 ブザー音の ON OFF 設定が可能です ON ON OFF OFF 4 Trigger Variable Speed トリ...

Страница 12: ...Indication Timing OK 表示タイミング OK の表示タイミングを Main Phase Finish メインフェーズ完了時 または All Phase Finish 全フェーズ 完了時 に設定できます Main Phase Finish メインフェーズ完了時 All Phase Finish 全フェーズ完了時 8 Speed drop detect 打撃力低下検出 打撃力の低下検出時の警告 動作禁止の設定が可能です ON Auto Stop ON オートストップ ON Warning Alarm ON 警告のみ OFF OFF 9 Field setting mode 現場設定モード 現場設定モード の ON OFF の設定が可能です 本アプリに接続せず 工具のみで打撃オートストップモードの Torque level トルクレベル設定 Rundown level 着座レベ...

Страница 13: ...ee mode フリーモード トリガスイッチを離すまで作業を継続するモード CW CCW Tightening Auto Stop mode 打撃オートストップモード 着座判定後 締付トルク設定に応じたタイミングで自動停止するモード CW CCW Loosening Auto Stop mode 緩み検出オートストップモード 打撃をしなくなった後 設定した回転数 回転角度 時間 で動作し 自動停止するモード 3 2 Free Tightening Auto Stop mode フリー 打撃オートストップモード 3 2 1 Torque level トルクレベル設定 締付トルクの設定が可能です 打撃オートストップモードのみ 3 2 2 Detect mask time 着座判定無効時間 Main Control Phase メインフェーズ 開始から着座判定しない時間の設定が可能です 3 2 ...

Страница 14: ...14 1 2 3 3 1 3 2 3 2 2 3 2 3 3 2 4 3 2 1 3 3 4 5 ...

Страница 15: ...ンをクリックしてください クリックすると 製品に設定されている情報が表示されます 重要 Access to Tool 工具にアクセス の Read 読出し をクリックしたときは 読み出し完了の メッセージが表示されるまで USB ケーブルを取り外さないでください 設定情報が読み出され ないだけでなく 工具が正しく動かなくなる恐れがあります そのような状態になった場合は 工具を USB ケーブルで接続し 再度設定情報の読み出しを完 了してください 重要 製品の設定を読み出すには Access to Tool 工具にアクセス の Read 読出し をクリックしてください ...

Страница 16: ...クすると ファイル保存のウィンドウが開きま すので お好みのファイル名を入力し OK OK ボタンをクリックして保存してください 保存先を設 定するウィンドウが開きますので パスを確認して保存してください Set Date time 時間情報入力 のチェックを入れると 入力したファイル名の後ろに現在の日付と時刻 が追加されます また Save 画面上に表示されている設定情報は 選択した状態で Delete 削除 をクリックすると削除 することができます 製品設定情報のパソコン保存は Access in PC PC にアクセス の Save 保存 をクリックしてください ...

Страница 17: ...17 ...

Страница 18: ...定情報の読み出しが可能です Access in PC PC にアクセス の Load 読出し をクリックすると 保存してある設定ファイルの一覧が 表示されます その中から必要なファイルを選択することで 設定情報の読み出しが可能です また Save 画面上に表示されている設定情報は 選択した状態で Delete 削除 をクリックすると削除す ることができます 製品設定情報のパソコン保存は Access in PC PC にアクセス の Load 読出し をクリックしてください ...

Страница 19: ...19 3 11 製品の設定情報の初期化 Factory initialize setting 工場出荷状態に戻す の Reset 初期化 をクリックすると 製品の設定情報を工 場出荷時の設定に初期化します この時 製品の設定は変更されていません 工場出荷時の情報に初期化するには Factory initialize setting 工場出 荷状態に戻す の Reset 初期化 をクリックしてください ...

Страница 20: ... 積算情報クリア ボタンをクリックするとリセットされます Last maintenance date 最終メンテナンスクリア日時 は 最後に Maintenance alarm stop setting メンテナ ンス警告 駆動禁止設定 後述 を実施した日時が表示されます 2 Maintenance alarm stop setting メンテナンス警告 駆動禁止設定 製品でメンテナンス表示 動作禁止をするタイミングを設定します 警告表示のみをする場合は Select Mode モード選択 から Alarm 警告のみ を選択し 警告表示及び動作を 禁止する場合は Select Mode モード選択 から Alarm Stop 警告 駆動禁止 を選択します OFF を選択 すると 警告表示も動作禁止も無効になります Type 対象 から Trigger count トリガ回数 また は Au...

Страница 21: ...さ い Trip Information clear 積算情報クリア をクリックしただけでは 設定は製品に転送されませ ん 重要 Maintenance alarm stop setting メンテナンス警告 駆動禁止時間設定 の設定は Trip Information clear 積算情報クリア をクリックして Trip Trigger count 積算トリガ回数 Trip Auto Stop count 積算 オートストップ回数 Trip Impact time 積算打撃時間 をリセットしなければ入力できません 1 2 ...

Страница 22: ...22 3 13 マキタ製品の取り外し 設定変更を終了するには 製品の USB ケーブルを外してください ...

Страница 23: ...sword setting when writing the product settings 30 3 6 Recording in Product Information NOTE1 NOTE2 31 3 7 Writing Product Setting Information to the Product Setting Change Common Settings Enable F R lever Setting 32 3 8 Reading the Product Setting Information from the Product 36 3 9 Saving the Product Setting Information to the PC 37 3 10 Loading the Product Setting Information from the PC 39 3 1...

Страница 24: ... is only for use with Makita products Makita Corporation is not responsible for damage to the user including direct damage special damage consequential damage punitive damage penalties loss of data loss of profit and resulting damage or fees for procuring a replacement device resulting from the use of this application The screenshots in this manual may differ from the content displayed on your dev...

Страница 25: ...25 2 Installing the application Please review Install Manual pdf stored in the Makita Industry Tool Settings folder ...

Страница 26: ...ct Refer to the User s Manual for the location of the USB terminal Note Make sure the battery is fully charged or close to fully charged Next use the supplied USB cable to connect the Makita product to the PC when the application is not running When the product is connected the LED indicator will flash yellow and you can proceed to the next step Note Please connect the product after installing the...

Страница 27: ...tomatically Once a connection to the application is established the flashing LED indicator changes from yellow to green indicating that communication with the application is underway Note While the LED indicator is flashing yellow no communication is possible Return to step 3 1 or perform the re install of the driver according to the procedure in the Supplement section of the Install manual pdf in...

Страница 28: ...Product Information field Note While there is a USB connection the product will not start even if the switch is operated Note The green flashing LED which indicate the correct connection between the application and the product continues while the product is connected to the PC via USB cable ...

Страница 29: ...You can change the interface text to the following languages JAPANESE ENGLISH FRENCH GERMAN ITALIAN DUTCH SPANISH PORTUGUESE CHINESE THAI INDONESIAN Information on the USB connected product Switching language Password setting Version information Forward rotation Reverse rotation Product settings Action buttons Settings information of the F R lever ...

Страница 30: ...rd Enter the old password and the new password and click the OK button Important The password is required only when the application is launched and the first product settings are written If you click the Close button in the upper right corner of the window without entering a password the configuration information will not be transferred to the product Important You need to enter the password to ch...

Страница 31: ...any string you like in Product Information Enter the character strings in the corresponding fields and click Write NOTE to record the settings information in the product The entered character strings can contain up to 32 alphanumeric characters and symbols single byte ...

Страница 32: ...ot only the settings will not be reflected but also the tool may not work properly If this happens connect the tool with a USB cable and complete writing the settings again Setting item Common Settings 1 Initialize To initialize the settings of Common Settings to the factory default condition click Initialize The product settings are not changed at this time 2 Lighting The product LED indicator li...

Страница 33: ...complete fastening warning Fwd Rev Fwd Rev 7 OK Indication Timing The OK display timing can be set to Main Phase Finish or All Phase Finish Main Phase Finish All Phase Finish 8 Speed drop detect A Speed drop detect warning and operation prohibition can be set ON Auto Stop ON Warning Alarm OFF 9 Field setting mode Field setting mode can be set to ON or OFF Without connecting to this application you...

Страница 34: ...leased CW CCW Tightening Auto Stop mode This mode automatically stops according to the tightening torque setting after detecting Rundown CW CCW Loosening Auto Stop mode This mode operates at the set rotation speed and rotation angle time and then stops automatically after not impacting 3 2 Free Tightening Auto Stop mode 3 2 1 Torque level Set the tightening torque settings Tightening Auto Stop mod...

Страница 35: ...35 1 2 3 3 1 3 2 3 2 2 3 2 3 3 2 4 3 2 1 3 3 4 5 ...

Страница 36: ...t When you click the Read button under Access to Tool do not remove the USB cable until a read complete message is displayed There is not only a risk that the setting information will not be read out but also that the tool may not work properly If this happens connect the tool with a USB cable and complete reading out the configuration information again Important You must click the Read button und...

Страница 37: ...ck OK to save the settings A window for setting the save destination will open please check and save the path When you check Set Date Time the current Date and Time will be added after the file name you entered In addition the configuration information displayed on the Save screen can be deleted by clicking Delete while it is selected Click the Save button under Access in PC to save the Product Se...

Страница 38: ...38 ...

Страница 39: ...ess in PC to display a list of saved setting files The setting information can be retrieved by selecting the required file from the list In addition the configuration information displayed on the Save screen can be deleted by clicking Delete while it is selected Click the Load button under Access in PC to save the Product Setting Information on the PC ...

Страница 40: ...utton under Factory initialize setting to initialize the Product Setting Information to the factory initialize setting The product settings are not changed at this time To initialize to the factory initialize setting click the Reset button under Factory initialize setting ...

Страница 41: ...tenance alarm stop setting Set the timing for displaying the maintenance alarm operation prohibition for the product Select Alarm from Select Mode to display the alarm only and select Alarm Stop from Select Mode to display the alarm and operation prohibition If OFF is selected both the alarm display and the operation prohibition will be disabled Select Trigger count or Auto Stop count from Type an...

Страница 42: ...42 1 2 ...

Страница 43: ...43 3 13 Disconnecting the Makita Product When you have done changing settings terminate the session by disconnecting the USB cable from the product ...

Страница 44: ...ure des réglages du produit 51 3 6 Enregistrement dans Product Information Information produit NOTE 1 NOTE 2 52 3 7 Écriture sur le produit d informations concernant ses réglages Modification des paramètres Paramètres communs Activer le réglage du levier F R 53 3 8 Lecture des informations de réglage du produit depuis le produit 57 3 9 Sauvegarde des informations de réglage du produit sur l ordina...

Страница 45: ...kita Corporation n est aucunement responsable des dommages subis par l utilisateur y compris les dommages directs spéciaux consécutifs punitifs les amendes les pertes de données ou de bénéfices et les dommages causés ou les coûts d obtention d un appareil de remplacement résultant de l utilisation de cette application Les captures d écran dans ce mode d emploi peuvent être différentes du contenu a...

Страница 46: ...46 2 Installation de l application Veuillez consulter le fichier Install Manual pdf que vous trouverez dans le dossier Makita Industry Tool Settings ...

Страница 47: ...Consultez le manuel d utilisation pour connaître l emplacement de la prise USB Remarque Assurez vous que la batterie est complètement chargée ou presque Ensuite utilisez le câble USB fourni pour connecter le produit Makita à l ordinateur sans exécuter l application Lorsque le produit est connecté le témoin LED clignote en jaune et vous pouvez passer à l étape suivante Remarque Veuillez relier le p...

Страница 48: ...produit débute automatiquement Une fois que la connexion avec l application est établie le témoin LED clignotant passe du jaune au vert indiquant que la communication avec l application est en cours Remarque Tant que le témoin LED clignote en jaune la communication est impossible Revenez à l étape 3 1 ou réinstallez le pilote selon la procédure de la section Supplement Supplément du fichier Instal...

Страница 49: ...formation Information produit Remarque En cas de connexion USB le produit ne démarrera pas même si vous actionnez le commutateur Remarque Le témoin LED clignotant en vert indiquant une connexion correcte entre l application et le produit continue à clignoter ainsi lorsque le produit est relié à l ordinateur via le câble USB ...

Страница 50: ...de l interface dans les langues suivantes JAPONAIS ANGLAIS FRANÇAIS ALLEMAND ITALIEN NÉERLANDAIS ESPANOL PORTUGAIS CHINOIS THAÏLANDAIS INDONÉSIEN Informations sur le produit connecté par USB Paramètres du produit Modification de la langue du réglage du mot de passe et des informations de version Boutons d action Informations des paramètres du levier F R Rotation avant Rotation arrière ...

Страница 51: ... Password Modifier mot de passe Saisissez l ancien mot de passe le nouveau et cliquez sur le bouton OK OK Important Le mot de passe n est nécessaire que lors du lancement de l application et de l écriture des premiers réglages du produit Si vous cliquez sur le bouton Fermer dans le coin supérieur droit de la fenêtre sans saisir le mot de passe les informations de configuration ne sont pas transfér...

Страница 52: ...dans Product Information Information produit Saisissez les chaînes de caractères dans les champs correspondants et cliquez sur Write NOTE Ecrire une note pour enregistrer les informations de réglage dans le produit Les chaînes de caractères saisies peuvent contenir jusqu à 32 caractères et symboles alphanumériques d un seul octet ...

Страница 53: ...nctionner correctement Dans ce cas connectez l outil à l aide d un câble USB et terminez à nouveau l écriture des réglages Élément de réglage Common Settings Paramètres communs 1 Initialize Initialiser Pour initialiser les réglages de Common Settings Paramètres communs à leur condition par défaut cliquez sur Initialize Initialiser Les réglages du produit ne sont pas modifiés à ce stade 2 Lighting ...

Страница 54: ... Phase principale finie ou All Phase Finish Phases terminées Main Phase Finish Phase principale finie All Phase Finish Phases terminées 8 Speed drop detect Chute de vitesse détectée Vous pouvez régler un avertissement Speed drop detect Chute de vitesse détectée ainsi qu une interdiction de fonctionnement ON Auto Stop ON auto Stop ON Warning Alarm ON Alarme d alerte OFF OFF 9 Field setting mode Cha...

Страница 55: ...es du Mode CW CCW Free mode Horaire Anti horaire mode libre Ce mode fonctionne jusqu à ce que vous relâchiez la gâchette CW CCW Tightening Auto Stop mode Horaire Anti horaire mode arrêt auto serrage Après une détection de décélération ce mode s arrête automatiquement conformément au réglage du couple de serrage CW CCW Loosening Auto Stop mode Horaire Anti horaire arrêt auto desserrage Ce mode fonc...

Страница 56: ...mps de fonctionnement pour votre travail Vous pouvez configurer les temps de fonctionnement minimal et maximal en sélectionnant la case à cocher Si vous terminez votre travail plus rapidement que le temps de fonctionnement défini ou si vous ne le terminez pas pendant le temps imparti un avertissement de travail incomplet est émis 1 2 3 3 1 3 2 3 2 2 3 2 3 3 2 4 3 2 1 3 3 4 5 ...

Страница 57: ...s cliquez sur Read Lire dans Access to Tool Accès à l outil ne débranchez pas le câble USB tant que le message de lecture terminée ne s affiche pas Il existe non seulement un risque que les informations de réglage ne soient pas lues mais aussi que l outil ne fonctionne pas correctement Dans ce cas connectez l outil à l aide d un câble USB et terminez à nouveau la lecture des informations de config...

Страница 58: ...trer les paramètres Une fenêtre permettant de régler la destination d enregistrement s ouvre Vérifiez et enregistrez le chemin Lorsque vous cochez Set Date Time Def Date Temps la date et l heure actuelles sont ajoutées au nom de fichier saisi En outre vous pouvez supprimer les informations de configuration affichées sur l écran Save en cliquant sur Delete Effacer lorsqu elles sont sélectionnées Cl...

Страница 59: ...59 ...

Страница 60: ...fficher une liste des fichiers de réglage enregistrés Vous pouvez récupérer les informations de réglage en sélectionnant le fichier requis dans la liste En outre vous pouvez supprimer les informations de configuration affichées sur l écran Save en cliquant sur Delete Effacer lorsqu elles sont sélectionnées Cliquez sur le bouton Load Charger dans Access in PC Accès PC pour enregistrer les informati...

Страница 61: ...itialize setting Paramètres d usine Réglages pour initialiser les informations de réglage du produit aux paramètres d usine Les réglages du produit ne sont pas modifiés à ce stade Pour initialiser aux paramètres d usine cliquez sur le bouton Reset Réinitialiser dans Factory initialize setting Paramètres d usine Réglages ...

Страница 62: ... gâchette Trip Auto Stop count Cumul auto stop et Trip Impact time Cumul temps de frappe Last maintenance date Dernière date de maintenance indique la date et l heure auxquelles le réglage Maintenance alarm stop setting Maintenace alarme réglage arrêt le plus récent voir ci dessous a été exécuté 2 Maintenance alarm stop setting Maintenace alarme réglage arrêt Réglez le moment où l alarme de mainte...

Страница 63: ...réglages vers le produit Si vous cliquez uniquement sur Trip Information clear Effacer les infos de cumul les réglages ne seront pas transférés sur le produit Important Afin de pouvoir indiquer les réglages Maintenance alarm stop setting Maintenace alarme réglage arrêt vous devez cliquer sur Trip Information clear Effacer les infos de cumul et réinitialiser Trip Trigger count Nombre période d acti...

Страница 64: ...64 3 13 Déconnexion du produit Makita Lorsque vous avez fini de modifier les réglages terminez la session en débranchant le câble USB du produit ...

Страница 65: ...g bei der Festlegung der Produkteinstellungen 72 3 6 Aufnahme unter Product Information Produktinformation Anmerkung 1 Anmerkung 2 73 3 7 Übertragen der Produkteinstellungs Informationen zum Produkt Änderung der Einstellungen Einstellungen R L Umschaltung EIN 74 3 8 Lesen der Produkteinstellungs Informationen des Produkts 78 3 9 Speichern der Produkteinstellungs Informationen im PC 79 3 10 Laden d...

Страница 66: ...ie Makita Corporation ist nicht verantwortlich für Schäden einschließlich direkter Schäden spezieller Schäden Folgeschäden Strafgelder Konventionalstrafen Verlust von Daten Verlust von Gewinn und resultierende Schäden oder Gebühren zum Erwerb eines Ersatzgeräts die dem Benutzer durch den Gebrauch dieser Applikationssoftware entstehen Die Screenshots in dieser Anleitung können von dem auf Ihrem Ger...

Страница 67: ...67 2 Installieren der Applikationssoftware Bitte überprüfen Sie die im Ordner Makita Industry Tool Settings gespeicherte Datei Install Manual pdf ...

Страница 68: ... zur Position des USB Anschlusses finden Sie in der Bedienungsanleitung Anmerkung Vergewissern Sie sich dass der Akku voll oder nahezu voll aufgeladen ist Schließen Sie als Nächstes das Makita Produkt mit dem mitgelieferten USB Kabel an den PC an wenn die Applikationssoftware nicht läuft Wenn das Produkt angeschlossen wird blinkt die LED in Gelb und Sie können mit dem nächsten Schritt fortfahren A...

Страница 69: ...dung zur Applikationssoftware hergestellt worden ist wechselt die Farbe der blinkenden LED Anzeige von Gelb zu Grün um anzuzeigen dass die Kommunikation mit derApplikationssoftware im Gange ist Anmerkung Während die LED Anzeige in Gelb blinkt ist keine Kommunikation möglich Kehren Sie zu Schritt 3 1 zurück oder führen Sie eine Neuinstallation des Treibers nach dem Verfahren im Abschnitt Ergänzung ...

Страница 70: ...Produktinformation angezeigt Anmerkung Solange eine USB Verbindung besteht läuft das Produkt nicht an selbst wenn der Schalter betätigt wird Anmerkung Die grün blinkende LED Anzeige die die erfolgreiche Verbindung mit der Applikationssoftware anzeigt blinkt weiter solange das Produkt über das USB Kabel mit dem PC verbunden ist ...

Страница 71: ...rfläche in die folgenden Sprachen ändern JAPANISCH ENGLISCH FRANZÖSISCH DEUTSCH ITALIENISCH NIEDERLÄNDISCH SPANISCH PORTUGIESISCH CHINESISCH THAILÄNDISCH INDONESISCH Informationen über das über USB verbundene Produkt Produkteinstellungen Ändern der Sprache Passworteinstellung Versionsinformationen Aktionstasten Einstellungsinformationen des F R Hebels Vorwärtsdrehung Rückwärtsdrehung ...

Страница 72: ...ndern klicken Geben Sie das alte und das neue Passwort ein und klicken Sie auf die Schaltfläche OK OK Wichtig Das Passwort ist nur erforderlich wenn die Applikationssoftware gestartet wird und die ersten Produkteinstellungen festgelegt werden Wenn Sie in der oberen rechten Ecke des Fensters auf die Schließen Schaltfläche klicken ohne ein Passwort einzugeben werden die Konfigurationsinformationen n...

Страница 73: ...nter Product Information Produktinformation aufnehmen Geben Sie die Zeichenfolgen in die entsprechenden Felder ein und klicken Sie auf Write NOTE Anmerkung schreiben um die Einstellungsinformationen auf dem Produkt aufzunehmen Die eingegebenen Zeichenfolgen können bis zu 32 alphanumerische Zeichen und Symbole Ein Byte enthalten ...

Страница 74: ...t möglicherweise nicht ordnungsgemäß Wenn dies passiert schließen Sie das Werkzeug mit einem USB Kabel an und führen Sie mit der Übertragung der Einstellung fort Einstellungsposten Common Settings Einstellungen 1 Initialize Initialisieren Um die Common Settings Einstellungen auf Werkseinstellung zurückzusetzen klicken Sie auf Initialize Initialisieren Zu diesem Zeitpunkt werden die Produkteinstell...

Страница 75: ...itmessung kann auf Main Phase Finish Hauptprüfung Ende oder All Phase Finish Alle Tests Ende eingestellt werden Main Phase Finish Hauptprüfung Ende All Phase Finish Alle Tests Ende 8 Speed drop detect Geschwindigkeitsabfall Eine Speed drop detect Geschwindigkeitsabfall Warnung und die Bediensperre können eingestellt werden ON Auto Stop EIN Auto Stop ON Warning Alarm EIN Alarmton OFF Aus 9 Field se...

Страница 76: ...keiner Festlegung wird das Produkt über Main Control phase Hauptprüfung betrieben 3 Main Control Phase Hauptprüfung 3 1 Mode Modus Legen Sie die Moduseinstellungen fest CW CCW Free mode CW CCW Freier Modus Dieser Modus führt den Vorgang aus bis der Schalter gelöst wird CW CCW Tightening Auto Stop mode CW CCW Anziehen Auto Stop Modus Dieser Modus stoppt entsprechend der Einstellung des Befestigungs...

Страница 77: ...ird der Vorgang über Main Control phase Hauptprüfung abgeschlossen 5 All phase Alle Prüfungen Sie können einen gültigen Zeitrahmen für Ihre Arbeiten einstellen Die minimalen und maximalen Arbeitszeiten können über das Kontrollkästchen eingestellt werden Wenn Ihre Arbeit vor Ablauf des eingestellten Zeitrahmens oder nicht innerhalb des Zeitrahmens abgeschlossen wird wird eine Unvollständigkeitsmeld...

Страница 78: ... unter Access to Tool Zugriff auf das Werkzeug klicken entfernen Sie das USB Kabel nicht bis eine Lesen abgeschlossen Meldung angezeigt wird Es besteht das Risiko dass die Einstellungsinformationen nicht ausgelesen werden und das Werkzeug funktioniert möglicherweise nicht ordnungsgemäß Wenn dies passiert schließen Sie das Werkzeug mit einem USB Kabel an und führen Sie das Auslesen der Konfiguratio...

Страница 79: ...ern Ein Fenster zur Einstellung des Speicherorts wird geöffnet bitte überprüfen und speichern Sie den Pfad Wenn Sie Set Date Time Datum Uhrzeit einstellen auswählen werden das aktuelle Datum und die Zeit hinter dem eingegebenen Dateinamen hinzugefügt Die auf dem Speicher Bildschirm angezeigten Konfigurationsinformationen können zudem gelöscht werden wenn sie ausgewählt sind und auf Delete Löschen ...

Страница 80: ...80 ...

Страница 81: ...n Einstellungsdateien anzuzeigen Die Einstellungsinformationen können abgerufen werden indem die erforderliche Datei in der Liste ausgewählt wird Die auf dem Speicher Bildschirm angezeigten Konfigurationsinformationen können zudem gelöscht werden wenn sie ausgewählt sind und auf Delete Löschen geklickt wird Klicken Sie auf die Schaltfläche Load Laden unter Access in PC Zugriff über PC um die Produ...

Страница 82: ...seinstellung Einstellung um die Produkteinstellungs Informationen auf die Werkseinstellung zurückzusetzen Zu diesem Zeitpunkt werden die Produkteinstellungen noch nicht geändert Um die Einstellungen auf die Werkseinstellung zurückzusetzen klicken Sie auf die Schaltfläche Reset Zurücksetzen unter Factory initialize setting Werkseinstellung Einstellung ...

Страница 83: ...d die Uhrzeit der letzten Ausführung von Maintenance alarm stop setting Wartungsalarm Stoppeinstellung siehe unten angezeigt 2 Maintenance alarm stop setting Wartungsalarm Stoppeinstellung Damit wird der Zeitpunkt für die Anzeige des Wartungsalarms der Bediensperre für das Produkt festgelegt Wählen Sie Alarm Alarm unter Select Mode Modus auswählen um nur den Alarm anzuzeigen und wählen Sie Alarm S...

Страница 84: ...hen klicken werden die Einstellungen nicht auf das Produkt übertragen Wichtig Die Einstellungen unter Maintenance alarm stop setting Wartungsalarm Stoppeinstellung können nicht eingegeben werden bevor Sie auf Trip Information clear Anzeige löschen klicken und Trip Trigger count Schalterbetätigung Trip Auto Stop count Anto Stop Anzahl und Trip Impact time Schlagzeit zurücksetzen 1 2 ...

Страница 85: ...85 3 13 Trennen des Makita Produkts Wenn Sie mit der Änderung der Einstellungen fertig sind beenden Sie die Sitzung indem Sie das USB Kabel vom Produkt abziehen ...

Страница 86: ... prodotto 93 3 6 Registrazione in Product Information Informazioni Utensile Nota1 Nota2 94 3 7 Scrittura sul prodotto delle informazioni sulle impostazioni del prodotto Modifica delle impostazioni Configurazione generale Abilita impostazione leva F R 95 3 8 Lettura dal prodotto delle informazioni sulle impostazioni del prodotto 99 3 9 Salvataggio sul PC delle informazioni sulle impostazioni del pr...

Страница 87: ...zzo con prodotti Makita Makita Corporation non si assume alcuna responsabilità per danni all utente inclusi danni diretti danni speciali danni indiretti risarcimenti esemplari penali perdite di dati lucro cessante e danni correlati o costi di approvvigionamento di un dispositivo di sostituzione derivanti dall utilizzo della presente applicazione Le schermate nel presente manuale possono variare ri...

Страница 88: ...88 2 Installazione dell applicazione Leggere Install Manual pdf archiviato nella cartella Makita Industry Tool Settings ...

Страница 89: ... Manuale dell utente per informazioni sulla posizione del terminale USB Nota Accertarsi che la batteria sia completamente carica oppure prossima alla carica completa Quindi utilizzare il cavo USB in dotazione per collegare il prodotto Makita al PC quando l applicazione non è in esecuzione Quando il prodotto è connesso l indicatore LED lampeggia in giallo ed è possibile procedere alla fase successi...

Страница 90: ...a volta stabilita una connessione con l applicazione l indicatore LED lampeggiante passa da giallo a verde per indicare che è in corso la comunicazione con l applicazione Nota Mentre l indicatore LED lampeggia in giallo non è possibile alcuna comunicazione Tornare al punto 3 1 oppure eseguire la reinstallazione del driver attenendosi alla procedura indicata nella sezione Supplement Supplemento di ...

Страница 91: ...t Information Informazioni Utensile Nota Mentre è in corso un collegamento USB il prodotto non si avvia anche se si attiva l interruttore Nota Il LED lampeggiante in verde che indica il corretto collegamento tra l applicazione e il prodotto continua a lampeggiare mentre il prodotto è collegato al PC mediante cavo USB ...

Страница 92: ...postare il testo dell interfaccia nelle seguenti lingue Giapponese Inglese Francese Tedesco Italiano Olandese Spagnolo Portoghese Cinese Thailandese Indonesiano Informazioni sul prodotto collegato via USB Impostazioni del prodotto Modifica lingua Impostazione password Informazioni sulla versione Pulsanti delle operazioni Informazioni sulle impostazioni della leva F R Rotazione in avanti Rotazione ...

Страница 93: ... su Change Password Cambio password Immettere la password precedente e la nuova password e fare clic sul pulsante OK OK Importante La password viene richiesta solo all avvio dell applicazione e al momento della scrittura delle prime impostazioni del prodotto Se si fa clic sul pulsante di chiusura nell angolo superiore destro della finestra senza immettere una password le informazioni di configuraz...

Страница 94: ...siderata in Product Information Informazioni Utensile Immettere le stringhe di caratteri nei campi corrispondenti e fare clic su Write NOTE Scrivi Note per registrare le informazioni delle impostazioni nel prodotto Le stringhe di caratteri immessi possono contenere fino a 32 caratteri alfanumerici e simboli a singolo byte ...

Страница 95: ...ettamente Se ciò accade collegare l utensile con un cavo USB e completare la scrittura delle impostazioni nuovamente Voce di impostazione Common Settings Configurazione Generale 1 Initialize Inizializzazione Per inizializzare le impostazioni di Common Settings Configurazione Generale alla condizione predefinita di fabbrica fare clic su Initialize Inizializzazione Le impostazioni del prodotto non v...

Страница 96: ...n Phase Finish Fase principale terminata o su All Phase Finish Tutte le fasi terminate Main Phase Finish Fase principale terminata All Phase Finish Tutte le fasi terminate 8 Speed drop detect Rilevamento caduta di velocità È possibile impostare un avviso Speed drop detect Rilevamento caduta di velocità e un divieto di funzionamento ON Auto Stop ON Auto Stop ON Warning Alarm ON Avviso di allarme OF...

Страница 97: ...orario AO modalità libera Questa modalità continua a funzionare fino a quando non si rilascia l interruttore a grilletto CW CCW Tightening Auto Stop mode O orario AO serraggio arresto automatico Questa modalità si arresta automaticamente in base all impostazione della coppia di serraggio dopo aver rilevato l avvitatura CW CCW Loosening Auto Stop mode O orario AO allentamento arresto automatico Que...

Страница 98: ...voro È possibile impostare i tempi di lavoro minimi e massimi selezionando la casella di controllo Se il lavoro viene completato prima dell intervallo di tempo di lavoro impostato o se non viene completato a tempo si emetterà un avviso incompleto 1 2 3 3 1 3 2 3 2 2 3 2 3 3 2 4 3 2 1 3 3 4 5 ...

Страница 99: ...ulsante Read Lettura in Access to Tool Accesso all utensile non rimuovere il cavo USB fino a quando non si visualizza il messaggio del completamento della lettura Non solo c è il rischio che le informazioni sulle impostazioni non vengano lette ma anche che l utensile possa non funzionare correttamente Se ciò accade collegare l utensile con un cavo USB e completare nuovamente la lettura delle infor...

Страница 100: ...impostazioni Si aprirà una finestra per impostare la destinazione di salvataggio selezionare e salvare il percorso Se si seleziona Set Date Time Imposta data ora si aggiungono le data e l ora attuali dopo il nome file immesso Inoltre è possibile eliminare le informazioni di configurazione visualizzate sulla schermata di salvataggio facendo clic su Delete Elimina mentre si mantiene la selezione Far...

Страница 101: ...101 ...

Страница 102: ...elenco di file di impostazioni salvate È possibile recuperare informazioni sulle impostazioni selezionando il file richiesto dall elenco Inoltre è possibile eliminare le informazioni di configurazione visualizzate sulla schermata di salvataggio facendo clic su Delete Elimina mentre si mantiene la selezione Fare clic sul pulsante Load Carico in Access in PC Accesso al PC per salvare sul PC le infor...

Страница 103: ...azione per inizializzare le informazioni sulle impostazioni del prodotto all impostazione di inizializzazione di fabbrica Le impostazioni del prodotto non vengono modificate in questo momento Per eseguire l inizializzazione all impostazione di inizializzazione di fabbrica fare clic sul pulsante Reset Reimpostare in Factory initialize setting Inizializzazione fabbrica Impostazione ...

Страница 104: ...Data ultima manutenzione mostra la data e l ora in cui è stata effettuata la Maintenance alarm stop setting Impostazione manutenzione allarme arresto più recente vedere sotto 2 Maintenance alarm stop setting Impostazione manutenzione allarme arresto Consente di impostare la temporizzazione per la visualizzazione dell allarme di manutenzione divieto di funzionamento per il prodotto Selezionare Alar...

Страница 105: ...ostazioni non vengono trasferite al prodotto Importante Non è possibile immettere le impostazioni di Maintenance alarm stop setting Impostazione manutenzione allarme arresto a meno che non si faccia clic su Trip Information clear Cancella informazioni attività e si azzeri Trip Trigger count Conteggio parziale attivazioni pulsante Trip Auto Stop count Conteggio auto stop e Trip Impact time Tempo im...

Страница 106: ...106 3 13 Scollegamento del prodotto Makita Al termine delle modifiche alle impostazioni concludere la sessione scollegando il cavo USB dal prodotto ...

Страница 107: ...edschapsinstellingen 114 3 6 Opnemen in Product Information Product Informatie Notitie1 Notitie2 115 3 7 De informatie over de gereedschapsinstellingen opslaan Wijziging van instelling Algemene instellingen Instelling L R schakelaar 116 3 8 De informatie over de gereedschapsinstellingen lezen uit het gereedschap 120 3 9 De informatie over de gereedschapsinstellingen opslaan op de computer 121 3 10...

Страница 108: ...gebruik met Makita gereedschappen Makita Corporation is niet aansprakelijk voor schade van de gebruiker inclusief directe schade speciale schade gevolgschade schadevergoeding boetes verlies van gegevens winstderving en resulterende schade of kosten voor aanschaf van een vervangend apparaat voortvloeiend uit het gebruik van deze applicatie De schermafbeeldingen in deze handleiding kunnen verschille...

Страница 109: ...109 2 Het installeren van de applicatie Lees Install Manual pdf opgeslagen in de map Makita Industry Tool Settings ...

Страница 110: ...erst de accu aan op het gereedschap Raadpleeg de Gebruikershandleiding voor de locatie van de USB aansluiting Merk op Zorg ervoor dat de accu bijna geheel opgeladen is Gebruik vervolgens de bijgeleverde USB kabel om het Makita gereedschap aan te sluiten op de computer terwijl de applicatie niet geopend is Wanneer het gereedschap is aangesloten knippert het led lampje geel en kunt u verder gaan naa...

Страница 111: ...isch Nadat de verbinding met de applicatie tot stand is gekomen verandert de kleur van het knipperende led lampje van geel naar groen waarmee wordt aangegeven dat met de applicatie wordt gecommuniceerd Merk op Terwijl het led lampje geel knippert is geen communicatie mogelijk Ga terug naar stap 3 1 of installeer het stuurprogramma opnieuw volgens de procedure in het hoofdstuk Supplement van de Ins...

Страница 112: ...n Product Informatie Merk op Tijdens een USB verbinding kan het gereedschap niet worden ingeschakeld ook niet wanneer de schakelaar wordt bediend Merk op Het groen knipperende led dat de correcte verbinding tussen de applicatie en het gereedschap aanduidt blijft knipperen terwijl het gereedschap via een USB kabel op de pc is aangesloten ...

Страница 113: ...tekst van de interface wijzigen naar de volgende talen JAPANS ENGELS FRANS DUITS ITALIAANS NEDERLANDS SPAANS PORTUGEES CHINEES THAIS INDONESISCH Gereedschapsinstellingen Informatie over het via USB aangesloten gereedschap Voorwaarts rotatie Achterwaartse rotatie Taal wijzigen Wachtwoord instellen Versie informatie Actieknoppen Informatie over de instellingen van de V A hendel ...

Страница 114: ...e Password Wijzig wachtwoord Voer het oude en het nieuwe wachtwoord in en klik op de knop OK OK Belangrijk Het wachtwoord is alleen nodig wanneer de applicatie wordt gestart en de eerste gereedschapsinstellingen worden geschreven Als u op de knop Sluiten in de rechterbovenhoek van het venster klikt zonder een wachtwoord in te voeren dan wordt de informatie van de configuratie niet naar het gereeds...

Страница 115: ...ewenste string opnemen in Product Information Product Informatie Voer de tekenreeks in de betreffende velden in en klik op Write NOTE Notitie opslaan om de instellingen in het gereedschap op te nemen De ingevoerde tekenreeksen mogen maximaal 32 tekens en symbolen van elk één byte lang zijn ...

Страница 116: ...et goed Als dit gebeurt sluit het gereedschap met een USB kabel aan en voltooi opnieuw het opslaan van de instellingen Instelitem Common Settings Algemene instellingen 1 Initialize Initialiseren Klik op Initialize Initialiseren om de instellingen van Common Settings Algemene instellingen terug te zetten naar de fabrieksstandaardwaarden De gereedschapsinstellingen worden dan niet gewijzigd 2 Lighti...

Страница 117: ...g De OK indicatie timing kan worden ingesteld op Main Phase Finish Hoofd Fase Afwerking of All Phase Finish Alle Fase Afwerking Main Phase Finish Hoofd Fase Afwerking All Phase Finish Alle Fase Afwerking 8 Speed drop detect Detectie vermindering rpm Een Speed drop detect Detectie vermindering rpm waarschuwing en verbod op bediening kunnen worden ingesteld ON Auto Stop Aan auto stop ON Warning Alar...

Страница 118: ...ings Fase 3 1 Mode Modus Stel de modusinstellingen in CW CCW Free mode Rechtsom Linksom Vrije Modus Deze modus blijft werken tot de trekschakelaar wordt vrijgegeven CW CCW Tightening Auto Stop mode Rechtsom Linksom Verbinden Auto Stop Deze modus stopt automatisch volgens de instelling van het aanhaalmoment na detectie van de Rundown CW CCW Loosening Auto Stop mode Rechtsom Linksom Losdraaien Auto ...

Страница 119: ...male werktijden kunnen worden ingesteld door het keuzevakje aan te vinken Als uw werk vroeger is voltooid dan het ingestelde bereik van de werktijd of als uw werk niet binnen de tijd voltooid is dan wordt een waarschuwing over onvolledigheid weergegeven 1 2 3 3 1 3 2 3 2 2 3 2 3 3 2 4 3 2 1 3 3 4 5 ...

Страница 120: ...ijk Wanneer u op de knop Read Lezen onder Access to Tool Toegang tot Machine klikt verwijder de USB kabel dan pas zodra een bericht over lezen voltooid wordt weergegeven Er bestaat niet alleen het risico dat de ingestelde informatie niet wordt gelezen maar ook dat het gereedschap niet goed werkt Als dit gebeurt sluit het gereedschap met een USB kabel aan en voltooi opnieuw het lezen van de configu...

Страница 121: ...lingen op te slaan Er wordt een venster geopend voor het instellen van de bestemming voor het opslaan controleer en sla het pad op Wanneer u Set Date Time Datum Tijd controleert worden de huidige datum en tijd toegevoegd aan de bestandsnaam die u hebt ingevoerd Daarnaast kan de op het scherm Opslaan weergegeven configuratie informatie worden gewist door op Delete Verwijder te klikken wanneer ze is...

Страница 122: ...122 ...

Страница 123: ...jst van opgeslagen instellingsbestanden weer te geven Informatie over de instellingen kan worden opgehaald door het gewenste bestand te selecteren in de lijst Daarnaast kan de op het scherm Opslaan weergegeven configuratie informatie worden gewist door op Delete Verwijder te klikken wanneer ze is geselecteerd Klik op de knop Load Laden onder Access in PC Toegang tot PC om de informatie over de ger...

Страница 124: ... initialize setting Fabrieksinstelling om de informatie van de gereedschapsinstellingen terug te zetten naar de fabriekswaarden De gereedschapsinstellingen worden dan niet gewijzigd Om alles terug te zetten naar de fabriekswaarden klikt u op de knop Reset Reset onder Factory initialize setting Fabrieksinstelling ...

Страница 125: ...nterval te resetten Last maintenance date Datum laatste onderhoud toont de datum en tijd wanneer de recentste Maintenance alarm stop setting Onderhoud Alarm Stop instelling zie onder is uitgevoerd 2 Maintenance alarm stop setting Onderhoud Alarm Stop instelling Stel de tijd in voor het weergeven van het onderhoudsalarm werkingsverbod van het gereedschap Selecteer Alarm Alarm in Select Mode Selecte...

Страница 126: ...den de instellingen niet naar het gereedschap overgebracht Belangrijk De instellingen van Maintenance alarm stop setting Onderhoud Alarm Stop instelling kunnen niet worden ingevoerd tenzij u op Trip Information clear Reset Interval Informatie en Trip Trigger count Aantal inschakelingen per interval klikt en Trip Auto Stop count Aantal Auto Stop per interval en Trip Impact time Werktijd per interva...

Страница 127: ...127 3 13 Het gereedschap van Makita loskoppelen Wanneer u klaar bent met het wijzigen van de instellingen beëindigt u de sessie door de USB kabel los te koppelen van het gereedschap ...

Страница 128: ...to 135 3 6 Grabación en Product Information Información del producto NOTA1 NOTA2 136 3 7 Grabación de la información de los ajustes del producto en el producto cambio de configuración ajustes habituales activar la ajuste de selector F R 137 3 8 Lectura de la información de los ajustes del producto configurada en el producto 141 3 9 Guardar la información de los ajustes del producto en el PC 142 3 ...

Страница 129: ...ta Corporation no se hace responsable de los daños que pueda sufrir el usuario incluidos daños directos daños cuantificables daños resultantes daños punitivos sanciones pérdidas de datos pérdidas de beneficios y daños indirectos o pagos para adquirir un dispositivo de reemplazo que puedan derivarse del uso de esta aplicación Las capturas de pantalla que aparecen en este manual pueden variar del co...

Страница 130: ...130 2 Instalación de la aplicación Revise el manual Install Manual pdf guardado en la carpeta Makita Industry Tool Settings ...

Страница 131: ...manual de usuario para localizar el terminal USB Nota Asegúrese de que la batería está completamente cargada o casi completamente cargada A continuación utilice el cable USB suministrado para conectar el producto Makita al PC cuando la aplicación no esté iniciada Cuando el producto esté conectado el indicador LED parpadeará en amarillo y podrá proceder con el siguiente paso Nota Conecte el product...

Страница 132: ...se establece la conexión con la aplicación el parpadeo del indicador LED cambia de amarillo a verde lo que indica que la comunicación con la aplicación se ha iniciado Nota Mientras el LED está parpadeando en amarillo no es posible establecer comunicación Vuelva al paso 3 1 o realice la reinstalación del driver de acuerdo con el procedimiento indicado en la sección Suplemento del manual Install man...

Страница 133: ... Información del producto Nota Mientras haya una conexión USB el producto no se pondrá en marcha aunque se accione el interruptor Nota Una vez establecida correctamente la conexión entre la aplicación y el producto el LED continuará parpadeando en verde mientras el producto esté conectado al PC a través del cable USB ...

Страница 134: ...ede cambiar el texto de la interfaz a los siguientes idiomas JAPONÉS INGLÉS FRANCÉS ALEMÁN ITALIANO HOLANDÉS ESPAÑOL PORTUGUÉS CHINO THAILANDÉS INDONESIO Información sobre el producto conectado por USB Ajustes del producto Cambio de idioma configuración de la contraseña información de la versión Botones de acción Información de los ajustes del selector F R Rotación hacia delante Rotación en revers...

Страница 135: ... contraseña Introduzca la contraseña anterior y la nueva contraseña y haga clic en el botón OK OK Importante La contraseña solo es necesaria al iniciar la aplicación y para grabar los ajustes del producto por primera vez Si hace clic en el botón de cierre de la esquina superior derecha de la ventana sin introducir una contraseña la información de configuración no se transferirá al producto Importa...

Страница 136: ...ue desee en Product Information Información del producto Introduzca los caracteres en los campos correspondientes y haga clic en Write NOTE NOTA de grabación para grabar la información de los ajustes en el producto La secuencia introducida puede contener un máximo de 32 caracteres alfanuméricos y símbolos un byte ...

Страница 137: ...re conecte la herramienta con el cable USB y finalice la grabación de los ajustes nuevamente Elemento de ajuste Common Settings Ajustes habituales 1 Initialize Inicializar Para devolver la configuración de Common Settings Ajustes habituales a la predeterminada de fábrica haga clic en Initialize Inicializar Los ajustes del producto no se cambiarán en este momento 2 Lighting Iluminación Puede ajusta...

Страница 138: ...ase Finish Finalizar fase principal o All Phase Finish Finalizar todas las fases Main Phase Finish Finalizar fase principal All Phase Finish Finalizar todas las fases 8 Speed drop detect Detección de caída de velocidad Pueden establecerse una advertencia de Speed drop detect Detección de caída de velocidad y una prohibición de funcionamiento ON Auto Stop En paro automático ON Warning Alarm En alar...

Страница 139: ...incipal 3 1 Mode Modo Establezca los ajustes de modo CW CCW Free mode Modo libre CW CCW Este modo sigue con el funcionamiento hasta que se suelte el gatillo interruptor CW CCW Tightening Auto Stop mode Paro automático de apriete CW CCW Este modo se detiene automáticamente en función del ajuste de torque de apriete tras detectar una reducción CW CCW Loosening Auto Stop mode Paro automático de afloj...

Страница 140: ...ngo de tiempo válido para el trabajo Para establecer los tiempos de trabajo mínimo y máximo seleccione la casilla de verificación Se emitirá una advertencia de operación incompleta si el trabajo se completa antes del rango de tiempo de trabajo establecido o si el trabajo no se completa dentro del intervalo de tiempo 1 2 3 3 1 3 2 3 2 2 3 2 3 3 2 4 3 2 1 3 3 4 5 ...

Страница 141: ... Cuando haga clic en el botón Read Leer de Access to Tool Acceso a la herramienta no retire el cable USB hasta que se muestre el mensaje de lectura completada No solo existe el riesgo de que no se lea la información de los ajustes sino que también es posible que la herramienta no funcione correctamente Si esto ocurre conecte la herramienta con el cable USB y complete la lectura de la información d...

Страница 142: ...ara guardar los ajustes Se abrirá una ventana para establecer la ubicación de almacenamiento compruebe y guarde la ruta Si selecciona Set Date Time Configurar fecha tiempo se añadirán la fecha y hora actuales tras el nombre que haya introducido Además puede eliminar la información de los ajustes mostrada en la pantalla de guardado haciendo clic en Delete Borrar con la información seleccionada Haga...

Страница 143: ...143 ...

Страница 144: ...zar la lista de los archivos de configuración guardados Puede recuperar la información de los ajustes seleccionando el archivo correspondiente de la lista Además puede eliminar la información de los ajustes mostrada en la pantalla de guardado haciendo clic en Delete Borrar con la información seleccionada Haga clic en el botón Load Leer de Access in PC Acceso en PC para guardar la información de lo...

Страница 145: ...Inicio de fábrica configuración para inicializar la información de los ajustes del producto a la predeterminada de fábrica Los ajustes del producto no se cambiarán en este momento Para inicializar la configuración predeterminada de fábrica haga clic en el botón Reset Reinicio de Factory initialize setting Inicio de fábrica configuración ...

Страница 146: ...ger count Conteo de gatillo Trip Auto Stop count Conteo de paro automático de viaje y Trip Impact time Tiempo de impacto de viaje Last maintenance date Última fecha de mantenimiento muestra la fecha y la hora del ajuste más reciente de Maintenance alarm stop setting Alarma de mantenimiento configuración de paro ver más abajo 2 Maintenance alarm stop setting Alarma de mantenimiento configuración de...

Страница 147: ...ferir los ajustes al producto Si solo hace clic en Trip Information clear Borrar información de viaje los ajustes no se transferirán al producto Importante No pueden introducirse los ajustes de Maintenance alarm stop setting Alarma de mantenimiento configuración de paro a menos que haga clic en Trip Information clear Borrar información de viaje y reinicie los recuentos de Trip Trigger count Conteo...

Страница 148: ...148 3 13 Desconexión del producto Makita Cuando haya terminado de cambiar los ajustes termine la sesión desconectando el cable USB del producto ...

Страница 149: ...149 ...

Страница 150: ...150 ...

Страница 151: ...151 ...

Страница 152: ...885712 927 CRE Makita Jan Baptist Vinkstraat 2 3070 Belgium Makita Corporation Anjo Aichi Japan www makita com ...

Отзывы: