5
4. Charge the battery cartridge if you do not use it for a
long period (more than six months).
Save all warnings and
instructions for future reference.
FUNCTIONAL DESCRIPTION
Installing or removing the battery
cartridge (Fig. 1)
CAUTION:
• Always switch off the luminaire before installing or
removing of the battery cartridge.
•
Hold the luminaire and the battery cartridge firmly
when installing or removing battery cartridge.
Failure to hold the luminaire and the battery cartridge
firmly may cause them to slip off your hands and result
in damage to the luminaire and battery cartridge and a
personal injury.
To remove the battery cartridge, slide it from the luminaire
while sliding the button on the front of the cartridge.
To install the battery cartridge, align the tongue on the
battery cartridge with the groove in the housing and slip it
into place. Insert it all the way until it locks in place with a
little click. If you can see the red indicator on the upper
side of the button, it is not locked completely.
CAUTION:
• Always install the battery cartridge fully until the red
indicator cannot be seen. If not, it may accidentally fall
out of the luminaire, causing injury to you or someone
around you.
• Do not install the battery cartridge forcibly. If the
cartridge does not slide in easily, it is not being inserted
correctly.
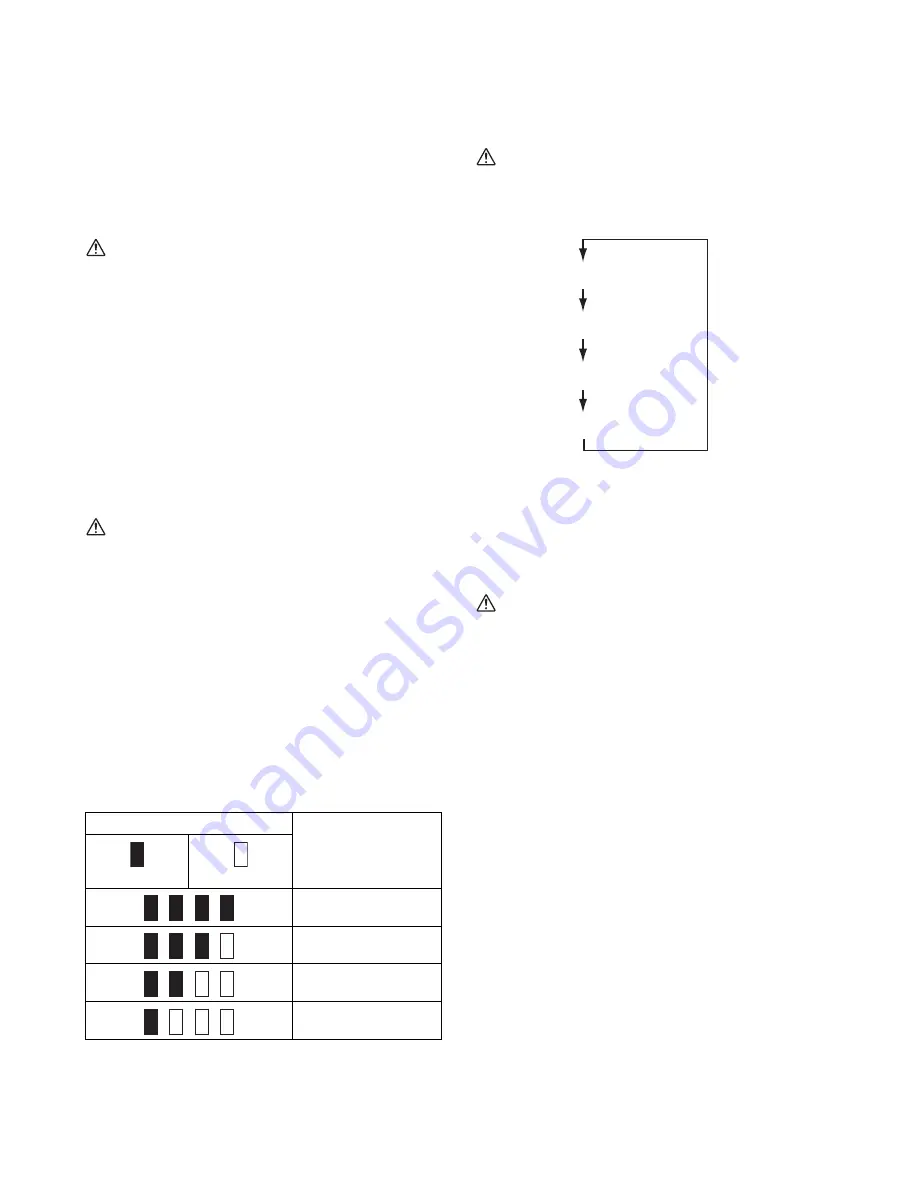
Indicating the remaining battery capacity
(Fig. 2)
(Only for battery cartridges with “B” at the end of the
model number.)
Press the check button on the battery cartridge to indicate
the remaining battery capacity. The indicator lamps light
up for few seconds.
NOTE:
• Depending on the conditions of use and the ambient
temperature, the indication may differ slightly from the
actual capacity.
Overdischarge protection
When the battery capacity is not enough, the light goes off
automatically. In this case, remove the battery from the
tool and charge the battery.
Light switch operations (Fig. 3)
CAUTION:
• Do not look in the LED light or see the source of light
directly.
Press the light switch as shown below to change modes.
* The LEDs on the opposite side of the light switch light
up.
Metal hook (Fig. 4)
Pivot the metal hook upright before using it.
The hook can be turned at 360° and removed.
Connecting USB devices (Fig. 5)
CAUTION:
• Connect only devices which are compatible with the
USB power supply port. Otherwise it may cause
malfunction to the battery holder.
This luminaire (with the battery) can work as an external
power supply for USB devices.
Open the cover and connect the USB cable (not included)
with the power supply port of the battery holder. And then
connect the other end of the cable with the device.
Press the USB power supply switch. The switch lights in
green and the USB power supply port (with the battery)
starts to supply DC5V, 2.1A at a maximum. Press the
USB power supply switch again to turn off the power
supply.
NOTE:
• Before connecting USB device to the luminaire (with
the battery), always backup your data of USB device.
Otherwise your data may be lost by any possibility.
• The luminaire may not supply power to some USB
devices.
• When not using or after charging, remove the USB
cable and close the cover.
• To save the battery power, the USB power supply
switch will automatically turn off when; 30 minutes is
past since the power supply is finished; or the power
supply is not performed for 30 minutes.
• If the remaining battery capacity become lower, the
USB power supply switch will turn off and the power
supply will stop to prevent overdischarging of the
battery. In this case, charge the battery or replace with
new one.
Indicator lamps
Remaining capacity
Lighted
Off
75% to 100%
50% to 75%
25% to 50%
0% to 25%
Main LED (20 pcs.) light up
Main LED (5 pcs.) light up*
Sub LED (1 pc.) light up
OFF
Содержание ML104
Страница 2: ...2 1 2 3 4 5 6 7 1 3 2 4 5 7 6 8 9 I O 11 10 12 ...
Страница 37: ...37 3 7 D Makita 3 3 3 9 B 3 3 B Makita Y 7 D ...
Страница 38: ...38 ...
Страница 39: ...39 ...
Страница 40: ...Makita Corporation 3 11 8 Sumiyoshi cho Anjo Aichi 446 8502 Japan ML104 9L 12VMAX 1607 www makita com ALA ...


