background image

CAUTION: 

• 

Always check the direction of rotation before 
operation. 

• 

Use the reversing switch only after the tool comes 
to a complete stop. Changing the direction of 
rotation before the tool stops may damage the tool. 

• 

When not operating the tool, always set the 
reversing switch lever to the neutral position. 


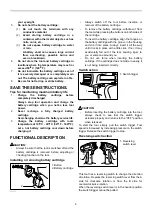
Speed change 

5

4

3

1


003353 

 
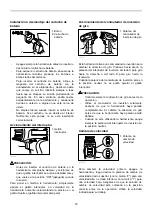
To change the speed, first switch off the tool and then 
slide the speed change lever to the upper side for high 
speed ("2" marking) or lower side for low speed ("1" 
marking). Be sure that the speed change lever is set to 
the correct position before operation. Use the right 
speed for your job. 


CAUTION: 

• 

Always set the speed change lever fully to the 
correct position. If you operate the tool with the 
speed change lever positioned half-way between 
the "1" marking side and "2" marking side, the tool 
may be damaged. 

• 

Do not use the speed change lever while the tool is 
running. The tool may be damaged. 


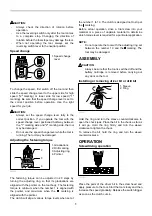
Adjusting the fastening torque 

1

2

3

4


003354 

 
The fastening torque can be adjusted in 20 steps by 
turning the adjusting ring so that its graduations are 
aligned with the pointer on the tool body. The fastening 
torque is minimum when the number 1 is aligned with 
the pointer, and maximum when the 

 marking  is 

aligned with the pointer. 
The clutch will slip at various torque levels when set at 

the number 1 to 19. The clutch is designed not to slip at 
the

marking. 

Before actual operation, drive a trial screw into your 
material or a piece of duplicate material to determine 
which torque level is required for a particular application. 


NOTE: 

• 

Do not operate the tool with the adjusting ring set 
between the number 19 and the

marking. The 

tool may be damaged. 


ASSEMBLY 


CAUTION: 

• 

Always be sure that the tool is switched off and the 
battery cartridge is removed before carrying out 
any work on the tool. 


Installing or removing driver bit or drill bit 

1

2


003355 

 
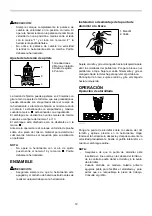
Hold the ring and turn the sleeve counterclockwise to 
open the chuck jaws. Place the bit in the chuck as far as 
it will go. Hold the ring firmly and turn the sleeve 
clockwise to tighten the chuck. 
To remove the bit, hold the ring and turn the sleeve 
counterclockwise. 


OPERATION 

Screwdriving operation 


003356 

 
Place the point of the driver bit in the screw head and 
apply pressure to the tool. Start the tool slowly and then 
increase the speed gradually. Release the switch trigger 
as soon as the clutch cuts in. 


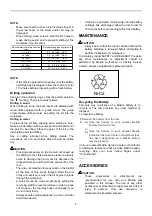
1. Sleeve 
2. Ring 

1. Graduations 
2. Drill marking 
3. Adjusting ring 
4. Pointer 

1. Speed change 

lever 

Содержание MDF330D

Страница 1: ...RTISSEMENT Pour votre propre sécurité prière de lire attentivement avant l utilisation GARDER CES INSTRUCTIONS POUR RÉFÉRENCE ULTÉRIEURE ADVERTENCIA Para su seguridad personal LEA DETENIDAMENTE este manual antes de usar la herramienta GUARDE ESTAS INSTRUCCIONES PARA FUTURA REFERENCIA Cordless Driver Drill Perceuse visseuse sans fil Atornillador Taladro Inalámbrico MDF330D 008428 ...

Страница 2: ... create a risk of fire Personal Safety 6 Stay alert watch what you are doing and use common sense when operating a power tool Do not use tool while tired or under the influence of drugs alcohol or medication A moment of inattention while operating power tools may result in serious personal injury 7 Dress properly Do not wear loose clothing or jewelry Contain long hair Keep your hair clothing and g...

Страница 3: ...mfort or familiarity with product gained from repeated use replace strict adherence to cordless drill safety rules If you use this tool unsafely or incorrectly you can suffer serious personal injury 1 Hold tool by insulated gripping surfaces when performing an operation where the cutting tool may contact hidden wiring Contact with a live wire will also make exposed metal parts of the tool live and...

Страница 4: ...or checking function on the tool Installing or removing battery cartridge 1 2 003348 Always switch off the tool before insertion or removal of the battery cartridge To remove the battery cartridge withdraw it from the tool while pressing the buttons on both sides of the cartridge To insert the battery cartridge align the tongue on the battery cartridge with the groove in the housing and slip it in...

Страница 5: ...ue is minimum when the number 1 is aligned with the pointer and maximum when the marking is aligned with the pointer The clutch will slip at various torque levels when set at the number 1 to 19 The clutch is designed not to slip at the marking Before actual operation drive a trial screw into your material or a piece of duplicate material to determine which torque level is required for a particular...

Страница 6: ... at the time of hole break through Hold the tool firmly and exert care when the bit begins to break through the workpiece A stuck bit can be removed simply by setting the reversing switch to reverse rotation in order to back out However the tool may back out abruptly if you do not hold it firmly Always secure small workpieces in a vise or similar hold down device If the tool is operated continuous...

Страница 7: ...AKITA BE LIABLE FOR ANY INDIRECT INCIDENTAL OR CONSEQUENTIAL DAMAGES FROM THE SALE OR USE OF THE PRODUCT THIS DISCLAIMER APPLIES BOTH DURING AND AFTER THE TERM OF THIS WARRANTY MAKITA DISCLAIMS LIABILITY FOR ANY IMPLIED WARRANTIES INCLUDING IMPLIED WARRANTIES OF MERCHANTABILITY AND FITNESS FOR A SPECIFIC PURPOSE AFTER THE ONE YEAR TERM OF THIS WARRANTY This Warranty gives you specific legal rights...

Страница 8: ...l alimenté par des batteries intégrées ou par un bloc piles séparé doit toujours être rechargé au moyen du chargeur spécifié pour la batterie en question L utilisation d un chargeur conçu pour un type donné de batterie peut comporter un risque d incendie avec un autre type de batterie 5 En utilisant un outil alimenté par batterie servez vous uniquement du bloc piles spécialement conçu à cet effet ...

Страница 9: ...a subi aucun dommage affectant son bon fonctionnement Le cas échéant faites réparer l outil avant de l utiliser De nombreux accidents sont causés par des outils mal entretenus 20 Utilisez uniquement les accessoires recommandés par le fabricant pour le modèle utilisé Des accessoires qui conviennent à un outil donné peuvent comporter un risque de blessure lorsque utilisés sur un autre outil SERVICE ...

Страница 10: ...rcuit de la batterie pourrait provoquer un fort courant une surchauffe parfois des brûlures et même une panne 6 Ne rangez pas l outil ou la batterie dans des endroits où la température risque d atteindre ou de dépasser 50 ゚ C 122 ゚ F 7 Ne jetez pas la batterie au feu même si elle est sérieusement endommagée ou complètement épuisée La batterie peut exploser au contact du feu 8 Prenez garde d échapp...

Страница 11: ...evier inverseur se trouve en position neutre ATTENTION Vérifiez toujours le sens de rotation avant de mettre l outil en marche N actionnez l inverseur qu une fois que l outil est complètement arrêté Si vous changez le sens de rotation avant l arrêt de l outil vous risquez de l endommager Lorsque vous n utilisez pas l outil placez toujours le levier inverseur en position neutre Changement de vitess...

Страница 12: ...manchon en sens des aiguilles d une montre pour serrer le mandrin Pour retirer le foret l embout saisissez l anneau et tournez le manchon en sens inverse des aiguilles d une montre UTILISATION Vissage 003356 Placez la pointe de l embout dans la tête de vis et appliquez une pression sur l outil Faites démarrer l outil à vitesse réduite puis augmentez graduellement la vitesse Relâchez la gâchette dè...

Страница 13: ...retirée avant d y effectuer tout travail d inspection ou d entretien Pour maintenir la SÉCURITÉ et la FIABILITÉ du produit les réparations tout autre travail d entretien ou de réglage doivent être effectués dans un centre de service Makita agréé ou un centre de service de l usine Makita exclusivement avec des pièces de rechange Makita Contactez le centre de services ou distributeur Makita le plus ...

Страница 14: ...IT CET AVIS DE NON RESPONSABILITÉ S APPLIQUE À LA FOIS PENDANT ET APRÈS LA PÉRIODE COUVERTE PAR CETTE GARANTIE MAKITA DÉCLINE TOUTE RESPONSABILITÉ QUANT À TOUTE GARANTIE TACITE INCLUANT LES GARANTIES TACITES DE QUALITÉ MARCHANDE ET ADÉQUATION À UN USAGE PARTICULIER APRÈS LA PÉRIODE D UN AN COUVERTE PAR CETTE GARANTIE Cette garantie vous donne des droits spécifiques reconnus par la loi et possiblem...

Страница 15: ...erramienta de funcionamiento a batería con baterías integrales o una batería separada deberán ser cargada solamente con el cargador especificado para la batería Un cargador que pueda ser apropiado para un tipo de batería podrá crear un riesgo de incendio cuando se utilice con otra batería 5 Utilice la herramienta de funcionamiento a batería solamente con la batería designada específicamente para e...

Страница 16: ...r al funcionamiento de las herramientas eléctricas Si la herramienta eléctrica está dañada haga que se la reparen antes de utilizarla Muchos accidentes son ocasionados por herramientas eléctricas con un mal mantenimiento 19 Mantenga las herramientas de corte afiladas y limpias Las herramientas de corte con buen mantenimiento y con los bordes de corte afilados son menos propensas a estancarse y más...

Страница 17: ...a limpia y consulte de inmediato a un médico Podría perder la visión 5 No cortocircuite el cartucho de batería 1 No toque las terminales con ningún material conductor 2 Evite guardar el cartucho de batería en un cajón junto con otros objetos metálicos tales como clavos monedas etc 3 No exponga la batería al agua o a la lluvia Si la batería entra en cortocircuito puede causar sobrecalentamiento un ...

Страница 18: ...ión en el gatillo Suelte el gatillo interruptor para parar Accionamiento del conmutador de inversión de giro A 1 B 1 003951 Esta herramienta tiene un conmutador de inversión para cambiar la dirección de giro Presione hacia dentro la palanca del interruptor de inversión del lado A para giro hacia la derecha o del lado B para giro hacia la izquierda Cuando la palanca del conmutador de inversión esté...

Страница 19: ...n el aro de ajuste puesto entre el número 19 y la marca Podría dañarse la herramienta ENSAMBLE PRECAUCIÓN Asegúrese siempre de que la herramienta esté apagada y el cartucho de batería extraído antes de realizar cualquier trabajo en la herramienta Instalación o desmontaje de la punta de atornillar o la broca 1 2 003355 Sujete el anillo y gire el manguito hacia la izquierda para abrir las mordazas d...

Страница 20: ...emenda sobre la herramienta broca Sujete la herramienta firmemente y tenga cuidado cuando la broca comience a penetrar en la pieza de trabajo Una broca atorada podrá extraerse simplemente poniendo el interruptor de inversión en giro inverso para que retroceda Sin embargo la herramienta podrá retroceder bruscamente si no la sujeta firmemente Sujete siempre las piezas de trabajo pequeñas en un torni...

Страница 21: ...o por mano de obra o material defectuoso Makita la reparará o a nuestra opción reemplazará sin cobrar Esta garantía no será aplicable cuando EN NINGÚN CASO MAKITA SE HARÁ RESPONSABLE DE NINGÚN DAÑO INDIRECTO FORTUITO O CONSECUENCIAL DERIVADO DE LA VENTA O USO DEL PRODUCTO ESTA RENUNCIA SERÁ APLICABLE TANTO DURANTE COMO DESPUÉS DEL TÉRMINO DE ESTA GARANTÍA MAKITA RENUNCIA LA RESPONSABILIDAD POR CUA...

Страница 22: ...22 ...

Страница 23: ...23 ...

Страница 24: ...NCIA Algunos tipos de polvo creados por el lijado serrado amolado taladrado y otras actividades de la construccion contienen sustancias quimicas reconocidas por el Estado de California como causantes de cancer defectos de nacimiento y otros peligros de reproduccion Algunos ejemplos de estos productos quimicos son plomo de pinturas a base de plomo silice cristalino de ladrillos y cemento y otros pr...

Отзывы: