Makita Maktec MT925 Скачать руководство пользователя страница 2

 P  

2

7

R

epair

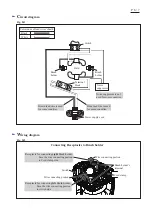
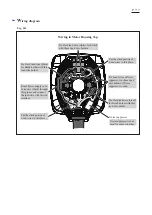
Lubrication is not required for this product because no gear is used for transmission.

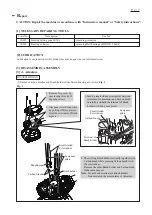
(1) Remove Carbon brushes and Brush holders from Motor housing as drawn in 

Fig. 1

.

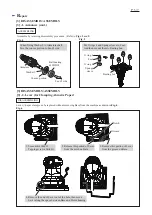
[3] DISASSEMBLY/ASSEMBLY

[3] -1. Armature

[1] NECESSARY REPAIRING TOOLS

CAUTION: Repair the machine in accordance with “Instruction  manual” or “Safety instructions”.

Code No.

Description

Use for

1R027

Bearing setting pipe 18-10.2

removing Armature

1R269

Bearing extractor 

removing Ball bearings 629DDW,  606ZZ

[2] LUBRICATION

DISASSEMBLING

3. Insert a small slotted screwdriver between 

    Armature’s commutator and Carbon brush

    carefully, and hold the terminal of Brush 

    holder with Long nose pliers.


4. Then, lift up Brush holder vertically together with 

    Carbon brush while pressing Carbon brush with

    the screwdriver.

    Remove the other Brush holder and Carbon brush

    in the same manner.

Note

: Do not bend terminals of Brush holders.

          Do not scratch the commutator of Armature.

Carbon brushes

Brush holder

Brush holder

Fig. 1

Terminal of

Brush holder

Carbon brush

Small slotted

Screwdriver

Small slotted

Screwdriver

Long nose

pliers

Long nose

pliers

1. Remove Top cover by 

    unscrewing three 4x18 

    Tapping screws.

2. Disconnect Field lead wires 

    by pulling off Receptacles 

    from the terminals of Brush 

    holders.

Содержание Maktec MT925

Страница 1: ...at less expense Model MT925G is Green housing model exclusively developed for Korean market Width W Voltage V 112 x 102 4 3 8 x 4 0 89 2 0 Pad size mm 114 x 140 4 1 2 x 5 1 2 Abrasive paper size mm ø1 5 1 16 Protection from electric shock Double insulation Power supply cord m ft MT925 MT925G Orbits per minute opm min ˉ Sanding strokes spm min ˉ Specification Model Orbit diameter mm 2 0 6 6 14 000 ...

Страница 2: ...ted screwdriver between Armature s commutator and Carbon brush carefully and hold the terminal of Brush holder with Long nose pliers 4 Then lift up Brush holder vertically together with Carbon brush while pressing Carbon brush with the screwdriver Remove the other Brush holder and Carbon brush in the same manner Note Do not bend terminals of Brush holders Do not scratch the commutator of Armature ...

Страница 3: ...d together with Ball bearing 6001ZZ 5 Remove Sponge sleeves and Foots with O rings 4 from Bearing box 6 Remove Fan 65 from Armature shaft Ball bearing 6001ZZ Bearing box 2 Disassemble the parts in bottom section and remove Armature from Motor housing as drawn in Fig 2 7 Remove four 4x18 Tapping screws that fasten Bearing box to Motor housing Fig 2 4x18 Tapping screws O ring 4 8 pcs Foot 4 pcs Spon...

Страница 4: ...ture shaft using 1R269 and Water pump pliers Note There are little space between Ball bearing 606ZZ and Insulation washer Fig 3 A Ball bearing 629DDW and Washer 9 Fig 3 B Therefore hold the jaws of 1R269 with Water pump pliers to retain Ball bearing securely Temporarily tighten M4x18 Pan head screw to Armature shaft to protect the female thread when removing Ball bearing 629DDW Fig 3 B 1R269 Water...

Страница 5: ...aring box Ball bearing 629DDW Bearing box 3 DISASSEMBLY ASSEMBLY 3 1 Armature cont 3 DISASSEMBLY ASSEMBLY 3 2 Lever for Clamping Abrasive Paper DISASSEMBLING Fig 6 Lever paper clamp can be replaced without removing Base from the machine as drawn in Fig 6 1 Loosen this M4x12 Tapping screw a little bit Groove Notch 2 Release this portion of Lever from the notch on Base 3 Remove this portion of Lever...

Страница 6: ... connecting portion Wire connecting portion Receptacle for connecting left Brush holder Face the wire connecting portion to switch side Wiring diagram Connecting Receptacles to Brush holder Brown lead wire is used for some countries Blue lead wire is used for some countries Receptacle for connecting right Brush holder Face the wire connecting portion to Cord clamp side Noise suppressor is not used...

Страница 7: ...e black for Brush holder with this lead wire holder Noise suppressor is not used for some countries Noise suppressor Route Power supply cord Lead wire black through this groove and connect the lead wire with Switch terminal Put the slack portion of Lead wires in this place Put the slack portion of Lead wires in this place Fix Lead wires of Noise suppressor in these Lead wire holders if Noise suppr...

Отзывы: