Makita M8600G Скачать руководство пользователя страница 5

FUNCTIONAL DESCRIPTION 


CAUTION: 

• 

Always be sure that the tool is switched off and 
unplugged before adjusting or checking function 
on the tool. 

Switch action 


CAUTION: 

• 

Before plugging in the tool, always check to see 
that the switch trigger actuates properly and 
returns to the "OFF" position when released. 

• 

Switch can be locked in "ON" position for ease of 
operator comfort during extended use. Apply 
caution when locking tool in "ON" position and 
maintain firm grasp on tool. 

1

2


015226 

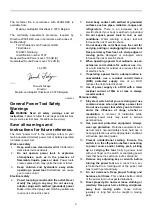
To start the tool, simply pull the switch trigger. Release 
the switch trigger to stop. 
For continuous operation, pull the switch trigger and 
then push in the lock button. 
To stop the tool from the locked position, pull the switch 
trigger fully, then release it. 
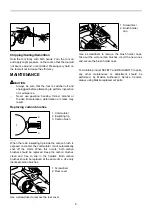
ASSEMBLY 


CAUTION: 

• 

Always be sure that the tool is switched off and 
unplugged before carrying out any work on the tool. 

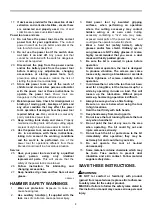
Installing side grip (auxiliary handle) 

1


015227 

The side grip swings around to either side, allowing 
easy handling of the tool in any position. Loosen the 
side grip by turning it counterclockwise, swing it to the 
desired position and then tighten it by turning clockwise. 

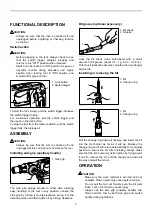
Bit grease (optional accessory) 

1

2


015228 

Coat the bit shank head beforehand with a small 
amount of bit grease (about 0.5 -1 g; 0.02 - 0.04 oz.). 
This chuck lubrication assures smooth action and longer 
service life. 

Installing or removing the bit 

2

1


015229 

2

1


015230 

Pull the change ring down all the way and insert the bit 
into the tool holder as far as it will go. Release the 
change ring and it will return automatically to its original 
position to secure the bit. After installing, always make 
sure that the bit is securely held in place by trying to pull 
it out. To remove the bit, pull the change ring down all 
the way and pull the bit out. 

OPERATION 


CAUTION: 

• 

Make sure the work material is secured and not 
unstable. Flown object may cause personal injury. 

• 

Do not pull the tool out forcibly even the bit gets 
stuck. Loss of control may cause injury. 

• 

Always use the side grip (auxiliary handle) and 
firmly hold the tool by both side grip and switch 
handle during operations. 

1. Bit 
2. Change ring 

1. Bit 
2. Change ring 

1. Bit shank 
2. Grease 

1. Side grip 

1. Lock button 
2. Switch trigger 

Содержание M8600G

Страница 1: ...1 ENGLISH Original instructions INSTRUCTION MANUAL DOUBLE INSULATION IMPORTANT Read Before Using Demolition Hammer M8600 015225 ...

Страница 2: ... from sockets without earth wire ENG905 1 Noise The typical A weighted noise level determined according to EN60745 Sound pressure level LpA 95 dB A Sound power level LWA 106 dB A Uncertainty K 3 dB A Wear ear protection ENG900 1 Vibration The vibration total value tri axial vector sum determined according to EN60745 Work mode chiselling function with side grip Vibration emission ah CHeq 16 5 m s2 ...

Страница 3: ...e the risk of electric shock 7 Do not abuse the cord Never use the cord for carrying pulling or unplugging the power tool Keep cord away from heat oil sharp edges or moving parts Damaged or entangled cords increase the risk of electric shock 8 When operating a power tool outdoors use an extension cord suitable for outdoor use Use of a cord suitable for outdoor use reduces the risk of electric shoc...

Страница 4: ...es dry clean and free from oil and grease GEB004 6 HAMMER SAFETY WARNINGS 1 Wear ear protectors Exposure to noise can cause hearing loss 2 Use auxiliary handle s if supplied with the tool Loss of control can cause personal injury 3 Hold power tool by insulated gripping surfaces when performing an operation where the cutting accessory may contact hidden wiring or its own cord Cutting accessory cont...

Страница 5: ... Loosen the side grip by turning it counterclockwise swing it to the desired position and then tighten it by turning clockwise Bit grease optional accessory 1 2 015228 Coat the bit shank head beforehand with a small amount of bit grease about 0 5 1 g 0 02 0 04 oz This chuck lubrication assures smooth action and longer service life Installing or removing the bit 2 1 015229 2 1 015230 Pull the chang...

Страница 6: ... is exposed to contact the commutator it will automatically shut off the motor When this occurs both carbon brushes should be replaced Keep the carbon brushes clean and free to slip in the holders Both carbon brushes should be replaced at the same time Use only identical carbon brushes 2 1 015231 Use a screwdriver to remove the rear cover 2 1 015232 Use a screwdriver to remove the brush holder cap...

Страница 7: ...7 ...

Страница 8: ...8 www makita com Makita Jan Baptist Vinkstraat 2 3070 Belgium Makita Corporation Anjo Aichi Japan 885415 226 ...

Отзывы: