background image

3 ENGLISH

Personal Safety

1. 

Stay alert, watch what you are doing and use 

common sense when operating a power tool. 

Do not use a power tool while you are tired or 

under the influence of drugs, alcohol or med

-

ication.

 A moment of inattention while operating 

power tools may result in serious personal injury.

2. 

Use personal protective equipment. Always wear eye 

protection.

 Protective equipment such as a dust mask, 

non-skid safety shoes, hard hat or hearing protection used 

for appropriate conditions will reduce personal injuries.

3. 

Prevent unintentional starting. Ensure the 

switch is in the off-position before connecting 

to power source and/or battery pack, picking 

up or carrying the tool.

 Carrying power tools with 

your finger on the switch or energising power tools 

that have the switch on invites accidents.

4. 

Remove any adjusting key or wrench before turning 

the power tool on.

 A wrench or a key left attached to a 

rotating part of the power tool may result in personal injury.

5. 

Do not overreach. Keep proper footing and 

balance at all times.

 This enables better control 

of the power tool in unexpected situations.

6. 

Dress properly. Do not wear loose clothing or 

jewellery. Keep your hair, clothing, and gloves 

away from moving parts.

 Loose clothes, jewel

-

lery or long hair can be caught in moving parts.

7. 

If devices are provided for the connection of 

dust extraction and collection facilities, ensure 

these are connected and properly used.

 Use of 

dust collection can reduce dust-related hazards.

Power tool use and care

1. 

Do not force the power tool. Use the correct 

power tool for your application.

 The correct 

power tool will do the job better and safer at the 

rate for which it was designed.

2. 

Do not use the power tool if the switch does not turn 

it on and off.

 Any power tool that cannot be controlled 

with the switch is dangerous and must be repaired.

3. 

Disconnect the plug from the power source and/or 

the battery pack from the power tool before making 

any adjustments, changing accessories, or storing 

power tools.

 Such preventive safety measures reduce 

the risk of starting the power tool accidentally.

4. 

Store idle power tools out of the reach of children and 

do not allow persons unfamiliar with the power tool 

or these instructions to operate the power tool.

 Power 

tools are dangerous in the hands of untrained users.

5. 

Maintain power tools. Check for misalignment 

or binding of moving parts, breakage of parts 

and any other condition that may affect the 

power tool’s operation. If damaged, have the 

power tool repaired before use.

 Many accidents 

are caused by poorly maintained power tools.

6. 

Keep cutting tools sharp and clean.

 Properly 

maintained cutting tools with sharp cutting edges 

are less likely to bind and are easier to control.

7. 

Use the power tool, accessories and tool bits etc. 

in accordance with these instructions, taking into 

account the working conditions and the work to be 

performed.

 Use of the power tool for operations different 

from those intended could result in a hazardous situation.

Service

1. 

Have your power tool serviced by a qualified repair 

person using only identical replacement parts.

 This 

will ensure that the safety of the power tool is maintained.

2. 

Follow instruction for lubricating and chang-

ing accessories.

3. 

Keep handles dry, clean and free from oil and grease.

USE PROPER EXTENSION CORD. Make sure your 

extension cord is in good condition. When using an 

extension cord, be sure to use one heavy enough to 

carry the current your product will draw. An undersized 

cord will cause a drop in line voltage resulting in loss of 

power and overheating. Table 1 shows the correct size 

to use depending on cord length and nameplate ampere 

rating. If in doubt, use the next heavier gage. The 

smaller the gage number, the heavier the cord.

Table 1: Minimum gage for cord

Ampere Rating

Volts

Total length of cord in feet

120V

25 ft.

50 ft.

100 ft.

150 ft.

220V - 240V

50 ft.

100 ft.

200 ft.

300 ft.

More Than

Not More Than

AWG

0 A

6 A

18

16

16

14

6 A

10 A

18

16

14

12

10 A

12 A

16

16

14

12

12 A

16 A

14

12

Not Recommended

ROTARY HAMMER SAFETY WARNINGS

1. 

Wear ear protectors.

 Exposure to noise can 

cause hearing loss.

2. 

Use auxiliary handle(s), if supplied with the 

tool.

 Loss of control can cause personal injury.

3. 

Hold power tool by insulated gripping surfaces, 

when performing an operation where the cutting 

accessory may contact hidden wiring or its own 

cord.

 Cutting accessory contacting a "live" wire 

may make exposed metal parts of the power tool 

"live" and could give the operator an electric shock.

4. 

Wear a hard hat (safety helmet), safety glasses and/

or face shield. Ordinary eye or sun glasses are NOT 

safety glasses. It is also highly recommended that 

you wear a dust mask and thickly padded gloves.

5. 

Be sure the bit is secured in place before operation.

6. 

Under normal operation, the tool is designed to 

produce vibration. The screws can come loose 

easily, causing a breakdown or accident. Check 

tightness of screws carefully before operation.

7. 

In cold weather or when the tool has not been used for a 

long time, let the tool warm up for a while by operating it 

under no load. This will loosen up the lubrication. Without 

proper warm-up, hammering operation is difficult.

Содержание HR3011FC

Страница 1: ...UAL DE INSTRUCCIONES Combination Hammer Marteau Combi Martillo Rotativo Combinado HR3011FC HR3012FC HR3001C IMPORTANT Read Before Using IMPORTANT Lire avant usage IMPORTANTE Lea antes de usar DOUBLE INSULATION DOUBLE ISOLATION DOBLE AISLAMIENTO ...

Страница 2: ...nings refers to your mains operated corded power tool or battery operated cordless power tool Work area safety 1 Keep work area clean and well lit Cluttered or dark areas invite accidents 2 Do not operate power tools in explosive atmo spheres such as in the presence of flammable liquids gases or dust Power tools create sparks which may ignite the dust or fumes 3 Keep children and bystanders away w...

Страница 3: ...aged have the power tool repaired before use Many accidents are caused by poorly maintained power tools 6 Keep cutting tools sharp and clean Properly maintained cutting tools with sharp cutting edges are less likely to bind and are easier to control 7 Use the power tool accessories and tool bits etc in accordance with these instructions taking into account the working conditions and the work to be...

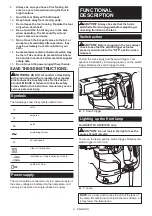
Страница 4: ...injury Symbols The followings show the symbols used for tool volts amperes hertz alternating current no load speed Class II Construction revolutions or reciprocation per minute number of blow Power supply The tool should be connected only to a power supply of the same voltage as indicated on the nameplate and can only be operated on single phase AC supply FUNCTIONAL DESCRIPTION CAUTION Always be s...

Страница 5: ...emoving the quick change chuck for SDS plus be sure to remove the bit Grasp the change cover of the quick change chuck for SDS plus and turn in the direction of the arrow until the change cover line moves from the symbol to the symbol Pull forcefully in the direction of the arrow 1 3 2 1 Quick change chuck for SDS plus 2 Change cover 3 Change cover line Installing the quick change drill chuck Chec...

Страница 6: ...ool NOTICE Drill bits such as hole saw which tend to pinch or catch easily in the hole are not appro priate for this tool This is because they will cause the torque limiter to actuate too frequently The torque limiter will actuate when a certain torque level is reached The motor will disengage from the output shaft When this happens the drill bit will stop turning Electronic function The tool is e...

Страница 7: ...1 1 Thumb screw 3 Tighten the thumb screw to secure the grip The grip can be fixed at desired angle Grease Coat the shank end of the drill bit beforehand with a small amount of grease about 0 5 1 g This chuck lubrication assures smooth action and lon ger service life Installing or removing drill bit Clean the shank end of the drill bit and apply grease before installing the drill bit 1 2 1 Shank e...

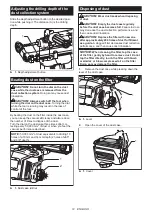
Страница 8: ...orth while pressing the lock button After the adjustment release the lock button to lock the depth gauge NOTE Make sure that the depth gauge does not touch the main body of the tool when attaching it Dust cup Optional accessory Use the dust cup to prevent dust from falling over the tool and on yourself when performing overhead drilling operations Attach the dust cup to the bit as shown in the figu...

Страница 9: ...pull it out For Model HR3012FC Before installing the dust cup set remove the bit from the tool if installed Install the dust cup set on the tool so that the sym bol on the dust cup is aligned with the groove in the tool 2 1 1 1 1 symbol 2 Groove To remove the dust cup set remove the bit while pulling the chuck cover in the direction of the arrow 1 2 1 Bit 2 Chuck cover Hold the root of dust cup an...

Страница 10: ...nger 2 Hole 3 Projection 4 Screw DUST COLLECTION SYSTEM For HR3011FC HR3012FC only Optional accessory The dust collection system is designed to collect dusts effectively when the concrete drilling operation 1 1 Dust collection system CAUTION Make sure that the tool is switched off and unplugged before carrying out any work on the tool Failure to do so may result in personal injury from accidental ...

Страница 11: ...the tool and causes jam in the airflow or break age of the tool Hook the dust collection system on the tool and then insert the dust collection system all the way until it locks in place with a little double click After that make sure that the dust collection system is securely installed 1 1 Air duct When removing the dust collection system press the lock off button 1 1 Lock off button Adjusting t...

Страница 12: ...000 mm 3 of dust or when you feel the vacuum performance declined NOTE 50 000 mm 3 of dust equivalents to drilling 10 holes of ø10 mm and 14 mm depth 2 holes of ø65 and 3 8 depth 1 2 1 Dust case 2 Dial Disposing of dust CAUTION Wear dust mask when disposing of dust CAUTION Empty the dust case regularly before the dust case becomes full Failure to do so may decrease the dust collection performance ...

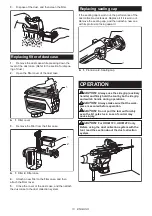
Страница 13: ...em Replacing sealing cap If the sealing cap is worn out the performance of the dust collection decreases Replace it if it is worn out Remove the sealing cap and then attach a new one with its protrusion facing upward 2 1 1 Protrusion 2 Sealing cap OPERATION CAUTION Always use the side grip auxiliary handle and firmly hold the tool by both side grip and switch handle during operations CAUTION Alway...

Страница 14: ...ase the efficiency Drilling in wood or metal CAUTION Hold the tool firmly and exert care when the drill bit begins to break through the workpiece There is a tremendous force exerted on the tool drill bit at the time of hole break through CAUTION A stuck drill bit can be removed simply by setting the reversing switch to reverse rotation in order to back out However the tool may back out abruptly if...

Страница 15: ...the tool lanyard to anything on your body or on movable components Anchor the tool lanyard to a rigid structure that can withstand the forces of a dropped tool 4 Make sure the lanyard is properly secured at each end prior to use 5 Inspect the tool and lanyard before each use for damage and proper function including fabric and stitching Do not use if damaged or not functioning properly 6 Do not wra...

Страница 16: ...ose If you need any assistance for more details regarding these accessories ask your local Makita Service Center Carbide tipped drill bits SDS Plus carbide tipped bits Core bit Bull point Diamond core bit Cold chisel Scaling chisel Grooving chisel Chuck adapter Keyless drill chuck Bit grease Depth gauge Blow out bulb Dust cup Dust cup set Spacer for HR3011FC HR3001C Dust collection system for HR30...

Страница 17: ... comporte un risque de choc électrique d incendie et ou de blessure grave Conservez toutes les mises en garde et instructions pour référence future Le terme outil électrique qui figure dans les avertis sements fait référence à un outil électrique branché sur une prise de courant par un cordon d alimentation ou alimenté par batterie sans fil Sécurité de la zone de travail 1 Maintenez la zone de tra...

Страница 18: ...es risques liés à la présence de poussière dans l air Utilisation et entretien des outils électriques 1 Ne forcez pas l outil électrique Utilisez l outil électrique adéquat suivant le type de travail à effectuer Si vous utilisez l outil électrique adéquat et respectez le régime pour lequel il a été conçu il effectuera un travail de meilleure qualité et plus sécuritaire 2 N utilisez pas l outil éle...

Страница 19: ...moment en le faisant tourner à vide Cela réchauffera le lubrifiant Sans un réchauffement adéquat le martelage s effectue difficilement 8 Pensez toujours à prendre pied solidement Assurez vous qu il n y a personne plus bas lorsque vous utilisez l outil en position élevée 9 Tenez l outil fermement à deux mains 10 Gardez les mains éloignées des pièces en mouvement 11 Ne quittez pas l outil pendant qu...

Страница 20: ...e de la lampe car cela peut affecter son intensité d éclairage Fonctionnement de l inverseur ATTENTION Vérifiez toujours le sens de rotation avant de mettre l outil en marche ATTENTION N actionnez l inverseur qu une fois l outil complètement arrêté Si vous changez le sens de rotation avant l arrêt de l outil vous risquez de l endommager AVIS Lorsque vous changez le sens de rotation veillez à mettr...

Страница 21: ...use à changement rapide et tournez la ligne de couvercle de changement vers le symbole jusqu à ce qu un bruit de déclic soit émis de manière nettement audible 2 4 1 3 1 Mandrin de perceuse à changement rapide 2 Axe 3 Ligne de couvercle de changement 4 Couvercle de changement Sélection du mode de fonctionnement AVIS Ne tournez pas le bouton de changement de mode pendant que l outil tourne L outil s...

Страница 22: ...ation Commande de vitesse constante La fonction de commande de vitesse procure une vitesse de rotation constante quelle que soit la charge Conduit d air Pour HR3011FC HR3012FC uniquement ATTENTION Ne mettez pas le doigt dans le conduit d air et n y insérez aucun objet Autrement vous risquez de vous blesser ou d en dommager l outil Le conduit d air sert à connecter l outil au dispositif de collecte...

Страница 23: ...1 Queue 2 Graisse Insérez l embout mèche dans l outil Tournez l em bout mèche et enfoncez le jusqu à ce qu il s engage Après avoir installé l embout mèche assurez vous toujours qu il est fermement fixé en tirant dessus 1 1 Embout mèche Pour retirer l embout mèche tirez le couvercle du mandrin complètement vers le bas et tirez sur l embout mèche 1 2 1 Embout mèche 2 Couvercle du mandrin Angle du ci...

Страница 24: ...per cez au dessus de votre tête Fixez le collecteur de poussières à l embout tel qu illustré sur la figure Le collecteur de pous sières peut être fixé aux embouts des dimensions suivantes Modèle Diamètre d embout Collecteur de poussières 5 6 mm 1 4 14 5 mm 9 16 Collecteur de poussières 9 12 mm 15 32 16 mm 5 8 1 1 Collecteur de poussières Ensemble de collecteur de poussières Accessoire en option Po...

Страница 25: ...e poussières soit aligné sur la rainure à l intérieur de l outil 2 1 1 1 1 Symbole symbole 2 Rainure Pour retirer l ensemble de collecteur de poussières reti rez l embout tout en tirant le couvercle du mandrin dans le sens de la flèche 1 2 1 Embout 2 Couvercle du mandrin Saisissez le collecteur de poussières par sa base et dégagez le en tirant NOTE Si vous raccordez un aspirateur à l ensemble de c...

Страница 26: ...du perçage dans le béton 1 1 Dispositif de collecte des poussières ATTENTION Avant d effectuer toute inter vention sur l outil assurez vous qu il est hors tension et débranché Autrement vous risquez une blessure suite à un démarrage accidentel ATTENTION Fixez toujours le filtre au dispo sitif de collecte des poussières Autrement vous inhalerez des poussières ATTENTION Assurez vous que le filtre n ...

Страница 27: ...la rupture de l outil Accrochez le dispositif de collecte des poussières sur l outil puis insérez le à fond jusqu à ce qu il se ver rouille avec un petit son de double déclic Ensuite assurez vous que le dispositif de collecte des poussières est fermement posé 1 1 Conduit d air Lors du retrait du dispositif de collecte des poussières appuyez sur le bouton de sécurité 1 1 Bouton de sécurité Réglage ...

Страница 28: ...l efficacité d aspiration a diminué NOTE 50 000 mm 3 de poussières équivalent au perçage de 10 trous de ø10 mm d une profondeur de 14 mm 2 trous de ø65 d une profondeur de 3 8 1 2 1 Compartiment à poussières 2 Cadran Mise au rebut des poussières ATTENTION Portez un masque antipous sières lorsque vous mettez les poussières au rebut ATTENTION Videz régulièrement le com partiment à poussières avant q...

Страница 29: ...d étanchéité Si le capuchon d étanchéité est usé la collecte des poussières sera moins efficace Remplacez le s il est usé Retirez le capuchon d étanchéité puis fixez en un neuf en plaçant sa partie saillante vers le haut 2 1 1 Partie saillante 2 Capuchon d étanchéité UTILISATION ATTENTION En tout temps utilisez la poi gnée latérale poignée auxiliaire et tenez ferme ment l outil par la poignée laté...

Страница 30: ...z le contact et appliquez une légère pression sur l outil de façon à en garder la maîtrise et à éviter qu il ne saute d un côté ou de l autre L application d une très grande pression sur l outil n augmentera pas l efficacité de l opération Perçage du bois ou du métal ATTENTION Tenez l outil fermement et faites bien attention lorsque l embout foret commence à approcher de la face opposée de la pièc...

Страница 31: ...iau similaire Cela risquerait d endommager l ensemble de collecteur de poussières à cause de la chaleur produite par les petites poussières métalliques ou similaires AVIS Ne pas installer ou retirer l ensemble de collecteur de poussières alors que l em bout mèche est inséré dans l outil Cela risquerait d endommager l ensemble de collecteur de pous sières et de laisser s échapper les poussières Rac...

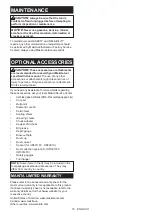
Страница 32: ...ion une déformation ou la forma tion de fissures peuvent en découler Pour maintenir la SÉCURITÉ et la FIABILITÉ du pro duit les réparations et tout autre travail d entretien ou de réglage doivent être effectués dans un centre de service après vente autorisé ou une usine Makita exclusivement avec des pièces de rechange Makita ACCESSOIRES EN OPTION ATTENTION Ces accessoires ou pièces complémentaires...

Страница 33: ...ncias generales de seguridad para herramientas eléctricas ADVERTENCIA Lea todas las advertencias de seguridad e instrucciones El no seguir las adver tencias e instrucciones indicadas puede ocasionar una descarga eléctrica un incendio y o lesiones graves Conserve todas las advertencias e ins trucciones como referencia en el futuro En las advertencias el término herramienta eléctrica se refiere a su...

Страница 34: ...vos para la conexión de equipos de extracción y recolección de polvo asegúrese de conectarlos y utilizarlos debida mente Hacer uso de la recolección de polvo puede reducir los riesgos relacionados con el polvo Mantenimiento y uso de la herramienta eléctrica 1 No fuerce la herramienta eléctrica Utilice la herramienta eléctrica correcta para su aplica ción La herramienta eléctrica adecuada hará un m...

Страница 35: ... un rato haciéndola funcionar sin carga Esto facilitará la lubricación Sin un calentamiento apropiado la operación de percusión resultará difícil 8 Asegúrese siempre de que pisa sobre suelo firme Asegúrese de que no haya nadie debajo cuando utilice la herramienta en lugares altos 9 Sujete la herramienta firmemente con ambas manos 10 Mantenga las manos alejadas de las piezas móviles 11 No deje la h...

Страница 36: ...ya que la iluminación podría disminuir Accionamiento del conmutador de inversión de giro PRECAUCIÓN Confirme siempre la direc ción de rotación antes de la operación PRECAUCIÓN Utilice el conmutador de inversión solamente después de que la herra mienta haya parado completamente Si cambia la dirección de rotación antes de que la herramienta haya parado podría dañarla AVISO Cuando cambie la dirección...

Страница 37: ...e cambio rápido y gire la línea de la cubierta de cambio al símbolo hasta que se pueda escuchar claramente un clic 2 4 1 3 1 Portabrocas adaptador de cambio rápido 2 Eje 3 Línea de la cubierta de cambio 4 Cubierta de cambio Selección del modo de accionamiento AVISO No gire la perilla de cambio de modo de accionamiento cuando la herramienta esté en marcha Esto podría causar daños a la herramienta A...

Страница 38: ...s para facilitar la operación Control de velocidad constante La función de control de velocidad permite una rotación constante independientemente de las condiciones de carga Conducto de aire Para los modelos HR3011FC HR3012FC solamente PRECAUCIÓN No coloque su dedo dentro del conducto de aire ni inserte cualquier otro objeto extraño en el mismo De lo contrario podría lesionarse o la herramienta po...

Страница 39: ... broca 1 2 1 Extremo de la espiga 2 Grasa Inserte la broca en la herramienta Gire la broca y empújela hacia adentro hasta que quede enganchada Después de instalar la broca asegúrese siempre de que la broca quede asegurada en su lugar intentando jalarla hacia afuera 1 1 Broca Para extraer la broca jale hasta abajo la cubierta del portabrocas y jale la broca hacia afuera 1 2 1 Broca 2 Cubierta del p...

Страница 40: ...onal Utilice el contenedor de polvo para evitar que el polvo caiga sobre la herramienta y sobre usted al realizar operaciones de perforación por encima de su cabeza Fije el contenedor de polvo en la punta tal como se muestra en la ilustración El tamaño de las puntas en las que el contenedor de polvo puede fijarse es el que se indica a continuación Modelo Diámetro de la punta Contenedor de polvo 5 ...

Страница 41: ...l modelo HR3012FC Antes de instalar el juego contenedor de polvo extraiga la punta de la herramienta en caso de estar instalada Instale el juego contenedor de polvo en la herramienta de manera que el símbolo en el contenedor de polvo quede alineado con la ranura en la herramienta 2 1 1 1 1 símbolo 2 Ranura Para extraer el juego contenedor de polvo retire la punta mientras jala la cubierta del port...

Страница 42: ...de la herramienta a esta última siga los pasos a continuación 1 Desconecte la clavija de conexión del suministro de energía 2 Inserte las protuberancias del colgador de la herramienta dentro de los orificios en la herramienta 3 Apriete los tornillos firmemente 2 1 4 3 1 Colgador de la herramienta 2 Orificio 3 Protuberancia 4 Tornillo SISTEMA DE RECOLECCIÓN DE POLVO Para los modelos HR3011FC HR3012...

Страница 43: ...ficultar la instalación del sistema de recolección de polvo En particular las materias extrañas en la inter faz eléctrica pueden causar un mal funcionamiento Si queda polvo en el conducto de aire el polvo entra en la herramienta y causa un atasco en el flujo de aire o la avería de la herramienta Enganche el sistema de recolección de polvo en la herramienta y luego inserte el sistema de recolección...

Страница 44: ...vo o cuando crea que el rendimiento de aspiración se ha reducido NOTA 50 000 mm3 de polvo equivalen a perforar 10 orificios de ø10 mm y 14 mm de profundidad 2 orifi cios de ø65 y 3 8 de profundidad 1 2 1 Caja para polvo 2 Selector Eliminación del polvo PRECAUCIÓN Cuando vaya a proceder a eli minar el polvo utilice una máscara contra polvo PRECAUCIÓN Vacíe la caja para polvo regu larmente antes de ...

Страница 45: ...sempeño de la recolección de polvo se verá reducido Reemplácelo si presenta indicios de desgaste Retire el tapón sellador y luego coloque uno nuevo con su protuberancia orientada hacia arriba 2 1 1 Protuberancia 2 Tapón sellador OPERACIÓN PRECAUCIÓN Utilice siempre la empuña dura lateral mango auxiliar y sujete firmemente la herramienta tanto de la empuñadura lateral como del mango del interruptor...

Страница 46: ...ta firmemente con ambas manos Encienda la herramienta y aplique una ligera presión sobre ella de manera que no rebote de forma descon trolada Aplicar mucha presión sobre la herramienta no incre mentará la eficiencia Taladrado en madera o metal PRECAUCIÓN Sujete firmemente la herra mienta y tenga cuidado cuando la broca de tala dro comience a penetrar en la pieza de trabajo La fuerza ejercida en la...

Страница 47: ...milar Esto podría dañar el juego contenedor de polvo debido al calor producido por las pequeñas partí culas de polvo de metal o material similar AVISO No instale ni extraiga el juego contene dor de polvo con la broca instalada en la herra mienta Esto podría dañar el juego contenedor de polvo y causar la filtración de polvo Conexión del cordel de seguridad correa de amarre al colgador de la herrami...

Страница 48: ...escoloramiento Para mantener la SEGURIDAD y FIABILIDAD del pro ducto las reparaciones y cualquier otra tarea de man tenimiento o ajuste deberán ser realizadas en centros de servicio autorizados o de fábrica Makita empleando siempre repuestos Makita ACCESORIOS OPCIONALES PRECAUCIÓN Estos accesorios o aditamen tos están recomendados para utilizarse con su herramienta Makita especificada en este manu...

Страница 49: ...49 ...

Страница 50: ...50 ...

Страница 51: ...51 ...

Страница 52: ... por el lijado aserrado esmerilado taladrado y otras actividades de la construcción contienen sustancias químicas reconocidas por el Estado de California como causantes de cáncer defectos de nacimiento y otros peligros de reproducción Algunos ejemplos de estos productos químicos son plomo de pinturas a base de plomo sílice cristalino de ladrillos y cemento y otros productos de albañilería y arséni...

Отзывы: