Makita GCV07 Скачать руководство пользователя страница 18

18 ENGLISH

Troubleshooting for wireless activation function

Before asking for repairs, conduct your own inspection first. If you find a problem that is not explained in the manual, 

do not attempt to dismantle the tool. Instead, ask Makita Authorized Service Centers, always using Makita replace

-

ment parts for repairs.

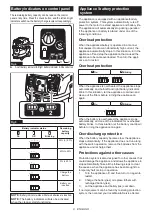
State of abnormality

Probable cause (malfunction)

Remedy

The wireless activation lamp does 

not light/blink.

The wireless unit is not installed into the 

cleaner and/or the tool. 

The wireless unit is improperly installed 

into the cleaner and/or the tool.

Install the wireless unit correctly.

The wireless activation button on the 

tool has not been pushed.

Push the wireless activation button on the tool 

briefly.

The stand-by switch on the cleaner is 

not set to "AUTO".

Set the stand-by switch on the cleaner to "AUTO".

No power supply

Supply the power to the tool and the cleaner.

Cannot finish tool registration / can

-

celling tool registration successfully.

The wireless unit is not installed into the 

cleaner and/or the tool.  

The wireless unit is improperly installed 

into the cleaner and/or the tool.

Install the wireless unit correctly.

The stand-by switch on the cleaner is 

not set to "AUTO".

Set the stand-by switch on the cleaner to "AUTO".

No power supply

Supply the power to the tool and the cleaner.

Incorrect operation

Push the wireless activation button briefly and perform 

the tool registration/cancellation procedures again.

The tool and cleaner are away from 

each other (out of the transmission 

range).

Get the tool and the cleaner closer to each other. The 

maximum transmission distance is approximately 10 m 

however it may vary according to the circumstances.

Before finishing the tool registration/cancellation;


- the switch of the tool is turned on or; 


- the power button on the cleaner is turned on.

Push the wireless activation button briefly and 

perform the tool registration/cancellation procedures 

again.

The tool registration procedures for the 

tool or the cleaner has not finished.

Perform the tool registration procedures for the tool 

and the cleaner at the same timing.

Radio disturbance by other appliances 

which generate high-intensity radio waves.

Keep the tool and the cleaner away from the appli-

ances such as Wi-Fi devices and microwave ovens.

The cleaner does not run along with 

the switch operation of the tool.

The wireless unit is not installed into the 

cleaner and/or the tool. 

The wireless unit is improperly installed 

into the cleaner and/or the tool.

Install the wireless unit correctly.

The wireless activation button on the 

tool has not been pushed.

Push the wireless activation button briefly and make 

sure that the wireless activation lamp is blinking in blue.

The stand-by switch on the cleaner is 

not set to "AUTO".

Set the stand-by switch on the cleaner to "AUTO".

More than 10 tools are registered to 

the cleaner.

Perform the tool registration again. 

If more than 10 tools are registered to the cleaner, the 

tool registered earliest will be cancelled automatically.

The cleaner erased all tool registrations.

Perform the tool registration again.

No power supply

Supply the power to the tool and the cleaner.

The tool and cleaner are away from 

each other (out of the transmission 

range).

Get the tool and the cleaner closer to each other. The 

maximum transmission distance is approximately 10 m 

however it may vary according to the circumstances.

Radio disturbance by other appliances 

which generate high-intensity radio waves.

Keep the tool and the cleaner away from the appli-

ances such as Wi-Fi devices and microwave ovens.

The cleaner runs while the tool is not 

operating.

Other users are using the wireless acti-

vation of the cleaner with their tools.

Turn off the wireless activation button of the other 

tools or cancel the tool registration of the other tools.

Cannot erase all tool registrations in 

the cleaner.

Pressing the wireless button on the tool. Press the wireless button on the cleaner for erasing 

all tool registrations.

The stand-by switch on the cleaner is 

not set to "AUTO".

Set the stand-by switch on the cleaner to "AUTO".

The wireless activation button is not 

held down correctly.

Hold down the wireless activation button for more than 6 

seconds and then release it when the wireless activation 

lamp blinks in red. Hold down the wireless activation button 

for more than 6 seconds again until the wireless activation 

button rapidly blinks in red and then release the button.

Содержание GCV07

Страница 1: ...INSTRUCTION MANUAL MANUAL DE INSTRUCCIONES Cordless Vacuum Cleaner Aspiradora Inalámbrica GCV07 IMPORTANT Read Before Using IMPORTANTE Lea antes de usar ...

Страница 2: ...attery cartridge s are shown in the table Applicable battery cartridge and charger Battery cartridge BL4020 BL4025 BL4040 BL4050F BL4080F Recommended battery Charger DC40RA DC40RB DC40RC Some of the battery cartridges and chargers listed above may not be available depending on your region of residence WARNING Only use the battery cartridges and chargers listed above Use of any other battery cartri...

Страница 3: ...en zine thinner etc Hot substances that are burn ing or smoking cigarettes matches incense sticks can dles hot ashes sparks and metal dust generated by cutting or grinding metal etc Flammable material toner paint spray etc Foam like carpet cleaning agent etc they may cause explosion or fire Explosive or pyrophoric sub stances nitroglycerin alumi num magnesium titanium zinc red phosphorus yellow ph...

Страница 4: ...dditionally seek medical help Liquid ejected from the battery may cause irritation or burns 7 Do not use a battery pack or appli ance that is damaged or modified Damaged or modified batteries may exhibit unpredictable behavior resulting in fire explosion or risk of injury 8 Do not expose a battery pack or appliance to fire or excessive tem perature Exposure to fire or tem perature above 130 C may ...

Страница 5: ...shipped consulting an expert for hazardous material is required Please also observe possibly more detailed national regulations Tape or mask off open contacts and pack up the battery in such a manner that it cannot move around in the packaging 11 When disposing the battery car tridge remove it from the tool and dispose of it in a safe place Follow your local regulations relating to disposal of bat...

Страница 6: ...e correct direction 16 Do not press the wireless activation button on the wireless unit too hard and or press the button with an object with a sharp edge 17 Always close the lid of the slot when operating 18 Do not remove the wireless unit from the slot while the power is being supplied to the tool Doing so may cause a malfunction of the wireless unit 19 Do not remove the sticker on the wireless u...

Страница 7: ...injury to you or someone around you CAUTION Do not install the battery cartridge forcibly If the cartridge does not slide in easily it is not being inserted correctly NOTE The cleaner does not work with only one battery cartridge Indicating the remaining battery capacity Press the check button on the battery cartridge to indi cate the remaining battery capacity The indicator lamps light up for a f...

Страница 8: ...hat caused the appliance to become overloaded Then turn the appli ance on to restart Overheat protection On Blinking When the appliance is overheated the appliance stops automatically and both left and right battery indicators blink In this situation let the appliance cool down and clean out the filters before turning the appliance on again On Blinking When the battery is overheated the appliance ...

Страница 9: ...ontinuous use under such conditions may cause an electric shock and breakage of the cleaner The cleaner has a mechanism that prevents water from immersing into the motor when picking up more than a certain amount of water When the tank is full with liquid the cleaner stops auto matically Switch off the cleaner and empty the tank Filter cleaning system This appliance has filter cleaning system Duri...

Страница 10: ...that the caster is unlocked Moving the cleaner with the caster in a locked position may cause damage to the caster Carriage handle CAUTION Lift and carry the appliance with due care Failing to do so may result in personal injury or damage to the appliance When carrying the cleaner carry it by holding the han dle on the head unit The handle is retractable on the head unit when not in use Fig 10 If ...

Страница 11: ...ardboard of the filter bag onto the tool so that it is positioned at the end beyond the detent protrusion 1 2 3 4 5 Fig 14 1 Filter bag 2 Cardboard opening 3 Filter bag holder 4 Dust intake 5 Edge When disposing the filter bag pull the edge on the filter bag s mouth so that the mouth is closed by a paper Installing polyethylene bag Lay a polyethylene bag over the tank and slip one side of the top ...

Страница 12: ...ene bag to be torn Installing hose NOTICE Never force the hose for bending or stamp it Never move the cleaner by pulling the hose Forcing stamping and pulling the hose may cause a breakage or deformation of the hose NOTICE When picking up large wastes such as planer carvings concrete dusts or similar other than small wastes use the 38 mm inner diameter hose optional accessory Using the 28 mm inner...

Страница 13: ...nstalling MAKPAC Failing to do so may result in personal injury or damage to the appliance CAUTION When MAKPAC is installed on the appliance do not lift the appliance with the han dle of MAKPAC CAUTION When moving the appliance which is installed MAKPAC do not push MAKPAC but the body of appliance Pushing MAKPAC may break the latches and drop MAKPAC which may result in personal injury Connectable ...

Страница 14: ...re less units are registered to one wireless unit the one registered earliest will be cancelled automatically NOTE The position of the wireless activation button varies depending on the tool NOTE The cleaner also starts by pressing the power button when the stand by switch is set to AUTO However the power button will not actuate when the wireless activation function is used Installing the wireless...

Страница 15: ...cleaner and the tool are linked successfully the wireless activation lamps will light up in green for 2 seconds and start blinking in blue NOTE The wireless activation lamps finish blinking in green after 20 seconds elapsed Press the wireless activation button on the tool while the wireless acti vation lamp on the cleaner is blinking If the wireless activation lamp does not blink in green push the...

Страница 16: ... tool registration for the cleaner Perform the following procedure when cancelling the tool registration for the cleaner 1 Install the wireless units to the cleaner and the tool respectively 2 Install the batteries to the cleaner and the tool 3 Set the stand by switch on the cleaner to AUTO 1 Fig 31 1 Stand by switch 4 Press the wireless activation button on the cleaner for 6 seconds The wireless ...

Страница 17: ...g Duration approximate Standby Blue Cleaner con tinuing Tool 2 hours Waiting for the tool registration or the wireless activation function is available The lamp on the cleaner blinks when the stand by switch is set in AUTO The lamp on the tool blinks when the wireless activation button is pushed The lamp on the tool will automatically turn off when no operation is performed for 2 hours When the to...

Страница 18: ...y other appliances which generate high intensity radio waves Keep the tool and the cleaner away from the appli ances such as Wi Fi devices and microwave ovens The cleaner does not run along with the switch operation of the tool The wireless unit is not installed into the cleaner and or the tool The wireless unit is improperly installed into the cleaner and or the tool Install the wireless unit cor...

Страница 19: ...CAUTION Be careful not to let the dust enter inside the tank cover when removing the filter unit The filter unit is attached on the head unit It consists of top plate prefilters dampers and powder filters 1 Release the locking hooks and lift the head unit up off the tank 2 Remove the filter unit from the head unit as shown in the figure 1 2 Fig 35 1 Latch 2 Filter unit Removing powder filter and p...

Страница 20: ...der filter and prefilter NOTICE The powder filter and prefilter can pick up both dry dusts and wet dusts Make sure that the water level sensors activate properly to pre vent the powder filter breakage Hook the edges of the filter unit to the top plate and then lower the knob 2 1 Fig 40 1 Edge 2 Knob NOTICE Before using the powder filter make sure that prefilter and damper are used together It is n...

Страница 21: ...rs detect liquid when the tank becomes full with liquid Clean the water level sensors with a soft cloth from time to time when changing filters 1 Fig 44 1 Water level sensor Storage of accessories Accessories and attachments not in use such as noz zles and pipes can be stored hanging on the hook at the rear of the cleaner 1 Fig 45 1 Accessory and attachment not in use Pipes with an optional stoppe...

Страница 22: ...le Round brush Powder filter M H HEPA Damper Prefilter Water filter Nozzle assembly Bent pipe Polyethylene bag Filter bag Makita genuine battery and charger Wireless unit MAKPAC NOTE Some items in the list may be included in the tool package as standard accessories They may differ from country to country MAKITA LIMITED WARRANTY Please refer to the annexed warranty sheet for the most current warran...

Страница 23: ...ho de batería y cargador aplicables Cartucho de batería BL4020 BL4025 BL4040 BL4050F BL4080F Batería recomendada Cargador DC40RA DC40RB DC40RC Algunos de los cartuchos de batería y cargadores enumerados arriba podrían no estar disponibles depen diendo de su área de residencia ADVERTENCIA Use únicamente los cartuchos de batería y los cargadores indicados arriba El uso de cualquier otro cartucho de ...

Страница 24: ...argue la batería en exteriores 16 No utilice la aspiradora como banco o mesa de trabajo La máquina podría caerse y ocasionar una lesión personal 17 No aspire los siguientes elementos Líquidos inflamables quero seno gasolina disolventes como bencina diluyentes etc Sustancias calientes que están ardiendo o echando humo cigarrillos cerillas palitos de incienso velas cenizas calien tes chispas y polvo...

Страница 25: ... fabricante Un cargador que es adecuado para un solo tipo de batería puede generar riesgo de incendio al ser utilizado con otra batería 4 Use los aparatos únicamente con los paquetes de baterías designa dos específicamente para ellos El uso de otros paquetes de baterías puede generar riesgo de lesiones e incendio 5 Cuando no se esté usando la bate ría manténgala alejada de otros objetos metálicos ...

Страница 26: ...ocircuitar el cartucho de batería 1 No toque las terminales con nin gún material conductor 2 Evite guardar el cartucho de batería en un cajón junto con otros objetos metálicos tales como clavos monedas etc 3 No exponga el cartucho de bate ría al agua o la lluvia Un cortocircuito en la batería puede causar un flujo grande de corriente sobrecalentamiento posibles quemaduras e incluso una descompostu...

Страница 27: ...rías exploten causando un incendio lesiones personales y daños Asimismo esto inva lidará la garantía de Makita para la herramienta y el cargador Makita Consejos para alargar al máximo la vida útil de la batería 1 Cargue el cartucho de batería antes de que se descargue completamente Pare siem pre la operación y cargue el cartucho de batería cuando note menos potencia en la herramienta 2 No cargue n...

Страница 28: ...tancias similares 26 Cuando vaya a almacenar la unidad inalám brica guárdela en el estuche suministrado o en un contenedor libre de electricidad estática 27 No inserte ningún otro dispositivo que no sea la unidad inalámbrica de Makita en la ranura de la herramienta 28 No utilice la herramienta si la tapa de la ranura está dañada La entrada de agua polvo o sucie dad en la ranura podría causar una a...

Страница 29: ...Botón de verificación Luces indicadoras Capacidad restante Iluminadas Apagadas Parpadeando 75 a 100 50 a 75 25 a 50 0 a 25 Cargar la batería La batería pudo haber funcionado mal NOTA Dependiendo de las condiciones de uso y la temperatura ambiente la indicación podrá diferir ligeramente de la capacidad real NOTA La primera luz indicadora extrema izquierda parpadeará cuando el sistema de protección ...

Страница 30: ...rato y recárguelas Protección contra otras causas El sistema de protección también está diseñado para otras causas que podrían dañar el aparato y permite que el aparato se detenga automáticamente Siga todos los pasos a continuación para eliminar las causas cuando el aparato se haya detenido temporalmente o se haya detenido durante el funcionamiento 1 Apague el aparato y luego enciéndalo nueva ment...

Страница 31: ...isminuir En ese caso se recomienda la limpieza manual del filtro 1 Apague el aparato 2 Ponga la potencia de succión al máximo y luego cierre la abertura de la manguera de succión con la palma de su mano 3 Apague el aparato y póngalo en funcionamiento por alrededor de 15 segundos con la abertura de la manguera de succión cerrada 1 Fig 7 1 Abertura de la manguera de succión NOTA El volumen de aire p...

Страница 32: ...ato esté apagado y los cartuchos de batería hayan sido extraídos antes de realizar cualquier trabajo en el aparato PRECAUCIÓN Utilice siempre una más cara contra el polvo durante el ensamblado o mantenimiento Instalación y desecho de la bolsa del filtro Accesorio opcional ADVERTENCIA Antes de usar una bolsa del filtro asegúrese de que la unidad de filtro se utilice en conjunto No utilizar la unida...

Страница 33: ...des superiores del tanque Se puede usar una bolsa de polietileno con la bolsa del filtro 1 2 3 Fig 15 1 Placa del sujetador 2 Pared frontal del tanque 3 Bolsa de polietileno NOTA Se puede utilizar cualquier bolsa de polieti leno disponible en el mercado Se recomienda que el grosor sea superior a 0 04 mm 1 6 mil y el perímetro sea superior a 2 000 mm 78 3 4 NOTA Demasiado polvo rasgará fácilmente l...

Страница 34: ...o entrada de la manguera de la aspiradora luego gírelo en el sentido de las manecillas del reloj hasta que encaje en su lugar 1 2 Fig 17 1 Manguera 2 Admisión para polvo entrada de la manguera Conexiones con sus herramientas de trabajo Específico del país Al conectar la aspiradora a cualquier herramienta de trabajo disponible compatible con la aspiradora funciona como un extractor de polvo para su...

Страница 35: ...to MAKPAC conectables y apilables se pueden instalar en la parte superior de la aspiradora Las cajas están disponibles en muchos tamaños y estilos para adaptarse a sus preferencias 1 Despliegue los pestillos de la superficie superior de la aspiradora 1 Fig 20 1 Pestillo 2 Monte las cajas MAKPAC sobre la aspiradora y fíjelas con los pestillos 1 2 Fig 21 1 Pestillo 2 MAKPAC La altura y peso máximos ...

Страница 36: ...ede ponerse en marcha oprimiendo el botón de encendido apagado cuando el interruptor de modo en espera está ajus tado en AUTO Sin embargo el botón de encendido apagado no se activará cuando la función de activación inalámbrica se esté utilizando Instalación de la unidad inalámbrica ADVERTENCIA Abra la tapa solo cuando instale la unidad inalámbrica por primera vez Nunca abra la tapa después de inst...

Страница 37: ...erde Y luego oprima el botón de activación inalámbrica en la herramienta de la misma manera 1 1 2 2 Fig 27 1 Botón de activación inalámbrica 2 Luz indica dora de activación inalámbrica Si la aspiradora y la herramienta han sido conectadas exitosamente las luces indicadoras de activación ina lámbrica se encenderán en verde durante 2 segundos y comenzarán a parpadear en azul NOTA Las luces indicador...

Страница 38: ... de modo en espera en la aspiradora en I o en O NOTA La luz indicadora de activación inalámbrica en la herramienta dejará de parpadear en azul cuando no haya operación durante 2 horas En este caso ajuste el interruptor de modo en espera en la aspi radora en AUTO y oprima el botón de activación inalámbrica en la herramienta nuevamente NOTA La aspiradora se pondrá en marcha deten drá con un retraso ...

Страница 39: ...s registros de herramientas de la aspiradora como se indica a continuación 1 2 3 Fig 33 1 Interruptor de modo en espera 2 Botón de acti vación inalámbrica 3 Luz indicadora de activación inalámbrica 1 Instale la unidad inalámbrica en la aspiradora 2 Instale las baterías en la aspiradora 3 Ajuste el interruptor de modo en espera en AUTO 4 Mantenga oprimido el botón de activación inalám brica durante...

Страница 40: ...e realiza ninguna operación durante 2 horas Cuando la herra mienta está funcionando La activación inalámbrica de la aspiradora está disponible y la herramienta está funcionando Registro de la herramienta Verde 20 segundos Ya se puede realizar el registro de la herramienta Se está bus cando la herramienta que se va a registrar 2 segundos El registro de la herramienta ha terminado La luz indicadora ...

Страница 41: ...brica está instalada incorrectamente en la aspiradora y o la herramienta Instale la unidad inalámbrica correctamente El interruptor de modo en espera en la aspiradora no está ajustado en AUTO Ajuste el interruptor de modo en espera en la aspiradora en AUTO No hay suministro de energía Suministre energía a la herramienta y a la aspiradora Operación incorrecta Oprima el botón de activación inalámbri...

Страница 42: ...enta a la aspiradora La distancia máxima de transmisión es de aproxima damente 10 m pero puede variar en función de las circunstancias La perturbación radioeléctrica generada por otros aparatos que emiten ondas de radio de alta intensidad Mantenga la herramienta y la aspiradora lejos de aparatos tales como dispositivos Wi Fi y hornos de microondas La aspiradora funciona mien tras la herramienta no...

Страница 43: ...UCIÓN Tenga cuidado de que no entre polvo dentro de la cubierta del tanque cuando retire la unidad de filtro La unidad de filtro esta colocada sobre el cabezal Comprende la placa superior prefiltros amortiguadores y filtros de polvo 1 Suelte los ganchos de bloqueo y levante el cabe zal para retirarlo del tanque 2 Retire la unidad de filtro del cabezal como se muestra en la figura 1 2 Fig 35 1 Pest...

Страница 44: ...El filtro de polvo y el prefiltro pueden reco ger tanto polvo seco como húmedo Asegúrese de que los sensores de nivel de agua se activen correc tamente para evitar la rotura del filtro de polvo Enganche los bordes de la unidad de filtro a la placa superior y luego baje la perilla 2 1 Fig 40 1 Borde 2 Perilla AVISO Antes de usar el filtro de polvo asegúrese de que el prefiltro y el amortiguador sie...

Страница 45: ...líquido cuando el tanque se llena de líquido Cuando cambie los filtros limpie los senso res de nivel de agua con un paño suave de vez en cuando 1 Fig 44 1 Sensor de nivel de agua Almacenamiento de los accesorios Los accesorios y aditamentos que no se utilicen como boquillas y tubos se pueden almacenar colgados del gancho en la parte trasera de la aspiradora 1 Fig 45 1 Accesorio y aditamento cuando...

Страница 46: ...o M H HEPA Amortiguador Prefiltro Filtro de agua Conjunto de boquillas Tubo curvo Bolsa de polietileno Bolsa del filtro Batería y cargador originales de Makita Unidad inalámbrica MAKPAC NOTA Algunos de los artículos en la lista pueden incluirse en el paquete de la herramienta como acce sorios estándar Éstos pueden variar de país a país GARANTÍA LIMITADA DE MAKITA Ésta Garantía no aplica para Méxic...

Страница 47: ...47 ...

Страница 48: ...ados por el lijado aserrado esmerilado taladrado y otras actividades de la construcción contienen sustancias químicas reconocidas por el Estado de California como causantes de cáncer defectos de nacimiento y otros peligros de reproducción Algunos ejemplos de estos productos químicos son plomo de pinturas a base de plomo sílice cristalino de ladrillos y cemento y otros productos de albañilería y ar...

Отзывы: