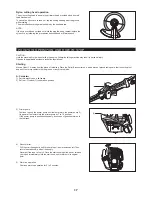
25
(For B & F4/Z5)
WARNING: Make sure that the cover of the nylon cutting head is secured to
the housing properly as described below. Failure to properly secure
WKHFRYHUPD\FDXVHWKHQ\ORQFXWWLQJKHDGWRÀ\DSDUWUHVXOWLQJLQ
VHULRXVSHUVRQDOLQMXU\
Press inward on the housing latches and lift upward to remove the cover.
Discard any of the remaining nylon cord.
Hook the middle of the new nylon cord to the notch located at the center of the
spool between the 2 channels provided for the nylon cord. One side of the cord
should be about 80 mm longer than the other side.
:LQGERWKHQGV¿UPO\DURXQGWKHVSRROLQWKHGLUHFWLRQPDUNHGRQWKHKHDGIRU
left hand direction indicated by LH.
Cover
Latches
Press
Press
80 mm
For left hand
rotation
Spool
Wind all but about 100 mm of the cords, leaving the ends temporarily hooked
through a notch on the side of the spool.
100 mm
Notches
Align the protrusion on the underside of the cover with the slots of the eyelets.
7KHQSXVKFRYHU¿UPO\RQWRWKHKRXVLQJWRVHFXUHLW0DNHVXUHWKHODWFKHVIXOO\
spread in the cover.
Cover
Protrusion
Slot of eyelet
Mount the spool in the housing so that the grooves and protrusions on the
spool match up with those in the housing. Keep the side with letters on the
spool visible on the top. Now, unhook the ends of the cord from their temporary
position and feed the cords through the eyelets to come out of the housing.
Eyelets


