background image

12 ENGLISH

Quick mode-switching function

What you can do with the quick mode-

switching function

The quick mode-switching function saves the time for changing 

the application mode of the tool. You can switch to your desired 

application mode by just pressing the quick mode-switching 

button. It is helpful when doing a repetitive work which requires 

to switch between two application modes alternately.

EXAMPLE

 If you have a work to use T mode and max 

impact force, register the max impact force for quick 

mode-switching function. Once register it, you can switch 

to the max impact force from T mode by just one click of 

the quick mode-switching button. Also, you can return to T 

mode by pressing the quick mode-switching button again.
Even if the tool is in other application mode than T 

mode, pressing the quick mode-switching button 

changes to max impact force. It is convenient for you 

to register a application mode that you frequently use.

You can choose one of following application modes for 

quick mode-switching function:

Impact force

• Max
• Hard
• Medium
• Soft

Assist type

• 

Wood mode

• 

Bolt mode

• 

T mode (1)

• 

T mode (2)

Registering application mode

To use the quick mode-switching function, register your 

desired application mode to the tool beforehand.

1.


With the button 

 or 

 , choose your desired 

application mode.

2.

  Press and hold the button 

 and the quick 

mode-switching button at the same time until the custom-

ize lamp and the lamp of desired application mode blinks.

1

2

►    

1.

 Quick mode-switching button 

2.

 Customize lamp

NOTE:

 You can overwrite the current application mode 

with new one by performing the procedure above.

Using the quick mode-switching function

When the tool is in the mode that is not registered, 

press the quick mode-switching button to switch to the 

registered application mode. The tool switches between 

the registered application mode and last application 

mode every time you press the quick mode-switching 

button. The front lamps on both sides will flash once 

when switching to the registered application mode.

NOTE:

 The customize lamp will light up when the 

application mode registered to the tool is chose.

Cancelling the quick mode-switching 

function

Press and hold the button 

 and quick mode-switch-

ing button at the same time until the customize lamp 

and all impact force grade lamps blink.

NOTE:

 After cancelling the quick mode-switching 

function, the quick mode-switching button works for 

changing the impact force.

ASSEMBLY

CAUTION:


Always be sure that the tool is 

switched off and the battery cartridge is removed 

before carrying out any work on the tool.

Installing or removing driver bit/

socket bit

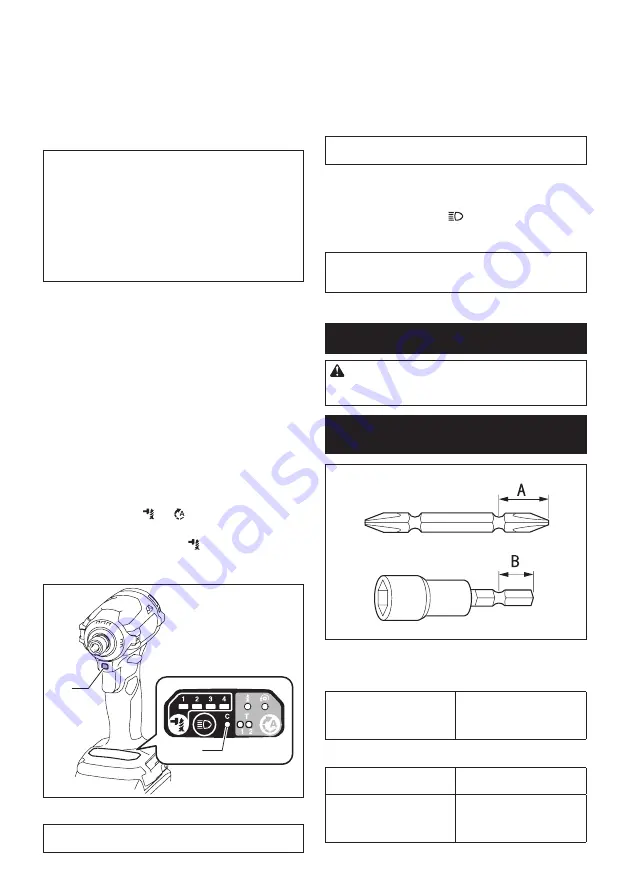
Use only driver bit/socket bit that has inserting portion shown 

in the figure. Do not use any other driver bit/socket bit.

For tool with shallow driver bit hole

A=12mm 

B=9mm 

Use only these type of driver 

bit. Follow the procedure 

1. (Note) Bit-piece is not 

necessary.

For tool with deep driver bit hole

A=17mm 

B=14mm

To install these types of driver 

bits, follow the procedure 1.

A=12mm 

B=9mm

To install these types of driver 

bits, follow the procedure 2. 

(Note) Bit-piece is necessary 

for installing the bit.

Содержание DTD171Z

Страница 1: ...INSTRUCTION MANUAL Cordless Impact Driver DTD171 ENGLISH Original instructions Read before use ...

Страница 2: ...ing to EPTA Procedure 01 2014 are shown in the table Applicable battery cartridge and charger Battery cartridge BL1815N BL1820 BL1820B BL1830 BL1830B BL1840 BL1840B BL1850 BL1850B BL1860B Charger DC18RC DC18RD DC18RE DC18SD DC18SE DC18SF Some of the battery cartridges and chargers listed above may not be available depending on your region of residence WARNING Only use the battery cartridges and ch...

Страница 3: ...ich may ignite the dust or fumes 3 Keep children and bystanders away while operating a power tool Distractions can cause you to lose control Electrical Safety 1 Power tool plugs must match the outlet Never modify the plug in any way Do not use any adapter plugs with earthed grounded power tools Unmodified plugs and matching outlets will reduce risk of electric shock 2 Avoid body contact with earth...

Страница 4: ...ents are caused by poorly maintained power tools 6 Keep cutting tools sharp and clean Properly maintained cutting tools with sharp cutting edges are less likely to bind and are easier to control 7 Use the power tool accessories and tool bits etc in accordance with these instructions tak ing into account the working conditions and the work to be performed Use of the power tool for operations differ...

Страница 5: ...y cartridge in a con tainer with other metal objects such as nails coins etc 3 Do not expose battery cartridge to water or rain A battery short can cause a large current flow overheating possible burns and even a breakdown 6 Do not store the tool and battery cartridge in locations where the temperature may reach or exceed 50 C 122 F 7 Do not incinerate the battery cartridge even if it is severely ...

Страница 6: ...slide in easily it is not being inserted correctly Tool battery protection system The tool is equipped with a tool battery protection sys tem This system automatically cuts off power to the motor to extend tool and battery life The tool will auto matically stop during operation if the tool or battery is placed under one of the following conditions Overload protection When the battery is operated i...

Страница 7: ...atus To turn off the lamp status first pull and release the switch trigger And then press the button within 10 seconds To turn on the lamp status again press the but ton again similarly NOTE When the tool is overheated the light flashes for one minute and then the LED display goes off In this case cool down the tool before operating again NOTE To confirm the lamp status pull the trigger When the l...

Страница 8: ...ode Quick mode switching button The function of the quick mode switching button varies depending on whether you have registered the applica tion mode to the tool 1 1 Quick mode switching button When the application mode is not registered The level of impact force changes every time you press the quick mode switching button The front lamps on both sides will flash once when the impact force is chan...

Страница 9: ...lication mode blinks When quick mode switch ing function is OFF Changing the impact force by the quick mode switch ing button The lamps on the tool flash once When quick mode switch ing function is ON Switching to the registered application mode The lamps on the tool flash once Erasing the registered application mode The customize lamp and all impact force grade lamps blink Disabling resuming the ...

Страница 10: ...underwork materi als tightening long screws or bolts Hard 3 600 min 1 min Tightening with less force and speed than Max mode easier to control than Max mode Driving screws to underwork materi als tightening bolts Medium 2 600 min 1 min Tightening when a good finishing is needed Driving screws to finishing boards or plaster boards Soft 1 100 min 1 min Tightening with less force to avoid screw threa...

Страница 11: ...his mode helps to prevent the screws from over tightening It also accomplishes quick oper ation and good finish at the same time The tool drives a screw with high speed rotation and stops soon after the tool starts to impact NOTE The timing to stop the driving varies depending on the type of the screw and material to be driven Make a test driving before using this mode Driving self drilling screws...

Страница 12: ...s 1 2 1 Quick mode switching button 2 Customize lamp NOTE You can overwrite the current application mode with new one by performing the procedure above Using the quick mode switching function When the tool is in the mode that is not registered press the quick mode switching button to switch to the registered application mode The tool switches between the registered application mode and last applic...

Страница 13: ...secured In this case try re inserting the bit according to the instruc tions above NOTE When it is difficult to insert the driver bit pull the sleeve and insert it into the sleeve as far as it will go NOTE After inserting the driver bit make sure that it is firmly secured If it comes out do not use it Installing hook CAUTION When installing the hook always secure it with the screw firmly If not th...

Страница 14: ...rform a test operation to determine the proper fastening time for your screw The fastening torque is affected by a wide variety of factors including the following After fastening always check the torque with a torque wrench 1 When the battery cartridge is discharged almost completely voltage will drop and the fastening torque will be reduced 2 Driver bit or socket bit Failure to use the correct si...

Страница 15: ...y use accessory or attachment for its stated purpose If you need any assistance for more details regard ing these accessories ask your local Makita Service Center Driver bits Socket bits Bit piece Hook Tool hanger Plastic carrying case Makita genuine battery and charger Battery protector NOTE Some items in the list may be included in the tool package as standard accessories They may differ from co...

Страница 16: ...www makita com Makita Europe N V Makita Corporation 3 11 8 Sumiyoshi cho Anjo Aichi 446 8502 Japan Jan Baptist Vinkstraat 2 3070 Kortenberg Belgium 885673 224 EN 20180620 ...

Отзывы: