background image

5 ENGLISH

10. 

Hold the power tool by insulated gripping 

surfaces only, when performing an operation 

where the cutting tool may contact hidden 

wiring.

 Contact with a "live" wire will also make 

exposed metal parts of the power tool "live" and 

could give the operator an electric shock.

11. 

Never lay the power tool down until the acces-

sory has come to a complete stop.

 The spinning 

accessory may grab the surface and pull the 

power tool out of your control.

12. 

Do not run the power tool while carrying it at 

your side.

 Accidental contact with the spinning 

accessory could snag your clothing, pulling the 

accessory into your body.

13. 

Regularly clean the power tool’s air vents.

 The 

motor’s fan will draw the dust inside the housing 

and excessive accumulation of powdered metal 

may cause electrical hazards.

14. 

Do not operate the power tool near flammable 

materials.

 Sparks could ignite these materials.

15. 

Do not use accessories that require liquid 

coolants.

 Using water or other liquid coolants 

may result in electrocution or shock.

Kickback and Related Warnings

Kickback is a sudden reaction to a pinched or snagged 

rotating wheel, backing pad, brush or any other acces

-

sory. Pinching or snagging causes rapid stalling of the 

rotating accessory which in turn causes the uncon

-

trolled power tool to be forced in the direction opposite 

of the accessory’s rotation at the point of the binding.

For example, if an abrasive wheel is snagged or 

pinched by the workpiece, the edge of the wheel that is 

entering into the pinch point can dig into the surface of 

the material causing the wheel to climb out or kick out. 

The wheel may either jump toward or away from the 

operator, depending on direction of the wheel’s move-

ment at the point of pinching. Abrasive wheels may also 

break under these conditions.

Kickback is the result of power tool misuse and/or 

incorrect operating procedures or conditions and can be 

avoided by taking proper precautions as given below.

1. 

Maintain a firm grip on the power tool and 

position your body and arm to allow you to 

resist kickback forces. Always use auxiliary 

handle, if provided, for maximum control over 

kickback or torque reaction during start-up.


The operator can control torque reactions or kick

-

back forces, if proper precautions are taken.

2. 

Never place your hand near the rotating acces-

sory.

 Accessory may kickback over your hand.

3. 

Do not position your body in the area where 

power tool will move if kickback occurs.


Kickback will propel the tool in direction opposite 

to the wheel’s movement at the point of snagging.

4. 

Use special care when working corners, sharp 

edges etc. Avoid bouncing and snagging the 

accessory.

 Corners, sharp edges or bouncing 

have a tendency to snag the rotating accessory 

and cause loss of control or kickback.

5. 

Do not attach a saw chain woodcarving blade 

or toothed saw blade.

 Such blades create fre-

quent kickback and loss of control.

Safety Warnings Specific for Grinding and Abrasive 

Cutting-Off Operations:

1. 

Use only wheel types that are recommended 

for your power tool and the specific guard 

designed for the selected wheel.

 Wheels for 

which the power tool was not designed cannot be 

adequately guarded and are unsafe.

2. 

The grinding surface of centre depressed 

wheels must be mounted below the plane of 

the guard lip.

 An improperly mounted wheel that 

projects through the plane of the guard lip cannot 

be adequately protected.

3. 

The guard must be securely attached to the 

power tool and positioned for maximum safety, 

so the least amount of wheel is exposed towards 

the operator. 

The guard helps to protect the opera

-

tor from broken wheel fragments, accidental contact 

with wheel and sparks that could ignite clothing.

4. 

Wheels must be used only for recommended 

applications. For example: do not grind with the 

side of cut-off wheel.

 Abrasive cut-off wheels are 

intended for peripheral grinding, side forces applied 

to these wheels may cause them to shatter.

5. 

Always use undamaged wheel flanges that are 

of correct size and shape for your selected 

wheel.

 Proper wheel flanges support the wheel 

thus reducing the possibility of wheel breakage. 

Flanges for cut-off wheels may be different from 

grinding wheel flanges.

6. 

Do not use worn down wheels from larger 

power tools.

 Wheel intended for larger power tool 

is not suitable for the higher speed of a smaller 

tool and may burst.

Additional Safety Warnings Specific for Abrasive 

Cutting-Off Operations:

1. 

Do not “jam“ the cut-off wheel or apply exces-

sive pressure. Do not attempt to make an 

excessive depth of cut.

 Overstressing the wheel 

increases the loading and susceptibility to twisting 

or binding of the wheel in the cut and the possibil-

ity of kickback or wheel breakage.

2. 

Do not position your body in line with and 

behind the rotating wheel.

 When the wheel, at 

the point of operation, is moving away from your 

body, the possible kickback may propel the spin

-

ning wheel and the power tool directly at you.

3. 

When wheel is binding or when interrupting 

a cut for any reason, switch off the power 

tool and hold the power tool motionless until 

the wheel comes to a complete stop. Never 

attempt to remove the cut-off wheel from the 

cut while the wheel is in motion otherwise 

kickback may occur.

 Investigate and take correc-

tive action to eliminate the cause of wheel binding.

4. 

Do not restart the cutting operation in the 

workpiece. Let the wheel reach full speed and 

carefully re-enter the cut.

 The wheel may bind, 

walk up or kickback if the power tool is restarted in 

the workpiece.

5. 

Support panels or any oversized workpiece to 

minimize the risk of wheel pinching and kick-

back.

 Large workpieces tend to sag under their 

own weight. Supports must be placed under the 

workpiece near the line of cut and near the edge 

of the workpiece on both sides of the wheel.

Содержание DGA467

Страница 1: ...TION MANUAL DE INSTRUCCIONES Cordless Angle Grinder Meuleuse d Angle sans Fil Esmeriladora Angular Inalámbrica DGA417 DGA418 DGA467 DGA468 DGA517 DGA518 IMPORTANT Read Before Using IMPORTANT Lire avant usage IMPORTANTE Lea antes de usar ...

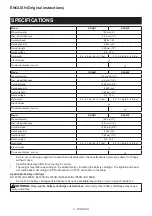
Страница 2: ...ss 6 4 mm 1 4 Spindle thread 15 88 mm 5 8 Rated speed n 8 500 min Overall length 382 mm 15 Rated voltage D C 18 V Net weight 2 4 3 1 kg 5 2 6 7 lbs 2 4 3 1 kg 5 3 6 8 lbs Electric brake Wireless activation function Due to our continuing program of research and development the specifications herein are subject to change without notice Specifications may differ from country to country The weight may...

Страница 3: ...ment such as dust mask non skid safety shoes hard hat or hearing protection used for appropriate conditions will reduce personal injuries 3 Prevent unintentional starting Ensure the switch is in the off position before connecting to power source and or BATTERY pack pick ing up or carrying the tool Carrying power tools with your finger on the switch or energising power tools that have the switch on...

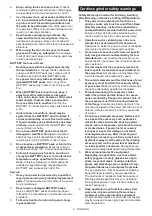
Страница 4: ...Cordless grinder safety warnings Safety Warnings Common for Grinding Sanding Wire Brushing or Abrasive Cutting Off Operations 1 This power tool is intended to function as a grinder sander wire brush or cut off tool Read all safety warnings instructions illustrations and specifications provided with this power tool Failure to follow all instructions listed below may result in electric shock fire an...

Страница 5: ... saw chain woodcarving blade or toothed saw blade Such blades create fre quent kickback and loss of control Safety Warnings Specific for Grinding and Abrasive Cutting Off Operations 1 Use only wheel types that are recommended for your power tool and the specific guard designed for the selected wheel Wheels for which the power tool was not designed cannot be adequately guarded and are unsafe 2 The ...

Страница 6: ...te reducing bushings or adaptors to adapt large hole abrasive wheels 11 Use only flanges specified for this tool 12 For tools intended to be fitted with threaded hole wheel ensure that the thread in the wheel is long enough to accept the spindle length 13 Check that the workpiece is properly supported 14 Pay attention that the wheel continues to rotate after the tool is switched off 15 If working ...

Страница 7: ...places where the temperature exceeds 50 C 122 F 6 Do not operate the wireless unit in places where medical instruments such as heart pace makers are near by 7 Do not operate the wireless unit in places where automated devices are near by If oper ated automated devices may develop malfunction or error 8 The wireless unit can produce electromagnetic fields EMF but they are not harmful to the user 9 ...

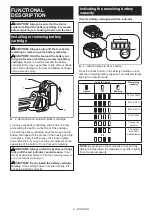
Страница 8: ...ousing and slip it into place Insert it all the way until it locks in place with a little click If you can see the red indicator on the upper side of the button it is not locked completely CAUTION Always install the battery cartridge fully until the red indicator cannot be seen If not it may accidentally fall out of the tool causing injury to you or someone around you CAUTION Do not install the ba...

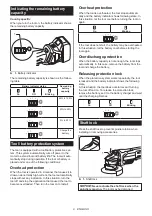
Страница 9: ...ecome overloaded Then turn the tool on to restart Overheat protection When the tool is overheated the tool stops automati cally and the battery indicator shows following state In this situation let the tool cool before turning the tool on again On Blinking If the tool does not start the battery may be overheated In this situation let the battery cool before starting the tool again Overdischarge pr...

Страница 10: ...ding rotation speed 1 1 Speed adjusting dial Number Speed 1 3 000 min 2 4 500 min 3 6 000 min 4 7 500 min 5 8 500 min NOTICE If the tool is operated continuously at low speed for a long time the motor will get over loaded resulting in tool malfunction NOTICE When changing the speed dial from 5 to 1 turn the dial counterclockwise Do not turn the dial clockwise forcibly Automatic speed change functi...

Страница 11: ...s toward the operator WARNING When using an abrasive cut off diamond wheel be sure to use only the special wheel guard designed for use with cut off wheels For tool with locking screw type wheel guard Mount the wheel guard with the protrusions on the wheel guard band aligned with the notches on the bear ing box Then rotate the wheel guard to such an angle that it can protect the operator according...

Страница 12: ...r wheel multi disc on the inner flange and screw the lock nut onto the spindle 1 2 4 3 1 Lock nut 2 Depressed center wheel 3 Inner flange 4 Mounting part To tighten the lock nut press the shaft lock firmly so that the spindle cannot revolve then use the lock nut wrench and securely tighten clockwise 1 2 1 Lock nut wrench 2 Shaft lock To remove the wheel follow the installation procedure in reverse...

Страница 13: ...ING Never vacuum metal particles created by grinding cutting sanding operation Metal particles created by such operation are so hot that they ignite dust and the filter inside the vacuum cleaner To avoid dusty environment caused by masonry cutting use a dust collecting wheel guard and a vacuum cleaner Refer to the instruction manual attached to the dust collecting wheel guard for assembling and us...

Страница 14: ...cut off wheels WARNING NEVER use cut off wheel for side grinding WARNING Do not jam the wheel or apply excessive pressure Do not attempt to make an excessive depth of cut Overstressing the wheel increases the loading and susceptibility to twisting or binding of the wheel in the cut and the possibility of kickback wheel breakage and overheating of the motor may occur WARNING Do not start the cuttin...

Страница 15: ...ond wheel 1 1 4 4 2 3 1 Lock nut 2 Diamond wheel Thinner than 4mm 5 32 3 Diamond wheel 4mm 5 32 or thicker 4 Inner flange Operation with wire cup brush Optional accessory CAUTION Check operation of brush by run ning tool with no load insuring that no one is in front of or in line with brush CAUTION Do not use brush that is damaged or which is out of balance Use of damaged brush could increase pote...

Страница 16: ... The wireless activation function enables clean and com fortable operation By connecting a supported vacuum cleaner to the tool you can run the vacuum cleaner automatically along with the switch operation of the tool To use the wireless activation function prepare follow ing items A wireless unit A vacuum cleaner which supports the wireless activation function The overview of the wireless activati...

Страница 17: ...stration for the vacuum cleaner NOTE A Makita vacuum cleaner supporting the wireless activation function is required for the tool registration NOTE Finish installing the wireless unit to the tool before starting the tool registration NOTE During the tool registration do not pull the switch trigger or turn on the power switch on the vacuum cleaner NOTE Refer to the instruction manual of the vacuum ...

Страница 18: ...ing the wireless activation function NOTE Finish the tool registration for the vacuum cleaner prior to the wireless activation NOTE Refer to the instruction manual of the vacuum cleaner too After registering a tool to the vacuum cleaner the vacuum cleaner will automatically runs along with the switch operation of the tool 1 Install the wireless unit to the tool 2 Connect the hose of the vacuum cle...

Страница 19: ...fer to the table below for the meaning of the lamp status Status Wireless activation lamp Description Color On Blinking Duration Standby Blue 2 hours The wireless activation of the vacuum cleaner is available The lamp will automatically turn off when no operation is performed for 2 hours When the tool is running The wireless activation of the vacuum cleaner is available and the tool is running Too...

Страница 20: ...nd then become red After that press the wireless activation button on the tool in the same way 1 2 1 2 1 Wireless activation button 2 Wireless activation lamp If the cancellation is performed successfully the wire less activation lamps will light up in red for 2 seconds and start blinking in blue NOTE The wireless activation lamps finish blinking in red after 20 seconds elapsed Press the wireless ...

Страница 21: ...led into the tool Install the wireless unit correctly The terminal of the wireless unit and or the slot is dirty Gently wipe off dust and dirt on the terminal of the wireless unit and clean the slot The stand by switch on the vacuum cleaner is not set to AUTO Set the stand by switch on the vacuum cleaner to AUTO No power supply Supply the power to the tool and the vacuum cleaner Incorrect operatio...

Страница 22: ...r out of the transmission range Get the tool and vacuum cleaner closer each other The maximum transmission distance is approxi mately 10 m however it may vary according to the circumstances Radio disturbance by other appliances which generate high intensity radio waves Keep the tool and vacuum cleaner away from the appliances such as Wi Fi devices and microwave ovens The vacuum cleaner runs while ...

Страница 23: ...tain and use all necessary fasteners and guards as recommended in this manual Your failure to do so could result in personal injury to you and others If you need any assistance for more details regarding these accessories ask your local Makita Service Center Makita genuine battery and charger Wireless unit For models with wireless activation function 2 5 2 2 11 12 15 4 3 5 6 7 8 9 10 1 13 3 14 5 3...

Страница 24: ... been made or attempted by others repairs are required because of normal wear and tear the tool has been abused misused or improperly maintained alterations have been made to the tool IN NO EVENT SHALL MAKITA BE LIABLE FOR ANY INDIRECT INCIDENTAL OR CONSEQUENTIAL DAMAGES FROM THE SALE OR USE OF THE PRODUCT THIS DISCLAIMER APPLIES BOTH DURING AND AFTER THE TERM OF THIS WARRANTY MAKITA DISCLAIMS LIA...

Страница 25: ...tage de l arbre 15 88 mm 5 8 Vitesse nominale n 8 500 min Longueur totale 382 mm 15 Tension nominale C C 18 V Poids net 2 4 3 1 kg 5 2 6 7 lbs 2 4 3 1 kg 5 3 6 8 lbs Frein électrique Fonction d activation sans fil Étant donné l évolution constante de notre programme de recherche et développement les spécifications contenues dans ce manuel sont sujettes à modification sans préavis Les spécification...

Страница 26: ...us devez utiliser un outil électrique dans un endroit humide utilisez une source d ali mentation protégée par un disjoncteur de fuite à la terre L utilisation d un disjoncteur de fuite à la terre réduit le risque de choc électrique 7 Les outils électriques peuvent produire des champs électromagnétiques CEM qui ne sont pas préjudiciables à l utilisateur Les utilisa teurs de stimulateur cardiaque ou...

Страница 27: ...ation de l outil ne portez pas de gants de travail en tissu qui risquent de s enchevêtrer dans l outil L enchevêtrement de gants de travail en tissu dans les pièces en mou vement peut entraîner une blessure Utilisation et entretien des outils alimentés par batterie 1 Pour recharger utilisez uniquement le char geur spécifié par le fabricant L utilisation d un chargeur conçu pour un type donné de bl...

Страница 28: ... accessoire cassé peuvent s envoler et blesser quelqu un même au delà de la zone de travail immédiate 10 Tenez l outil électrique par ses surfaces de prise isolées pendant toute utilisation où l accessoire de coupe pourrait venir en contact avec un câblage dissimulé En cas de contact avec un fil sous tension les pièces métalliques à découvert de l outil électrique deviendraient éga lement sous ten...

Страница 29: ...l outil électrique directement vers vous 3 Lorsque la meule se coince ou que vous interrompez une coupe pour une raison quel conque éteignez l outil électrique et mainte nez le immobile jusqu à ce que la meule s ar rête complètement Ne cherchez jamais à sortir la meule tronçonneuse de l entaille pendant que la meule est encore en mouvement car vous vous exposeriez à un recul Si la meule a tendance...

Страница 30: ...pétée par un sentiment d aisance ou de familiarité avec le produit en négligeant les consignes de sécurité qui accompagnent le produit L UTILISATION INCORRECTE ou l ignorance des consignes de sécurité du présent manuel d instructions com porte un risque de blessure grave Symboles Les symboles utilisés pour l outil sont indiqués ci dessous volts courant continu vitesse nominale tours ou alternances...

Страница 31: ... L unité sans fil peut générer des champs électromagnétiques CEM mais ils sont sans danger pour l utilisateur 9 L unité sans fil est un instrument de précision Évitez d échapper ou de heurter l unité sans fil 10 Évitez de toucher la borne de l unité sans fil à mains nues ou avec des objets métalliques 11 Retirez toujours la batterie de l outil lors de l installation de l unité sans fil 12 Lorsque ...

Страница 32: ...diez un léger déclic Si vous pouvez voir le voyant rouge sur le dessus du bouton la batterie n est pas complètement verrouillée ATTENTION Installez toujours la batterie à fond jusqu à ce que vous ne puissiez plus voir le voyant rouge Autrement elle risque de tomber acci dentellement de l outil et d entraîner des blessures ATTENTION Ne forcez pas sur la batterie pour l installer Si la batterie ne g...

Страница 33: ...ontact pour redémarrer Protection contre la surchauffe Lorsque l outil surchauffe il s arrête automatiquement et le témoin de batterie indique l état suivant Dans ce cas laissez refroidir l outil avant de remettre le contact Allumé Clignotant Si l outil ne démarre pas il se peut que la batterie soit surchauffée Dans ce cas laissez refroidir la batterie avant de redémarrer l outil Protection contre...

Страница 34: ...l peut être modifiée en tournant le cadran de réglage de la vitesse Le tableau ci dessous indique la correspondance entre le numéro du cadran et la vitesse de rotation 1 1 Cadran de réglage de la vitesse Numéro Vitesse 1 3 000 min 2 4 500 min 3 6 000 min 4 7 500 min 5 8 500 min AVIS Si l outil est utilisé de manière continue à vitesse réduite sur une période prolongée le moteur sera surchargé et c...

Страница 35: ...le Pour meule à moyeu déporté multidisque meule flexible brosse métallique circulaire meule tronçonneuse abrasive meule diamant MISE EN GARDE Si vous utilisez une meule à moyeu déporté un multidisque une meule flexible ou une brosse métallique circulaire le protecteur de meule doit être placé sur l outil de sorte que la partie de la meule recouverte par le protecteur soit du côté de l utilisateur ...

Страница 36: ...ntérieur du mauvais côté peut entraîner de dangereuses vibrations Montez le flasque intérieur sur l arbre Assurez vous de placer la partie dentelée du flasque intérieure dans la partie rectiligne au bas de l arbre Placez la meule à moyeu déporté ou le multidisque sur le flasque intérieur et vissez le contre écrou sur l arbre 1 2 4 3 1 Contre écrou 2 Meule à moyeu déporté 3 Flasque intérieur 4 Pièc...

Страница 37: ...m 4 1 2 125 mm 5 1 2 3 1 Contre écrou de ponçage 2 Disque abrasif 3 Plateau de caoutchouc 1 Montez le plateau de caoutchouc sur l arbre 2 Placez le disque sur le plateau de caoutchouc et vissez le contre écrou de ponçage sur l arbre 3 Tenez l arbre avec le blocage de l arbre et ser rez fermement le contre écrou de ponçage dans le sens des aiguilles d une montre à l aide de la clé à contre écrou Po...

Страница 38: ...e d une meule neuve ne faites pas progresser la meuleuse vers l avant sinon elle risque de couper la pièce à travailler Une fois le bord de la meule rodée la meule peut être utilisée dans les sens avant et arrière Travaux avec meule tronçonneuse abrasive ou meule diamant Accessoire en option MISE EN GARDE Lorsque vous utilisez une meule tronçonneuse abrasive diamant vous devez utiliser uniquement ...

Страница 39: ... 1 Contre écrou 2 Meule diamant plus mince que 4 mm 5 32 3 Meule diamant 4 mm 5 32 ou plus épaisse 4 Flasque intérieur Travaux avec une brosse coupe métallique Accessoire en option ATTENTION Vérifiez le fonctionnement de la brosse en faisant fonctionner l outil sans charge en vous assurant que personne ne se trouve devant la brosse ou sur sa trajectoire ATTENTION N utilisez pas la brosse si elle e...

Страница 40: ...8 uniquement Ce que vous pouvez faire avec la fonction d activation sans fil La fonction d activation sans fil permet une utilisation propre et confortable En raccordant un aspirateur compatible à l outil vous pouvez activer l aspirateur automatiquement lorsque vous utilisez l interrupteur de l outil Pour utiliser la fonction d activation sans fil préparez les éléments suivants Une unité sans fil ...

Страница 41: ...registrement d outil pour l aspirateur NOTE Un aspirateur Makita compatible avec la fonction d activation sans fil est nécessaire pour l enregistrement d outil NOTE Terminez l installation de l unité sans fil sur l outil avant de commencer l enregistrement d outil NOTE Pendant l enregistrement d outil n appuyez pas sur la gâchette et ne mettez pas l interrupteur d alimentation en position de march...

Страница 42: ... à la fois Démarrer la fonction d activation sans fil NOTE Terminez l enregistrement d outil pour l aspi rateur avant d effectuer l activation sans fil NOTE Reportez vous également au manuel d ins tructions de l aspirateur Après l enregistrement d un outil sur l aspirateur ce dernier s activera automatiquement lors de l utilisation de l interrupteur de l outil 1 Installez l unité sans fil sur l ou...

Страница 43: ...sans fil Reportez vous au tableau suivant pour connaître la signification de l état du témoin État Témoin d activation sans fil Description Couleur Allumé Clignotant Durée Attente Bleu 2 heures L activation sans fil de l aspirateur est disponible Le témoin s éteindra automatiquement après 2 heures de non utilisation Lorsque l outil est en marche L activation sans fil de l aspirateur est disponible...

Страница 44: ...e la même manière sur le bouton d activation sans fil sur l outil 1 2 1 2 1 Bouton d activation sans fil 2 Témoin d activation sans fil Si l annulation réussit les témoins d activation sans fil s allumeront en rouge pendant 2 secondes puis se mettront à clignoter en bleu NOTE Les témoins d activation sans fil cessent de clignoter en rouge au bout de 20 secondes Appuyez sur le bouton d activation s...

Страница 45: ...nstallée dans l outil Installez l unité sans fil correctement La borne de l unité sans fil et ou la fente est sale Essuyez doucement les poussières et saletés sur la borne de l unité sans fil et nettoyez la fente L interrupteur d attente de l aspirateur n est pas sur AUTO Mettez l interrupteur d attente de l aspirateur sur AUTO Pas d alimentation Fournissez une source d alimentation à l outil et à...

Страница 46: ...st d environ 10 m mais elle peut varier selon les circonstances Perturbation radioélectrique par d autres appareils qui génèrent des ondes radio de forte intensité Gardez l outil et l aspirateur à l écart des appareils tels que dispositifs Wi Fi et fours à micro ondes L aspirateur se met en marche alors que la gâchette de l outil n est pas enfoncée D autres utilisateurs utilisent l activation sans...

Страница 47: ...ice d usine Makita pensez à vous procurer et à utiliser également toutes les pièces de ser rage et protecteurs recommandés dans ce manuel L inobservation de ce conseil risquerait d entraîner des bles sures à soi même ou à d autres personnes se trouvant à proximité Si vous désirez obtenir plus de détails sur ces accessoires veuillez contacter le centre de service après vente Makita le plus près Cha...

Страница 48: ... garantie ne s applique pas dans les cas où des réparations ont été effectuées ou tentées par un tiers des réparations sont nécessaires en raison de l usure normale l outil a été malmené mal utilisé ou non adéquate ment entretenu l outil a subi des modifications MAKITA NE SERA EN AUCUN CAS RESPONSABLE DE TOUS DOMMAGES INDIRECTS ACCESSOIRES OU CONSÉCUTIFS DE LA VENTE OU DE L UTILISATION DU PRODUIT ...

Страница 49: ... mm 5 Grosor máx de la rueda o disco abrasivo 6 4 mm 1 4 Rosca del eje 15 88 mm 5 8 Velocidad especificada n 8 500 r min Longitud total 382 mm 15 Tensión nominal 18 V c c Peso neto 2 4 kg 3 1 kg 5 2 lbs 6 7 lbs 2 4 kg 3 1 kg 5 3 lbs 6 8 lbs Freno eléctrico Función de activación inalámbrica Debido a nuestro continuo programa de investigación y desarrollo las especificaciones aquí incluidas están su...

Страница 50: ...el riesgo de que se produzca una descarga eléctrica 6 Si no es posible evitar usar una herramienta eléctrica en condiciones húmedas utilice un alimentador protegido con interruptor de cir cuito de falla a tierra ICFT El uso de un ICFT reduce el riesgo de descarga eléctrica 7 Las herramientas eléctricas pueden producir campos electromagnéticos CEM que no son dañinos para el usuario Sin embargo si l...

Страница 51: ...tela ya que éstos podrían atorarse Si los guantes de trabajo de tela llegaran a atorarse en las piezas móviles esto podría ocasionar lesiones personales Uso y cuidado de la herramienta a batería 1 Recargue sólo con el cargador especificado por el fabricante Un cargador que es adecuado para un solo tipo de batería puede generar riesgo de incendio al ser utilizado con otra batería 2 Utilice las herr...

Страница 52: ...roto podrán salir proyectados más allá del área inmediata de operación y causar lesiones 10 Cuando realice una operación en la que la herramienta de corte pueda entrar en contacto con cableado oculto sujete la herramienta eléc trica por las superficies de asimiento aisladas El contacto con un cable con corriente también hará que la corriente circule por las partes metáli cas expuestas de la herram...

Страница 53: ...da se tuerza o atasque durante el corte y que se genere un retroceso brusco o la rotura de la rueda 2 No coloque su cuerpo en línea con la rueda girato ria ni detrás de ésta En el momento de la operación cuando la rueda se esté alejando de su cuerpo el posible retroceso brusco podrá lanzar la rueda girato ria y la herramienta eléctrica directamente hacia usted 3 Cuando la rueda se atasque o se int...

Страница 54: ...odidad o familiaridad con el producto a base de utilizarlo repetidamente sustituya la estricta observancia de las normas de seguridad para dicho producto El MAL USO o el no seguir las normas de seguri dad establecidas en este manual de instrucciones puede ocasionar lesiones personales graves Símbolos A continuación se muestran los símbolos utilizados para la herramienta volts o voltios corriente d...

Страница 55: ...nalámbrica puede producir campos electromagnéticos CEM sin embargo éstos no son dañinos para el usuario 9 La unidad inalámbrica es un instrumento de precisión Tenga cuidado de no dejar caer ni golpear la unidad inalámbrica 10 Evite tocar la terminal de la unidad inalámbrica con las manos descubiertas o con materiales metálicos 11 Retire siempre la batería en la herramienta al instalar la unidad in...

Страница 56: ...ugar Inserte por completo hasta que se fije en su lugar con un pequeño clic Si puede ver el indicador rojo del lado superior del botón esto indica que no ha quedado fijo por completo PRECAUCIÓN Introduzca siempre com pletamente el cartucho de batería hasta que el indicador rojo no pueda verse Si no podría accidentalmente salirse de la herramienta y caer al suelo causando una lesión a usted o algui...

Страница 57: ...usó que la herramienta se sobrecargara Luego encienda la herramienta para reiniciarla Protección contra sobrecalentamiento Cuando la herramienta se sobrecalienta ésta se detiene automáticamente y el indicador de batería muestra el siguiente estado En este caso espere a que la herramienta se enfríe antes de volver a encenderla Encendido Parpadeando Si la herramienta no arranca la batería puede habe...

Страница 58: ...elocidad La velocidad de rotación de la herramienta se puede cambiar girando el selector de ajuste de velocidad La tabla a continuación muestra el número en el selector y la velocidad de rotación correspondiente 1 1 Selector de ajuste de velocidad Número Velocidad 1 3 000 r min 2 4 500 r min 3 6 000 r min 4 7 500 r min 5 8 500 r min AVISO Si la herramienta es usada de manera continua a baja veloci...

Страница 59: ...eda de centro hundido multidisco rueda flexible rueda de cepillo de alambre rueda cortadora abrasiva rueda de diamante ADVERTENCIA Cuando se utilice una rueda o disco abrasivo de centro hundido multidisco rueda flexible o rueda de cepillo de alambre el protector de la rueda deberá estar instalado en la herramienta de tal forma que el lado cerrado del protector siempre quede orientado hacia el oper...

Страница 60: ...nstalación de la brida interior en el lado incorrecto puede ocasionar una vibración peligrosa Instale la brida interior en el eje Asegúrese que la parte dentada de la brida interior encaje en la parte recta del fondo del eje Coloque la rueda de centro hundido multidisco en la brida interior y atornille la contratuerca en el eje 1 2 4 3 1 Contratuerca 2 Rueda de centro hundido 3 Brida interior 4 Pi...

Страница 61: ...den inverso Conexión de una aspiradora Accesorio opcional ADVERTENCIA Nunca aspire las partícu las metálicas generadas por la operación de esmerilado corte lijado Las partículas metálicas generadas por dichas operaciones están demasiado calientes y pueden prender fuego al polvo y al filtro en el interior de la aspiradora Para evitar un ambiente lleno de polvo a causa del corte de mampostería utili...

Страница 62: ...ENCIA NUNCA utilice una rueda cortadora para el esmerilado lateral ADVERTENCIA Evite trabar la rueda o aplicar una presión excesiva No intente hacer un corte de profundidad excesiva Aplicar presión excesiva a la rueda incrementa la carga y suscepti bilidad a que la rueda se tuerza o atasque durante el corte y la posibilidad de que se genere un retroceso brusco la rotura de la rueda y el sobrecalen...

Страница 63: ...nte 1 1 4 4 2 3 1 Contratuerca 2 Rueda de diamante con un gro sor menor de 4 mm 5 32 3 Rueda de diamante con un grosor de 4 mm 5 32 o mayor 4 Brida interior Operación con carda de alambre Accesorio opcional PRECAUCIÓN Verifique la operación del cepillo haciendo funcionar la herramienta sin carga y asegurándose de que no haya nadie enfrente ni en línea con el cepillo PRECAUCIÓN No utilice un cepill...

Страница 64: ...inalámbrica La función de activación inalámbrica permite una ope ración limpia y cómoda Si conecta a la herramienta una aspiradora compatible podrá hacer que ésta funcione automáticamente al activar el interruptor de la herramienta Para hacer uso de la función de activación inalámbrica tenga preparado lo siguiente Una unidad inalámbrica Una aspiradora compatible con la función de activación inalám...

Страница 65: ...Registro de la herramienta para la aspiradora NOTA Para el registro de la herramienta se requiere una aspiradora Makita compatible con la función de activación inalámbrica NOTA Termine de instalar la unidad inalámbrica en la herramienta antes de comenzar con el registro de la herramienta NOTA Durante el registro de la herramienta no jale el gatillo interruptor ni active el interruptor de encen did...

Страница 66: ...e uno en uno Inicio de la función de activación inalámbrica NOTA Termine con el registro de la herramienta para la aspiradora antes de la activación inalámbrica NOTA Consulte también el manual de instrucciones de la aspiradora Después de registrar una herramienta en la aspiradora esta última se activará automáticamente junto con el interruptor de la herramienta 1 Instale la unidad inalámbrica en l...

Страница 67: ...abla a continuación para ver qué significa el estado de la luz indicadora Estado Luz indicadora de activación inalámbrica Descripción Color Encendida Parpadeando Duración En espera Azul 2 horas La activación inalámbrica de la aspiradora está disponible La luz se apagará automáticamente cuando no se realice ninguna operación durante 2 horas Cuando la herra mienta está fun cionando La activación ina...

Страница 68: ...ctivación inalámbrica en la herramienta de la misma manera 1 2 1 2 1 Botón de activación inalámbrica 2 Luz indica dora de activación inalámbrica Si la cancelación se realiza exitosamente las luces indicadoras de activación inalámbrica se encenderán en rojo durante 2 segundos y comenzarán a parpadear en azul NOTA Las luces indicadoras de activación inalám brica terminarán parpadeando en rojo despué...

Страница 69: ...orrectamente en la herramienta Instale la unidad inalámbrica correctamente La terminal de la unidad inalámbrica y o la ranura está sucia Retire con cuidado el polvo y la suciedad en la terminal de la unidad inalámbrica y limpie la ranura El interruptor de modo en espera en la aspiradora no está ajustado en AUTO Ajuste el interruptor de modo en espera en la aspiradora en AUTO No hay suministro de e...

Страница 70: ...erramienta a la aspiradora La distan cia máxima de transmisión es de aproximadamente 10 m pero puede variar en función de las circunstancias La perturbación radioeléctrica generada por otros aparatos que emiten ondas de radio de alta intensidad Mantenga la herramienta y la aspiradora lejos de aparatos tales como dispositivos Wi Fi y hornos de microondas La aspiradora funciona aun cuando el gatillo...

Страница 71: ...ita asegúrese de obtener y utilizar todos los sujetadores y protectores tal como se recomienda en este manual El no hacerlo podría ocasionarle lesiones personales a usted y a otras personas Si necesita cualquier ayuda para más detalles en relación con estos accesorios pregunte a su centro de servicio local Makita Batería y cargador originales de Makita Unidad inalámbrica para modelos con función d...

Страница 72: ...azo sin ningún cargo Esta garantía no aplica cuando las reparaciones se hayan hecho o intentado hacer por otros se requieran reparaciones debido al desgaste normal la herramienta haya sido maltratada recibido un mal uso o haya recibido un mantenimiento inapropiado se hayan hecho modificaciones a la herramienta EN NINGÚN CASO MAKITA SE HARÁ RESPONSABLE DE NINGÚN DAÑO INDIRECTO INCIDENTAL O DERIVADO...

Страница 73: ...73 ...

Страница 74: ...74 ...

Страница 75: ...75 ...

Страница 76: ...s por el lijado aserrado esmerilado taladrado y otras actividades de la construcción contienen sustancias químicas reconocidas por el Estado de California como causantes de cáncer defectos de nacimiento y otros peligros de reproducción Algunos ejemplos de estos productos químicos son plomo de pinturas a base de plomo sílice cristalino de ladrillos y cemento y otros productos de albañilería y arsén...

Отзывы: