background image

10 ENGLISH

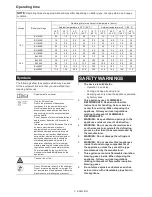
2. Turning on the appliance

Press the power button to turn on the appliance. Press 
the power button again to turn off the appliance.

3. Switching cooling / heating mode

Press the cool / heat switch button to switch the 
operating mode.
• 

When the appliance operates in cooling mode, the 
lamp of cooling mode lights up.

•  

When the appliance operates in heating mode, the 
lamp of heating mode lights up.

The temperature display flashes the control temperature.

4. Selecting the control temperature

Press the temperature plus button or the temperature 
reduction button to select the control temperature. Refer 
the chapter “SPECIFICATIONS” for the selectable 
control temperature.
The appliance starts cooling / heating 5 seconds after 
without any operation, then the control temperature stop 
flashing and the temperature display shows the current 
temperature.
The appliance stops cooling / heating when the current 
temperature reaches the control temperature.

Tips for efficient cooling

• 

Opening the upper cover for long periods can 
cause significant increase of the temperature in 
the chamber.

• 

Regularly clean surfaces that can come in contact 
with food and accessible drainage systems.

• 

Store raw meat and fish in suitable containers in 
the chamber, so that it is not in contact with or drip 
onto other food.

• 

If the chamber is left empty for long periods:


-  Switch off the appliance.


-  Defrost the chamber.


-  Clean and dry the chamber.


-   Leave the upper cover open to prevent mold 

developing within the chamber.

FUNCTION

Indicating the remaining battery 
capacity

The battery indicator shows the remaining battery 
capacity. The remaining battery capacity is shown as 
the following table.

Battery indicator status

Remaining 

capacity

Lighted

Off

50% to 100%

20% to 50%

0% to 20%

(Blinking)

Charge the 

battery.

(Only for battery cartridges with 
the indicator)

Press the check button on the battery cartridge to 
indicate the remaining battery capacity. The indicator 
lamps light up for a few seconds.

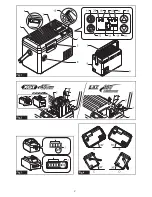
Fig.3 1.

 Indicator lamps

2.

 Check button

Indicator lamps

Remaining 

capacity

Lighted

Off

Blinking

75% to 100%

50% to 75%

25% to 50%

0% to 25%

Charge the 

battery.

The battery 

may have 

malfunctioned.

Содержание CW003GZ01

Страница 1: ...i k le og opvarmningsboks INSTRUKTIONSVEJLEDNING 67 EL 76 TR 85 SV Sladdl s kylar och v rmarbox BRUKSANVISNING 94 NO Batteridrevet kj le og varmeboks BRUKSANVISNING 103 FI Kannettava kylm ja kuumalauk...

Страница 2: ...2...

Страница 3: ...3...

Страница 4: ...mm not including the carrying handle Inside of the chamber 210 mm 150 mm 230 mm Net weight 9 4 kg with BL4080F 7 5 kg without battery Protection degree IPX4 only powered by battery pack Selectable co...

Страница 5: ...ulators and batteries as well as their adaptation to national law waste electrical equipment batteries and accumulators should be stored separately and delivered to a separate collection point for mun...

Страница 6: ...8 Do not place the appliance in hot places such as in a car under the sun or near heating materials Cooling performance may be reduced or a gas leak may cause a fire 9 Do not place the appliance near...

Страница 7: ...Hold the appliance firmly when carrying Otherwise the appliance may fall and cause a malfunction or falling on your feet may cause injury 44 When using in dusty environment clean the sponge filter mo...

Страница 8: ...in the packaging 11 When disposing the battery cartridge remove it from the appliance and dispose of it in a safe place Follow your local regulations relating to disposal of battery 12 Use the batteri...

Страница 9: ...ply of the AC adapter or the cigarette lighter adapter is regained PARTS DESCRIPTION Fig 1 1 Control panel 2 Battery cover 3 LED light 4 Upper cover 5 Upper cover hook 6 Opener 7 Carrying handle 8 DC...

Страница 10: ...Opening the upper cover for long periods can cause significant increase of the temperature in the chamber Regularly clean surfaces that can come in contact with food and accessible drainage systems S...

Страница 11: ...om level angle as shown A B C or D in the figure the appliance shuts down and the temperature display shows F1 for a while It takes 3 minutes to restart after the appliance back in level position Fig...

Страница 12: ...oration deformation or cracks may result To maintain product SAFETY and RELIABILITY repairs any other maintenance or adjustment should be performed by Makita Authorized or Factory Service Centers alwa...

Страница 13: ...CW003G 31L CE 2206 WLI CRE Makita Europe N V Makita Corporation Jan Baptist Vinkstraat 2 3070 Kortenberg Belgium 3 11 8 Sumiyoshi cho Anjo Aichi 446 8502 Japan www makita com...

Отзывы: