


9
fires, personal injury and damage. It will also void the
Makita warranty for the Makita tool and charger.
Tips for maintaining maximum battery life
1.
Charge the battery cartridge before completely
discharged. Always stop tool operation and
charge the battery cartridge when you notice less
tool power.
2.
Never recharge a fully charged battery cartridge.
Overcharging shortens the battery service life.
3.
Charge the battery cartridge with room
temperature at 10 °C - 40 °C (50 °F - 104 °F). Let a
hot battery cartridge cool down before charging it.
FUNCTIONAL DESCRIPTION
CAUTION:
• Always be sure that the tool is switched off and the
battery cartridge is removed before adjusting or
checking function on the tool.
Installing or removing battery cartridge
For Model CL072D (Fig. 1)
For Model CL102D (Fig. 2)
• Always switch off the tool before insertion or removal of
the battery cartridge.
• To remove the battery cartridge, withdraw it from the
tool while pressing the buttons on both sides of the
cartridge.
• To insert the battery cartridge, hold it so that the battery
cartridge front shape fits to that of the battery
installment opening and slip it into place. Always insert
it all the way until it locks in place with a little click. If
not, it may accidentally fall out of the tool, causing
injury to you or someone around you.
• Do not use force when inserting the battery cartridge. If
the cartridge does not slide in easily, it is not being
inserted correctly.
Battery protection system
The cleaner is equipped with the protection system, which
automatically cuts off the output power for its long service
life.
The cleaner stops during operation when the cleaner and/
or battery are placed under the following situation. This is
caused by the activation of protection system and does
not show the cleaner trouble.
• When the cleaner is overloaded:
At this time, release the switch trigger and remove
causes of overload and then pull the switch trigger
again to restart.
• When the remaining battery capacity gets low:
Recharge the battery cartridge.
Switch action (Fig. 3)
To start the cleaner, simply press the “HIGH/LOW” button.
To switch off, press the “OFF” button. To change the
cleaner speed, press the “HIGH/LOW” button. The first
press on this button is for high speed and the second
press for low speed and then each press on this button
repeats the high/low speed cycle alternatively.
Battery power lamp (Fig. 4)
• When the remaining battery capacity gets low, the
battery power lamp blinks.
• When the remaining battery capacity gets much lower,
the tool stops during operation and the battery power
lamp lights up for about ten seconds. At this time,
remove the battery cartridge from the tool and charge
it.
NOTE:
• The time at which the battery power lamp start blinking
or lighting up depends on the temperature at work
place and the battery cartridge conditions.
ASSEMBLY
CAUTION:
• Always be sure that the tool is switched off and the
battery cartridge is removed before carrying out any
work on the tool.
Disposing of Dust
CAUTION:
• Empty the cleaner before it becomes too full, or the
suction force weakens.
• Be sure to empty out the dust inside the cleaner itself.
Failure to do so may cause the sponge filter to be
clogged or the motor to be damaged.
• Never throw away the dust stopper because it should
be used whenever either the dust bag or the paper
pack is used.
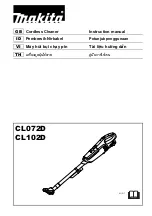
(Fig. 5)
1. Push the button to open the front cover. Opening it
until a click is heard allows a positive stop at that
position.
(Fig. 6)
NOTE:
• The cleaner is constructed in such a way that the front
cover comes off when trying to force the front cover
open at the angle of more than 90°. If the front cover
comes off, insert it into the front cover joint in place.
CAUTION:
• When closing the front cover, be careful not to pinch
your fingers.
(Fig. 7)
2. Pull out both the orange-colored dust stopper and dust
bag together at the same time.
(Fig. 8 & 9)
3. Remove the dust stopper and empty the cleaner.
Dust bag and paper pack
Install either dust bag or paper pack before using cleaner.
Use the dust stopper when installing either dust bag or
paper pack.
Dust bag are usable many times repeatedly by cleaning it
out.
Paper pack is a throw-away type. Throw away the entire
paper pack without emptying when it has become full.
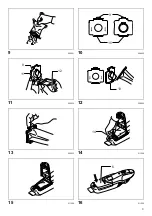
Installing dust bag (Fig. 10)
Use the dust stopper when installing dust bag. Be careful
not to take the upper side for the lower side by mistake
because they are different each other.
(Fig. 11)
1. Insert the protrusion of the dust bag into the groove in
the dust stopper as shown in the figure.
(Fig. 12)
2. There is no distinction between the upper and lower
sides of the dust bag. You may insert its protrusion of
Содержание CL102DWX
Страница 2: ...2 1 011525 2 011568 3 011519 4 011518 5 011527 6 011531 7 011536 8 008920 1 2 1 2 3 4 5 6 2 6 7 8 8 ...
Страница 3: ...3 9 008921 10 008930 11 008935 12 008932 13 008933 14 011528 15 011529 16 011526 9 10 8 11 12 13 14 6 ...
Страница 5: ...5 25 015594 26 015595 27 011533 28 008934 29 011534 20 ...
Страница 6: ...6 30 011535 31 1050601 21 22 ...