7
8.
Be careful not to drop or strike battery.
9.
Do not use dropped or struck battery.
SAVE THESE INSTRUCTIONS.
Tips for maintaining maximum battery life
1.
Charge the battery cartridge before completely
discharged.
Always stop tool operation and charge the
battery cartridge when you notice less tool
power.
2.
Never recharge a fully charged battery
cartridge.
Overcharging shortens the battery service life.
3.
Charge the battery cartridge with room
temperature at 10
゚
C - 40
゚
C (50
゚
F - 104
゚
F).
Let a hot battery cartridge cool down before
charging it.
FUNCTIONAL DESCRIPTION
CAUTION:
•
Always be sure that the tool is switched off and the
battery cartridge is removed before adjusting or
checking function on the tool.
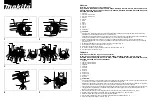
Installing or removing battery cartridge
1
2
3
007215
•
Always switch off the tool before insertion or
removal of the battery cartridge.
•
To remove the battery cartridge, withdraw it from
the tool while sliding the button on the front of the
cartridge.
•
To insert the battery cartridge, align the tongue on
the battery cartridge with the groove in the housing
and slip it into place. Always insert it all the way
until it locks in place with a little click. If you can
see the red part on the upper side of the button, it
is not locked completely. Insert it fully until the red
part cannot be seen. If not, it may accidentally fall
out of the tool, causing injury to you or someone
around you.
•
Do not use force when inserting the battery
cartridge. If the cartridge does not slide in easily, it
is not being inserted correctly.
Shaft lock
1
007216
CAUTION:
•
Never actuate the shaft lock when the spindle is
moving. The tool may be damaged.
Press the shaft lock to prevent spindle rotation when
installing or removing accessories.
Switch action
1
007217
CAUTION:
•
Before inserting the battery cartridge into the tool,
always check to see that the slide switch actuates
properly and returns to the "OFF" position when
the rear of the slide switch is depressed.
To start the tool, slide the slide switch toward the "I (ON)"
position. For continuous operation, press the front of the
slide switch to lock it.
To stop the tool, press the rear of the slide switch, then
slide it toward the "O (OFF)" position.
Indication lamp with multi function
1
007224
Indication lamps are located in two positions.
When the battery cartridge is inserted on the tool with
the slide switch positioned in the "O (OFF)" position, the
indication lamp flickers quickly for approximately one
second. If it does not flicker so, the battery cartridge or
1. Indication lamp
1. Slide switch
1. Shaft lock
1. Button
2. Red part
3. Battery cartridge
Содержание BGA402
Страница 12: ...12 Makita Corporation www makita com 884662D0...

