background image

7

Refresh charging

• Refreshing battery adapter (optional accessory) can

refresh an inactive battery cartridge.

• Refresh charging should be done once a week.
• When you charge a new battery cartridge or a battery

cartridge that has not been used for a long time, it may
not accept a full charge. In this case, refresh charging
must be done. The battery cartridge may decrease the
tool performance, because the chemical substance of
the battery cartridge is inactive.

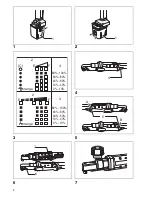
Checking the remaining battery capacity (Fig. 3)

For BH9020A, BH9033A

When charging

When the charging begins, the first (far left) indicating
lamp begins to flicker. Then, as charging proceeds, the
other lamps light, one after the other, to indicate the bat-
tery capacity.

When using

When the tool is switched on, the lamps will light to indi-
cate the remaining battery capacity. When the tool is
switched off, the light goes out. If the battery has not
been used for a long time, or is needed refresh charging,
the orange lamp begins to flicker. Use Makita refreshing
adapter to refresh the battery. 

CAUTION:

• A battery cartridge extracted from the charger that has

been unplugged with the battery cartridge inserted
does not indicate the battery capacity due to its protec-
tive function even if the tool is switched on after the bat-
tery insertion into the tool. At this time, recharge it for
about five seconds before use.

NOTE:

• Please contact Makita Authorized or Factory Service

Center if the warning lamp of the battery cartridge does
not light up when using or charging.

Switch action (Fig. 4)

CAUTION:

• Before inserting the battery cartridge into the tool,

always check to see that the switch trigger actuates
properly and returns to the “OFF” position when
released.

To start the tool, simply pull the switch trigger. Release
the switch trigger to stop.

Reversing switch action (Fig. 5)

CAUTION:

• Always check the direction of rotation before operation.
• Use the reversing switch only after the tool comes to a

complete stop. Changing the direction of rotation
before the tool stops may damage the tool.

• When not operating the tool, always set the reversing

switch lever to the neutral position

.

This tool has a reversing switch to change the direction of
rotation. Depress the reversing switch lever from the A
side for clockwise rotation or from the B side for counter-
clockwise rotation.
When the reversing switch lever is in the neutral position,
the switch trigger cannot be pulled.

Lighting up the lamps (Fig. 6)

CAUTION:

• Do not look in the light or see the source of light

directly.

Pull the switch trigger to light up the lamp. The lamp
keeps on lighting while the switch trigger is being pulled.
The light automatically goes out 10 seconds after the
switch trigger is released.

NOTE:

• Use a dry cloth to wipe the dirt off the lens of lamp. Be

careful not to scratch the lens of lamp, or it may lower
the illumination.

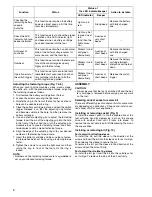
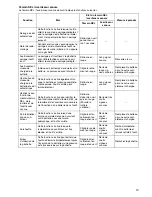
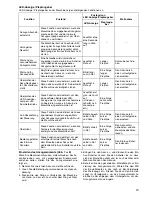
LED indicator / Beeper

LED indicator / Beeper on the tool shows the following functions.

Function

Status

Status of

 the LED indicator/beeper 

Action to be taken

LED indicator

Beeper

Auto-stop 
fastening

This function works when the tool has 
reached the preset fastening torque 
and normal tightening has been com-
pleted. This helps overtightening to be 
avoided.

Lights up in 
green for 
approximately 
one second.

__

__

Delayed re-start

For approximately one second after 
auto-stop fastening, the tool does not 
start even if the switch trigger is pulled.

Warning against 
insufficient fasten-
ing

Insufficient fastening has been per-
formed when the switch trigger has 
released before reaching the preset fas-
tening torque.

Lights up in 
red.

A long beep

Retighten the screw.

Warning for bat-
tery cartridge 
capacity

This indicates the appropriate time to 
replace the battery cartridge when the 
battery power becomes low.

Flickers in red 
slowly.

A series of 
long beeps

Replace the battery 
with fully charged 
one.

Содержание BFL060F

Страница 1: ...etriebsanleitung I Avvitatore ad angolo a batteria Istruzioni per l uso NL Accu haakse schroevendraaier Gebruiksaanwijzing E Atornillador angular a bater a Manual de instrucciones P Aparafusadora angu...

Страница 2: ...2 1 2 4 3 5 6 7 1 1 4 5 A B 7 6 C E F 80 100 60 80 40 60 10 40 0 10 80 100 60 80 40 60 10 40 0 10 E F 2 3 3 2 orange orange...

Страница 3: ...0 120 60 0 1 5 2 3 4 5 6 BFL060F 22 21 23 360 300 240 180 120 60 0 2 3 4 5 6 7 8 BFL080F 21 22 23 360 300 240 180 120 60 0 2 3 4 5 6 7 8 BFL081F 21 22 23 360 300 240 180 120 60 0 5 6 7 8 9 10 11 12 BF...

Страница 4: ...4 16 17 18 360 300 240 180 120 60 0 8 10 12 14 16 18 20 BFL200F 21 22 23 24 25 26...

Страница 5: ...operation where the fas tener may contact hidden wiring Fasteners con tacting a live wire may make exposed metal parts of the power tool live and could give the operator an electric shock 2 Always be...

Страница 6: ...BFL080F BFL120F Fig 1 To remove the battery cartridge withdraw it from the tool while pressing the buttons on both sides of the car tridge To insert the battery cartridge align the tongue on the batt...

Страница 7: ...5 CAUTION Always check the direction of rotation before operation Use the reversing switch only after the tool comes to a complete stop Changing the direction of rotation before the tool stops may da...

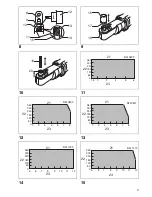
Страница 8: ...ve with another hand until it locks into place To remove the socket simply pull it off depressing the pin on the square drive Installing or removing bit Fig 10 For tools with retracting sleeve To inst...

Страница 9: ...ight present a risk of injury to persons Only use accessory or attachment for its stated purpose If you need any assistance for more details regarding these accessories ask your local Makita Service C...

Страница 10: ...ructions pour r f rence ult rieure GEB050 2 CONSIGNES DE S CURIT POUR LA VISSEUSE SANS FIL 1 Saisissez l outil lectrique par ses surfaces de poigne isol es lorsque vous effectuez une op ration au cour...

Страница 11: ...ve entre 10 C et 40 C Avant de charger une batterie chaude laissez la refroidir 4 Chargez la batterie au nickel hydrure m tallique lorsqu elle est rest e inutilis e pendant plus de six mois DESCRIPTIO...

Страница 12: ...n adaptateur de remise en condition Makita pour remettre la batterie en condition de charge initiale ATTENTION cause de la fonction de protection de la batterie la charge restante de cette derni re ne...

Страница 13: ...ie est presque compl te ment puis e L outil s arr te alors imm diatement S allume en rouge Long signal sonore Remplacez la batterie par une autre com pl tement charg e V rifiez le bon fonctionne ment...

Страница 14: ...ins rez l embout fond dans le manchon Rel chez ensuite le manchon pour fixer l embout Pour retirer l embout tirez le manchon dans le sens de la fl che et tirez fermement sur l embout Outils sans manch...

Страница 15: ...entre eux La valeur d mission de vibrations d clar e peut aussi tre utilis e pour l valuation pr liminaire de l exposi tion AVERTISSEMENT L mission de vibrations lors de l usage r el de l outil lectr...

Страница 16: ...ie das Elektrowerkzeug nur an den iso lierten Grifffl chen wenn Sie Arbeiten ausf h ren bei denen die Gefahr besteht dass das Befestigungselement verborgene Kabel kontak tiert Bei Kontakt mit einem St...

Страница 17: ...hine stets aus und laden Sie den Akku wenn Sie ein Nachlassen der Maschinenleistung feststellen 2 Unterlassen Sie das erneute Laden eines voll aufgeladenen Akkus berladen f hrt zu einer Verk rzung der...

Страница 18: ...r vom Ladeger t entnommene Akku aufgrund seiner Schutzfunktion nicht die Akkuka pazit t an wenn die Maschine nach dem Einsetzen des Akkus eingeschaltet wird Laden Sie den Akku in diesem Fall etwa f nf...

Страница 19: ...ment Eine Schraube wird unzureichend angezogen wenn der Ein Aus Schalter vor Erreichen des vorgegebenen Anzugsmoments losgelassen wird Leuchtet in Rot auf Langer Piepton Schraube nachzie hen Warnung f...

Страница 20: ...die Schraube oder Mutter besch digt wird Grenzen der Anzugskapazit t Abb 11 12 13 14 15 16 Benutzen Sie die Maschine innerhalb der Grenzen der Anzugskapazit t Wird die Maschine au erhalb der Grenzen...

Страница 21: ...abweichen Identifizieren Sie Sicherheitsma nahmen zum Schutz des Benutzers anhand einer Sch tzung des Gef hr dungsgrads unter den tats chlichen Benutzungsbedin gungen unter Ber cksichtigung aller Pha...

Страница 22: ...chiusura potrebbero fare contatto con fili elet trici nascosti I dispositivi di chiusura che fanno contatto con un filo elettrico sotto tensione potreb bero mettere sotto tensione le parti metalliche...

Страница 23: ...ccia della batteria calda prima di caricarla 4 Caricare la cartuccia della batteria all idruro di nickel metallico quando non la si usa per pi di sei mesi DESCRIZIONE DEL FUNZIONAMENTO ATTENZIONE Acce...

Страница 24: ...estratta dal caricatore che rimasto stac cato dalla presa di corrente con la batteria inserita non indica la capacit della batteria a causa della sua fun zione di protezione anche se si accende l ute...

Страница 25: ...iva quando la bat teria quasi completamente scarica L utensile si arresta allora immediata mente Si accende in rosso Un suono lungo Sostituire la batteria con una completa mente carica Controllo del f...

Страница 26: ...e pi oltre Rilasciare poi il manicotto per fis sare la punta Per rimuovere la punta tirare il manicotto nella direzione della freccia e tirar via fermamente la punta Utensili senza manicotto retrattil...

Страница 27: ...i emissione delle vibrazioni dichiarato pu anche essere usato per una valutazione preliminare dell esposizione AVVERTIMENTO L emissione delle vibrazioni durante l uso reale dell utensile elettrico pu...

Страница 28: ...LOZE SCHROEVENDRAAIER 1 Houd elektrisch gereedschap vast bij het ge so leerde oppervlak van de handgrepen wanneer u werkt op plaatsen waar het bevestigingsmateri aal in aanraking kan komen met verborg...

Страница 29: ...op bij een kamertemperatuur tus sen 10 C en 40 C Laat een warme accu afkoelen alvorens hem op te laden 4 Laad de nikkel metaalhydride accu op telkens wanneer u hem langer dan zes maanden niet hebt geb...

Страница 30: ...t de stekker van de acculader uit het stopcontact werd getrokken terwijl de accu er nog in zat zal de accu de acculading niet aangeven als gevolg van een beveilig ingsfunctie zelfs niet nadat de accu...

Страница 31: ...automatisch stoppen met aandraaien zal het gereedschap niet starten ook al wordt de trekschakelaar ingedrukt Waarschuwing voor onvoldoende aandraaien Als u de trekschakelaar loslaat voordat het voora...

Страница 32: ...g niet werken en zal het aandraaikoppel te laag zijn OPMERKING De draaiingshoek is de hoek waarbij een schroef bout draait wanneer het gereedschap tussen 50 en 100 van het gewenste koppel bereikt Bij...

Страница 33: ...rdt gebruikt Zorg ervoor dat veiligheidsmaatregelen worden getrof fen ter bescherming van de operator die zijn gebaseerd op een schatting van de blootstelling onder praktijkom standigheden rekening ho...

Страница 34: ...ncias GEB050 2 ADVERTENCIAS DE SEGURIDAD PARA EL ATORNILLADOR A BATER A 1 Cuando realice una operaci n en la que el ator nillador pueda entrar en contacto con cableado oculto sujete la herramienta el...

Страница 35: ...o note menos potencia en la herramienta 2 No cargue nunca un cartucho de bater a que est completamente cargado La sobrecarga acortar la vida de servicio de la bater a 3 Cargue el cartucho de bater a a...

Страница 36: ...CAUCI N Un cartucho de bater a que se extraiga de un cargador que ha estado desenchufado no indicar la capacidad de la bater a debido a su funci n de protecci n aunque encienda la herramienta despu s...

Страница 37: ...ada autom tica Esta funci n se accionar cuando la bater a est casi descargada En este momento la herramienta se parar inmediatamente Se encender en rojo Un pitido largo Reemplace la bate r a con una c...

Страница 38: ...n el man guito a tope Despu s suelte el manguito para sujetar la punta Para desmontar la punta empuje el manguito en el sen tido de la flecha y tire hacia fuera de la punta firme mente Para herramient...

Страница 39: ...una herramienta con otra El valor de emisi n de vibraci n declarado tambi n se puede utilizar en una valoraci n preliminar de exposi ci n ADVERTENCIA La emisi n de vibraci n durante la utilizaci n rea...

Страница 40: ...ica pelas partes iso ladas quando executa uma opera o em que o parafuso possa entrar em contacto com fios ocultos O contacto do parafuso com um fio ligado poder carregar as partes met licas da ferrame...

Страница 41: ...TO PRECAU O Verifique sempre se a ferramenta est desligada e se retirou a bateria antes de regular a ferramenta ou verifi car o seu funcionamento Instala o ou extrac o da bateria Desligue sempre a fer...

Страница 42: ...ria PRECAU O Uma bateria retirada do carregador que esteve desli gado da tomada com a bateria colocada n o indica a capacidade da bateria devido fun o protectora mesmo se a ferramenta estiver desligad...

Страница 43: ...stiver quase no fim Nessa altura a ferramenta p ra imediata mente Acende se com uma luz verme lha Um sinal sonoro longo Substitua a bateria por uma completa mente carregada Verifica o do funcionamento...

Страница 44: ...NTO Agarre na ferramenta firmemente e coloque o conector sobre o perno ou porca Em seguida ligue a ferramenta Quando a embraiagem engata o motor p ra automatica mente Nessa altura solte o interruptor...

Страница 45: ...menta utilizada Certifique se de identificar as medidas de seguran a para protec o do operador que sejam baseadas em uma estimativa de exposi o em condi es reais de utiliza o considerando todas as par...

Страница 46: ...ledninger Fastg relsesanordninger som kommer i kontakt med en str mf rende ledning kan g re uafd kkede metaldele p maskinen str mf rende og give opera t ren st d 2 S rg for at De altid har sikkert fo...

Страница 47: ...til at k le af inden den oplades 4 Oplad nikkel metal hydrid akkuen hvis den ikke skal anvendes i mere end seks m neder FUNKTIONSBESKRIVELSE FORSIGTIG Kontroller altid at maskinen er sl et fra og akku...

Страница 48: ...nke Benyt en Makita genopfriskningsadapter til at genopfri ske akkuen FORSIGTIG En akku som er taget ud af en oplader som er taget ud af forbindelse med akkuen sat i indikerer ikke batte rikapaciteten...

Страница 49: ...er gr nt i cirka et sekund __ __ Forsinket gen start I cirka et sekund efter automatisk stop af fastsp nding vil maskinen ikke starte selv om der trykkes p afbry derknappen Advarsel mod utilstr kkelig...

Страница 50: ...ment BEM RK Omdrejningsvinkel henviser til den vinkel afstand som en skrue bolt drejer n r maskinen opn r 100 til 50 af det nskede drejningsmoment Anvendelse af et batteri med en meget lav temperatur...

Страница 51: ...endes S rg for at identificere de sikkerhedsforskrifter til beskyttelse af operat ren som er baseret p en vurde ring af eksponering under de faktiske brugsforhold med hensyntagen til alle dele i brugs...

Страница 52: ...120F BFL081F BFL121F BFL200F 1 5 6 N m 2 8 N m 5 12 N m 2 8 N m 5 12 N m 8 20 N m 1 5 6 N m 2 7 5 N m 5 12 N m 2 7 5 N m 5 11 5 N m 8 18 N m 9 5 9 5 9 5 9 5 9 5 9 5 1 450 450 250 700 410 220 430 x 65...

Страница 53: ...53 ENC005 2 1 1 2 3 2 3 4 5 1 2 3 6 50 C 7 8 9 1 2 3 10 C 40 C 4 BFL060F BFL080F BFL120F 1 BFL081F BFL121F BFL200F 2...

Страница 54: ...1 2 3 10 C 40 C 4 5 3 BH9020A BH9033A Makita 4 OFF 5 6 10 mAh BH9020A Ni MH 2 000 8 30 BH9033 Ni MH 3 300 8 50 BH9033A Ni MH 3 300 8 50 BH1220 BH1220C Ni MH 2 000 10 30 BH1233 BH1233C Ni MH 3 300 10...

Страница 55: ...55 LED LED LED LED __ __ LED LED __...

Страница 56: ...56 7 8 1 2 3 4 5 6 7 8 9 10 11 12 13 14 15 16 100 50 17 18...

Страница 57: ...901 1 ENH101 15 Makita Corporation Makita BFL060F BFL080F BFL081F BFL120F BFL121F BFL200F 2006 42 EN60745 Makita International Europe Ltd Michigan Drive Tongwell Milton Keynes Bucks MK15 8JD England 3...

Страница 58: ...58...

Страница 59: ...59...

Страница 60: ...Makita Corporation Anjo Aichi Japan www makita com 884456J990 IDE...

Отзывы: