background image

8 ENGLISH

5. 

When inflating objects, check the status of the 

tool and object, and be sure that there is no air 

leak from the object.

6. 

Always be careful not to over-inflate objects 

during operation.

 It otherwise may burst the 

objects, possibly causing damage to the tool and 

personal injury.

7. 

After inflating objects, check the air pressure 

using a reliable and calibrated measuring 

equipment.

8. 

Never leave the tool unattended when the 

nozzle or attachment is attached to the object 

or during operation.

9. 

Do not use the tool as a vacuum cleaner.


Performing dust collection may damage the tool.

10. 

Do not use the tool as a breathing device.

11. 

Use only standard accessories provided 

by Makita.

 The use of any other accessories 

or attachments might present a risk of injury to 

persons.

Maintenance and storage

1. 

Keep all nuts, bolts and screws tight to be sure 

the dust blower is in safe working condition.

2. 

If the parts are worn or damaged, replace them 

with parts provided by Makita.

3. 

Store the dust blower in a dry place out of the 

reach of children.

4. 

When you stop the dust blower for inspection, 

servicing, storage, or changing accessory, 

switch off the dust blower and make sure that 

all moving parts come to a complete stop, and 

remove the battery cartridge. Cool down the 

dust blower before making any work on the 

dust blower. Maintain the dust blower with 

care and keep it clean.

5. 

When carrying the tool, do not hold or pull a 

nozzle or attachment.

 The tool may be damaged 

and cause an injury.

6. 

Always cool down the dust blower before 

storing.

7. 

Do not disassemble the tool.

Service

1. 

Have your power tool serviced by a qualified 

repair person using only identical replacement 

parts.

 This will ensure that the safety of the power 

tool is maintained.

2. 

Never service damaged battery packs.

 Service 

of battery packs should only be performed by the 

manufacturer or authorized service providers.

SAVE THESE 

INSTRUCTIONS.

WARNING:


DO NOT let comfort or familiarity 

with product (gained from repeated use) replace 

strict adherence to safety rules for the subject 

product.
MISUSE or failure to follow the safety rules stated 

in this instruction manual may cause serious 

personal injury.

Symbols

The followings show the symbols used for tool.

volts

direct current

Important safety instructions for 

battery cartridge

1. 

Before using battery cartridge, read all instruc-

tions and cautionary markings on (1) battery 

charger, (2) battery, and (3) product using 

battery.

2. 

Do not disassemble or tamper with the battery 

cartridge.

 It may result in a fire, excessive heat, 

or explosion.

3. 

If operating time has become excessively 

shorter, stop operating immediately. It may 

result in a risk of overheating, possible burns 

and even an explosion.

4. 

If electrolyte gets into your eyes, rinse them 

out with clear water and seek medical atten-

tion right away. It may result in loss of your 

eyesight.

5. 

Do not short the battery cartridge:

(1) 

Do not touch the terminals with any con-

ductive material.

(2) 

Avoid storing battery cartridge in a con-

tainer with other metal objects such as 

nails, coins, etc.

(3) 

Do not expose battery cartridge to water 

or rain.

A battery short can cause a large current 

flow, overheating, possible burns and even a 

breakdown.

6. 

Do not store and use the tool and battery car-

tridge in locations where the temperature may 

reach or exceed 50 °C (122 °F).

7. 

Do not incinerate the battery cartridge even if 

it is severely damaged or is completely worn 

out. The battery cartridge can explode in a fire.

8. 

Do not nail, cut, crush, throw, drop the battery 

cartridge, or hit against a hard object to the 

battery cartridge.

 Such conduct may result in a 

fire, excessive heat, or explosion.

9. 

Do not use a damaged battery.

10. 

The contained lithium-ion batteries are subject 

to the Dangerous Goods Legislation require-

ments. 

For commercial transports e.g. by third parties, 

forwarding agents, special requirement on pack

-

aging and labeling must be observed. 

For preparation of the item being shipped, consult

-

ing an expert for hazardous material is required. 

Please also observe possibly more detailed 

national regulations. 

Tape or mask off open contacts and pack up the 

battery in such a manner that it cannot move 

around in the packaging.

Содержание ADSA01

Страница 1: ...INSTRUCTION MANUAL MANUAL DE INSTRUCCIONES Cordless Dust Blower Sopladora Inalámbrica XSA01 ADSA01 IMPORTANT Read Before Using IMPORTANTE Lea antes de usar ...

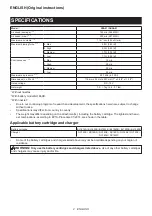
Страница 2: ... With nozzle 7 Due to our continuing program of research and development the specifications herein are subject to change without notice Specifications may differ from country to country The weight may differ depending on the attachment s including the battery cartridge The lightest and heavi est combinations according to EPTA Procedure 01 2014 are shown in the table Applicable battery cartridge an...

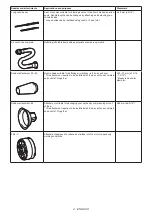
Страница 3: ...ng as inflator Inflating large inflatable pools or air mattresses Using as deflator Deflating large inflatable pools or air mattresses Functioning as a joint between air vent hose complete and rubber attachments ø13 mm ø1 2 Wide range nozzle Blowing air over dirt and liquid on desktop and wide open area Blowing range 120 with 5 holes ø6 0 mm ø1 4 As a single hole diameter Pinch valve nozzle Inflat...

Страница 4: ...opriate nozzles in operation Rubber attachment 20 30 Nozzle head suitable for deflating air mattress raft boat and pool This attachment requires to be installed with the air vent hose complete and nozzle 13 together ø20 30 mm ø13 16 1 3 16 Measured as outer diameter Rubber attachment 65 Attachment suitable for packaging your clothes by compressing air out of them This attachment requires to be ins...

Страница 5: ...equipment such as a dust mask non skid safety shoes hard hat or hearing protection used for appropriate conditions will reduce personal injuries 3 Prevent unintentional starting Ensure the switch is in the off position before connecting to power source and or battery pack picking up or carrying the tool Carrying power tools with your finger on the switch or energising power tools that have the swi...

Страница 6: ... batteries may exhibit unpredictable behaviour resulting in fire explosion or risk of injury 6 Do not expose a battery pack or tool to fire or excessive temperature Exposure to fire or tem perature above 130 C may cause explosion 7 Follow all charging instructions and do not charge the battery pack or tool outside the temperature range specified in the instruc tions Charging improperly or at tempe...

Страница 7: ...utlet Be careful not to block suction inlet or blower outlet with dust or dirt when oper ating in dusty area Do not use nozzles other than the nozzles provided by Makita 11 If the dust blower strikes any foreign objects or should start making any unusual noise or vibration immediately switch off the dust blower to stop it Remove the battery car tridge from the dust blower and inspect the dust blow...

Страница 8: ...e replace strict adherence to safety rules for the subject product MISUSE or failure to follow the safety rules stated in this instruction manual may cause serious personal injury Symbols The followings show the symbols used for tool volts direct current Important safety instructions for battery cartridge 1 Before using battery cartridge read all instruc tions and cautionary markings on 1 battery ...

Страница 9: ...ing fires personal injury and damage It will also void the Makita warranty for the Makita tool and charger Tips for maintaining maximum battery life 1 Charge the battery cartridge before completely discharged Always stop tool operation and charge the battery cartridge when you notice less tool power 2 Never recharge a fully charged battery car tridge Overcharging shortens the battery service life ...

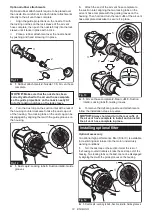
Страница 10: ...inlet at the rear of the housing counterclockwise to take the dust cap out of the housing Two locking tabs on the dust cap can be disengaged by aligning them with the guide grooves on the housing 1 2 3 4 Fig 4 1 Dust cap 2 Locking tabs 3 Suction inlet 4 Guide grooves 2 Reassemble the dust cap onto the suction inlet aligning the two locking tabs on the dust cap with the guide grooves on the housing...

Страница 11: ... only to have a shorter operating range Use both the long nozzle R and F to allow a wider operating range 4 To remove the long nozzles detach the nozzle 13 from the lock sleeve of the tool and then disassemble the long nozzles Installing and removing deflating nozzles and attachments Optional accessory NOTICE Always be sure to install and uninstall deflating nozzles and attachments only while the ...

Страница 12: ...s on the housing 1 2 3 4 Fig 12 1 Dust cap 2 Locking tabs 3 Suction inlet 4 Guide grooves 3 Attach the end of the air vent hose complete to the suction inlet aligning the two locking tabs on the air vent hose complete with the guide grooves on the housing Then hold and turn the rear cuffs of the air vent hose complete clockwise to secure it in place 1 4 5 3 2 Fig 13 1 Air vent hose complete 2 Rear...

Страница 13: ...oving battery cartridge CAUTION Always switch off the tool before installing or removing of the battery cartridge CAUTION Hold the tool and the battery car tridge firmly when installing or removing battery cartridge Failure to hold the tool and the battery cartridge firmly may cause them to slip off your hands and result in damage to the tool and battery cartridge and a personal injury 1 2 3 Fig 1...

Страница 14: ...on let the tool cool down before turning the tool on again Overdischarge protection When the battery becomes low on power during use the lamp will blink to alert you Then the tool automati cally stops with the lamp remaining lit for approximately 10 seconds shortly after the battery power becomes too low to operate during continuing use In such cases remove the battery from the tool and charge the...

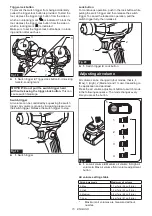
Страница 15: ...itch trigger Release the switch trigger to stop 1 Fig 19 1 Switch trigger Lock button For continuous operation push in the lock button while pulling the switch trigger and then release the switch trigger To cancel the locked on operation pull the switch trigger fully then release it 1 2 Fig 20 1 Switch trigger 2 Lock button Adjusting air volume Air volume can be changed in four modes that is 4 Max...

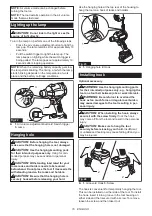
Страница 16: ...nding load rated for your tools racks and holders needs to be learned beforehand Do not place the tool if it exceeds the withstanding load on the racks and holders CAUTION Be sure that the hanging hole is securely hooked before releasing your hold Use the hanging hole at the top rear of the housing to hang the tool on a hook of racks and holders 1 2 Fig 23 1 Hanging hole 2 Hook Installing hook Opt...

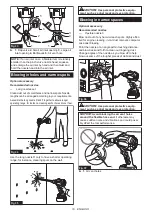
Страница 17: ...les Nozzle 3 Blow into confined spots corners and spaces by the walls to dust off Point the nozzle straight at spaces at a reasonable distance and squeeze the switch trigger to control blowing air volume Fig 26 Fig 27 CAUTION Keep the nozzle away a reasonable distance from blowing spots to avoid blowing up dust into the air CAUTION Use personal protective equip ment such as a dust mask and eye pro...

Страница 18: ...milar small plastic inflatables with pinch valve nozzle Inflate garden pools air mattresses and similar large plastic inflatables with nozzle 13 Insert the nozzle into an air inlet on an inflatable item and pull the switch trigger to start inflating Slowly release the switch trigger to reduce air volume as the inflatable item comes close to fully inflated Remove the nozzle from the air inlet after...

Страница 19: ... R only to have a shorter operating range for instance cleaning spots on the wall Fig 35 CAUTION Use personal protective equip ment such as a dust mask and eye protection Blowing in narrow spaces Optional accessory Recommended nozzles Flexible nozzle 6 Blow dust out of any hard to reach spots Highly effec tive for engine cleaning in car dust removal computer case dust blowing Point the nozzle at a...

Страница 20: ...ir vent hose complete 3 Insert the nozzle into the air valve or place the attachment over the air valve on inflatable items and pull the switch trigger to start deflating 4 Slowly release the switch trigger to reduce suc tion volume as an inflatable item comes close to fully deflated 5 Remove the nozzle or attachment from the air valve after stopping the air flow and then close the air valve With ...

Страница 21: ...nside the suction inlet as it needs to be positioned to protect the motor from any damage 1 Fig 43 1 Sponge filter A yellow 3 Wipe and shake dust off circular sponge filter B by hand Occasionally wash the filter in water rinse and dry thoroughly in the shade before use Fig 44 Fig 45 NOTICE Having washed in water dry the circular sponge filter B up before installing An insufficiently dried filter m...

Страница 22: ...lacement parts for repairs State of abnormality Probable cause malfunction Remedy Motor does not run The drive system does not work correctly Ask your local authorized service center for repair Motor stops running after a little use Overheating Stop using the tool to cool it down The tool does not reach the maxi mum air volume The drive system does not work correctly Ask your local authorized serv...

Страница 23: ...nch valve nozzle Flexible nozzle 6 Long nozzles set Air vent hose complete Rubber attachment 20 30 Rubber attachment 65 Filter C Hook Makita genuine battery and charger NOTE Some items in the list may be included in the product package as standard accessories They may differ from country to country MAKITA LIMITED WARRANTY Please refer to the annexed warranty sheet for the most current warranty ter...

Страница 24: ...a nuestro continuo programa de investigación y desarrollo las especificaciones aquí incluidas están sujetas a cambio sin previo aviso Las especificaciones pueden variar de país a país El peso puede variar en función de los accesorios incluido el cartucho de batería En la tabla se muestra la combinación de peso más ligero y más pesado conforme al procedimiento 01 2014 de EPTA Cartucho de batería y ...

Страница 25: ... o colchones de aire grandes Uso como desinflador Para desinflar piscinas inflables o colchones de aire grandes Funciona como una unión entre la manguera de ventilación de aire completa y los aditamentos de goma ø13 mm ø1 2 Boquilla de rango completo Soplado de aire sobre la suciedad y líquidos en escritorios y en áreas abiertas Rango de soplado 120 con 5 orificios ø6 0 mm ø1 4 Como diámetro de un...

Страница 26: ...artículos inflables con boquillas adecuadas en funcionamiento Aditamento de goma 20 30 Cabezal de boquilla adecuado para desinflar colchones de aire balsas botes y piscinas Este aditamento debe instalarse con la manguera de ventilación de aire completa y la boquilla 13 juntas ø20 30 mm ø13 16 1 3 16 Medido como diámetro exterior Aditamento de goma 65 Aditamento adecuado para empaquetar su ropa al ...

Страница 27: ... un cable de extensión apro piado para uso en exteriores La utilización de un cable apropiado para uso en exteriores redu cirá el riesgo de que se produzca una descarga eléctrica 6 Si no es posible evitar usar una herramienta eléctrica en condiciones húmedas utilice un alimentador protegido con interruptor de cir cuito de falla a tierra ICFT El uso de un ICFT reduce el riesgo de descarga eléctrica...

Страница 28: ...arse una situación peligrosa 8 Mantenga los mangos y superficies de asi miento secos limpios y libres de aceite o grasa Los mangos y superficies de asimiento resbalosos no permiten una manipulación segura ni el control de la herramienta en situaciones inesperadas 9 Cuando vaya a utilizar esta herramienta evite usar guantes de trabajo de tela ya que éstos podrían atorarse Si los guantes de trabajo ...

Страница 29: ...inflamables o combustibles tal como gasolina ni en áreas donde puedan estar presentes 12 Recargue sólo con el cargador especificado por el fabricante Un cargador que es adecuado para un solo tipo de paquete de baterías puede generar riesgo de incendio al ser utili zado con otro paquete de baterías GUARDE ESTAS INSTRUCCIONES Este aparato está diseñado para un uso doméstico solamente Instrucciones d...

Страница 30: ...ucir lesiones a las personas 2 Purgue despacio la presión de aire Cuando retire una boquilla o aditamento después de inflar objetos sujete firmemente el objeto la boquilla y el aditamento Podrían salir despedi dos debido al aire de escape y causar lesiones 3 No infle el objeto más allá de la presión máxima especificada para el objeto De lo con trario la herramienta o el objeto pueden resultar daña...

Страница 31: ...de explotar si se tira al fuego 8 No clave corte aplaste lance o deje caer el cartucho de batería ni golpee un objeto sólido contra el cartucho de batería Dicha acción podría resultar en un incendio calor excesivo o en una explosión 9 No use una batería dañada 10 Las baterías de ión de litio están sujetas a los requisitos reglamentarios en materia de bie nes peligrosos Para el trasporte comercial ...

Страница 32: ... una boquilla con las muescas de bloqueo del manguito de bloqueo de la herramienta luego empuje la boquilla firmemente dentro del manguito de bloqueo hasta que encaje en su lugar con un clic Una vez instalada la boquilla trate de jalarla para asegurarse de que está firmemente en su sitio 1 1 2 2 3 Fig 1 1 Protuberancias de la guía 2 Muescas de blo queo 3 Manguito de bloqueo AVISO Asegúrese de que ...

Страница 33: ...n las ranuras de guía de la carcasa Luego gire la tapa guardapolvo en el sentido de las manecillas del reloj para afianzarla en su sitio 2 4 3 1 Fig 5 1 Tapa guardapolvo 2 Lengüetas de bloqueo 3 Entrada de succión 4 Ranuras de guía Instalación y extracción de boquillas largas Accesorio opcional Un juego de boquillas largas ayuda a limpiar el polvo de pequeños orificios y puntos estrechos Las longi...

Страница 34: ...desconec tada de la herramienta Manipular la manguera de ventilación de aire completa ensamblada en la herramienta podría causar que la herramienta permanezca inestable y que se caiga 1 Alinee las protuberancias de la boquilla de la válvula de pinzamiento con las muescas de bloqueo del manguito de bloqueo de la manguera de ventilación de aire completa luego empuje la boquilla de la válvula de pinz...

Страница 35: ...a de succión 4 Lengüetas de bloqueo 5 Ranuras de guía 4 Para quitar la boquilla y los aditamentos de desin flado siga los pasos de instalación en orden inverso AVISO Siempre sostenga y gire los manguitos posteriores de la manguera de ventilación de aire completa para instalar y desinstalar la manguera de ventilación de aire completa en su lugar Instalación del filtro opcional Accesorio opcional Un...

Страница 36: ... el botón sobre la parte delan tera del cartucho Para instalar el cartucho de batería alinee la lengüeta sobre el cartucho de batería con la ranura en la carcasa y deslícela hasta su lugar Insértelo por completo hasta que se fije en su lugar con un pequeño clic Si puede ver el indicador rojo como se muestra en la ilustración este no ha quedado asegurado por completo PRECAUCIÓN Introduzca siempre c...

Страница 37: ...aya detenido tempo ralmente o se haya detenido durante el funcionamiento 1 Apague la herramienta y luego enciéndala nueva mente para reiniciarla 2 Cargue la s batería s o reemplácela s con batería s recargada s 3 Deje que la herramienta y la s batería s se enfríen Si no hay ninguna mejora al restaurar el sistema de protección comuníquese con su centro local de servi cio Makita Accionamiento del in...

Страница 38: ...n cuatro modos es decir 4 máx 3 alto 2 medio y 1 bajo según la aplicación y la carga de trabajo Presione el botón de ajuste del volumen de aire para cambiar el modo en la siguiente secuencia El modo cambia cada vez que presiona el botón 1 2 3 4 5 Fig 21 1 Volumen de aire bajo 2 Volumen de aire medio 3 Volumen de aire alto 4 Volumen de aire máximo 5 Botón de ajuste del volumen de aire Tabla de ajus...

Страница 39: ...la herramienta si excede el soporte de carga de los estantes y soportes PRECAUCIÓN Asegúrese de que el orificio para colgado esté bien enganchado antes de soltarlo Utilice el orificio para colgado en la parte superior trasera de la carcasa para colgar la herramienta de un gancho de estantes y soportes 1 2 Fig 23 1 Orificio para colgado 2 Gancho Instalación del gancho Accesorio opcional ADVERTENCIA...

Страница 40: ...anas PRECAUCIÓN Utilice equipo de protección personal como una máscara antipolvo y protec ción para los ojos AVISO Elimine las obstrucciones de las superfi cies antes de la operación de soplado Soplado en espacios reducidos Boquillas recomendadas Boquilla 3 Sople en lugares reducidos esquinas y espacios cerca de las paredes para quitar el polvo Apunte la boquilla directamente a los espacios a una ...

Страница 41: ...o completo Sople aire sobre la suciedad y el líquido en superficies amplias y abiertas como un escritorio y el piso utili zando la boquilla de cinco orificios con un rango de soplado de 120 grados Dirija la boquilla sobre un área grande dentro de una cierta distancia y gírela hacia adelante y hacia atrás y de lado a lado para soplar ampliamente Fig 30 PRECAUCIÓN Utilice equipo de protección person...

Страница 42: ... fluir a través del orificio de ventilación de aire en el cuello de botella de la boquilla de la válvula de pinzamiento debido a la circulación de aire NOTA Asegúrese de insertar la boquilla de la válvula de pinzamiento completamente a través de la entrada de aire para que el cabezal de la boquilla sirva para abrir la válvula de aleta dentro de la entrada de aire NOTA Para un artículo inflable con...

Страница 43: ...sorio opcional Boquillas recomendadas Boquilla flexible 6 Sople el polvo de cualquier lugar de difícil acceso Altamente eficaz para la limpieza del motor eliminación de polvo en el automóvil soplado de polvo en la car casa de la computadora Apunte la boquilla en un ángulo dentro de la distancia de contacto y sople hacia adelante y hacia atrás para limpiar el polvo remanente Cambie los ángulos de l...

Страница 44: ...ntilación de aire completa 3 Inserte la boquilla en la válvula de aire o coloque el accesorio sobre la válvula de aire de artículos infla bles y apriete el gatillo interruptor para comenzar a desinflar 4 Suelte lentamente el gatillo interruptor para redu cir el volumen de succión cuando un artículo inflable se desinfle casi por completo 5 Retire la boquilla o aditamento de la válvula de aire despu...

Страница 45: ...que el filtro de esponja circular B gris oscuro de la entrada de succión 1 Fig 42 1 Filtro de esponja circular B gris oscuro No retire el filtro de esponja A amarillo colocado más hacia adentro de la entrada de succión ya que debe colocarse para proteger el motor de cualquier daño 1 Fig 43 1 Filtro de esponja A amarillo 3 Limpie y sacuda el polvo del filtro de esponja circular B manualmente De vez...

Страница 46: ...la entrada de succión 1 2 Fig 46 1 Filtro de esponja circular B 2 Bordes interiores 5 Vuelva a montar la tapa guardapolvo sobre la entrada de succión alineando las dos lengüetas de bloqueo de la tapa guardapolvo con las ranuras de guía de la carcasa Luego gire la tapa guardapolvo en el sentido de las manecillas del reloj para afianzarla en su sitio 2 4 3 1 Fig 47 1 Tapa guardapolvo 2 Lengüetas de ...

Страница 47: ...rizado de su localidad ACCESORIOS OPCIONALES PRECAUCIÓN Estos accesorios o aditamen tos están recomendados para utilizarse con su producto de Makita especificado en este manual El uso de cualquier otro accesorio o aditamento puede ocasionar riesgo de lesiones personales Use los accesorios o aditamentos sólo para los propósitos para los que fueron diseñados Si necesita cualquier ayuda para más deta...

Страница 48: ...ados por el lijado aserrado esmerilado taladrado y otras actividades de la construcción contienen sustancias químicas reconocidas por el Estado de California como causantes de cáncer defectos de nacimiento y otros peligros de reproducción Algunos ejemplos de estos productos químicos son plomo de pinturas a base de plomo sílice cristalino de ladrillos y cemento y otros productos de albañilería y ar...

Отзывы: