


6
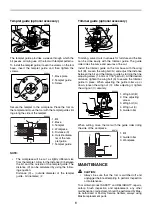
Templet guide (optional accessory)
The templet guide provides a sleeve through which the
bit passes, allowing use of the tool with templet patterns.
To install the templet guide, loosen the screws on the tool
base, insert the templet guide and then tighten the
screws.
Secure the templet to the workpiece. Place the tool on
the templet and move the tool with the templet guide slid-
ing along the side of the templet.
NOTE:
•
The workpiece will be cut a slightly different size
from the templet. Allow for the distance (X) between
the bit and the outside of the templet guide. The
distance (X) can be calculated by using the follow-
ing equation:
Distance (X) = (outside diameter of the templet
guide - bit diameter) / 2
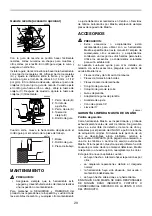
Trimmer guide (optional accessory)
Trimming, curved cuts in veneers for furniture and the like
can be done easily with the trimmer guide. The guide
roller rides the curve and assures a fine cut.
Install the trimmer guide on the tool base with the wing
bolt (B). Loosen the wing bolt (A) and adjust the distance
between the bit and the trimmer guide by turning the fine
adjusting screw (1.5 mm or 1/16” per turn). At the desired
distance, tighten the wing bolt (A) to secure the trimmer
guide in place. When adjusting the guide roller up or
down, loosen the wing nut (C). After adjusting it, tighten
the wing nut (C) securely.
When cutting, move the tool with the guide roller riding
the side of the workpiece.
MAINTENANCE
CAUTION:
•
Always be sure that the tool is switched off and
unplugged before attempting to perform inspection
or maintenance.
To maintain product SAFETY and RELIABILITY, repairs,
carbon brush inspection and replacement, any other
maintenance or adjustment should be performed by Mak-
ita Authorized or Factory Service Centers, always using
Makita replacement parts.
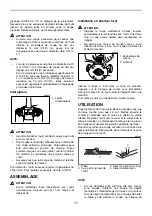
1. Base plate
2. Templet guide
3. Screw
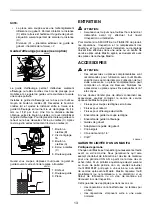
1. Bit
2. Base
3. Templet
4. Workpiece
5. Distance (X)
6. Outside diame-
ter of the tem-
plet guide
7. Templet guide
003687
1
2
3
003691
1
2
3
4
5
6
7
003695
1. Wing bolt (B)
2. Fine adjusting
screw
3. Wing bolt (A)
4. Wing nut (C)
5. Guide roller
1. Bit
2. Guide roller
3. Workpiece
003697
1
2
3
4
5
003699
3
1
2
003701


