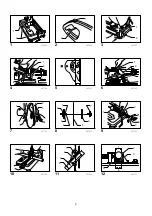
background image

tool, cut-off wheel or workpiece may result. 


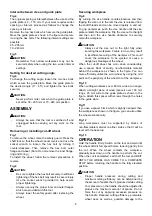
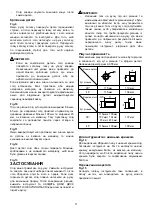
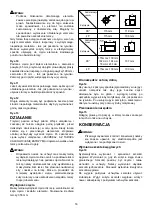
Cutting capacity 

Max. cutting capacity varies depending upon the cutting 
angle and workpiece shape. Applicable wheel diameter: 
355 mm 

90°

102 mm × 194 mm

70 mm × 233 mm

137 mm

45°

106 mm

100 mm

90°

45°

Workpiece 
shape

Cutting 
angle

Workpiece 
shape

Cutting 
angle

115 mm

115 mm

119 mm

115mm x 130mm

115mm x 103mm


005270 


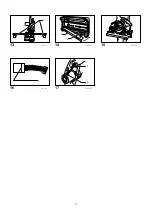
For tools with the under cover 

Fig.14 

To remove the collected dust from the under cover, place 
the tool with its side up and pull the under cover open 
after removing the wing bolt as shown in the figure. Be 
sure to close and secure the under cover with the wing 
bolt after the removal of dust. 


Carrying tool 

Fig.15 

Fold down the tool head to the position where you can 
attach the chain to the hook on the handle. 


MAINTENANCE 


CAUTION: 

• 

Always be sure that the tool is switched off and 
unplugged before attempting to perform inspection 
or maintenance. 


Replacing carbon brushes 

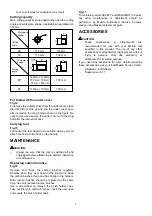
Fig.16 

Remove and check the carbon brushes regularly. 
Replace when they wear down to the limit mark. Keep 
the carbon brushes clean and free to slip in the holders. 
Both carbon brushes should be replaced at the same 
time. Use only identical carbon brushes. 
Use a screwdriver to remove the brush holder caps. 
Take out the worn carbon brushes, insert the new ones 
and secure the brush holder caps. 


Fig.17 

To maintain product SAFETY and RELIABILITY, repairs, 
any other maintenance or adjustment should be 
performed by Makita Authorized Service Centers, 
always using Makita replacement parts. 


ACCESSORIES 


CAUTION: 

• 

These accessories or attachments are 
recommended for use with your Makita tool 
specified in this manual. The use of any other 
accessories or attachments might present a risk of 
injury to persons. Only use accessory or 
attachment for its stated purpose. 

If you need any assistance for more details regarding 
these accessories, ask your local Makita Service Center. 

• 

Abrasive cut-off wheels 

• 

Socket wrench 17 

Содержание 2414NB

Страница 1: ...tarcza tn ca INSTRUKCJA OBS UGI RO Debitor pentru metale portabil MANUAL DE INSTRUC IUNI DE Tragbarer Trenntisch BEDIENUNGSANLEITUNG HU Hordozhat gyorsdarabol HASZN LATI K ZIK NYV SK Prenosn orez va...

Страница 2: ...2 1 2 1 003800 1 2 2 005269 1 2 3 003756 1 2 3 4 4 003758 5 003759 1 2 3 6 003760 1 2 3 7 003761 1 2 3 4 5 6 7 8 003762 1 2 3 9 003763 1 10 003764 1 2 3 4 5 11 005342 1 2 3 4 5 12 003766...

Страница 3: ...3 1 13 003767 1 2 14 005272 15 003768 1 16 001145 1 2 17 003769...

Страница 4: ...k area health and safety in your country ENF002 1 Power supply The tool should be connected only to a power supply of the same voltage as indicated on the nameplate and can only be operated on single...

Страница 5: ...the cutting edge of the wheel only Never use side surface 15 If the wheel stops during the operation makes an odd noise or begins to vibrate switch off the tool immediately 16 Always switch off and wa...

Страница 6: ...ads and can be moved rapidly in and out To grip workpieces push the vise handle until the vise plate contacts the workpiece Flip the vise nut to the right and then turn the vise handle clockwise to se...

Страница 7: ...to perform inspection or maintenance Replacing carbon brushes Fig 16 Remove and check the carbon brushes regularly Replace when they wear down to the limit mark Keep the carbon brushes clean and free...

Страница 8: ...7 2 7 3 8 1 8 2 8 3 8 4 8 5 8 6 8 7 9 1 9 2 9 3 10 1 11 1 11 2 11 3 45 11 4 65 11 5 190 12 1 12 2 12 3 12 4 12 5 13 1 14 1 14 2 16 1 17 1 17 2 2414NB 355 25 4 1 3800 500 x 280 x 620 18 5 II ENE007 2...

Страница 9: ...7 EC 28 2009 2006 42 EC 29 2009 EN61029 Makita International Europe Ltd Michigan Drive Tongwell Milton Keynes MK15 8JD 30th January 2009 000230 Makita Corporation 3 11 8 Sumiyoshi cho Anjo Aichi ENB06...

Страница 10: ...10 Fig 1 Fig 2 Fig 3 Fig 4 0 170 35 205 70 240 Fig 5 Fig 6 0 45 35 205 70 240 Fig 7 Fig 8...

Страница 11: ...11 Fig 9 Fig 10 65 190 45 Fig 11 Fig 12 Fig 13 355 90 102 194 70 233 137 45 106 100 90 45 115 115 119 115 x 130 115 x 103 005270 Fig 14 Fig 15...

Страница 12: ...12 Fig 16 Fig 17 17...

Страница 13: ...yfikacje mog ulec zmianom bez wcze niejszego powiadomienia Uwaga Specyfikacje mog r ni si w zale no ci od kraju ENE007 2 Przeznaczenie Narz dzie to przeznaczone jest do ci cia materia w budowlanych i...

Страница 14: ...o e to spowodowa p kni cie tarczy 7 TRZYMAJ OS ONY NA MIEJSCU i sprawd czy sprawnie dzia aj 8 Trzymaj mocno za uchwyt 9 Trzyma r ce z dala od cz ci obrotowych 10 Przed w czeniem urz dzenia upewni si c...

Страница 15: ...Pami taj e w skie elementy mog nie by wystarczaj c zablokowane je eli u yjesz dw ch szerszych ustawie odst pu Ustawianie danego k ta ci cia Rys 6 Aby zmieni k t ci cia odkr dwie ruby sze ciok tne moc...

Страница 16: ...isk na uchwyt oraz maksymaln wydajno ci cia mo na oceni na podstawie ilo ci iskier wydzielaj cych si podczas ci cia Nacisk na tarcz nale y dostosowa tak aby wydziela a si maksymalna ilo iskier Nie sto...

Страница 17: ...leca si stosowanie wymienionych akcesori w i dodatk w razem z elektronarz dziem Makita opisanym w niniejszej instrukcji Stosowanie jakichkolwiek innych akcesori w i dodatk w mo e stanowi ryzyko uszkod...

Страница 18: ...disc abraziv de retezat adecvat Respecta i toate legile i reglement rile din ara dvs privind praful i igiena i protec ia muncii n zona de lucru ENF002 1 Surs de alimentare Ma ina se va alimenta de la...

Страница 19: ...cio persoan n calea sc nteilor P stra i la ndem n un extinctor corespunz tor nc rcat 14 Folosi i numai muchia t ietoare a discului Nu folosi i niciodat fa a lateral 15 Dac discul se opre te n timpul o...

Страница 20: ...i garnitura inelar Pentru a monta peria executa i n ordine invers opera iile de demontare Fig 8 ATEN IE Ave i grij s str nge i ferm urubul cu cap hexagonal Str ngerea insuficient a urubului cu cap hex...

Страница 21: ...inferior prin tragere dup demontarea urubului fluture dup cum se vede n figur Ave i grij s nchide i i s fixa i capacul inferior cu urubul fluture dup eliminarea prafului Transportarea ma inii Fig 15 C...

Страница 22: ...Eisenmaterial mit der entsprechenden Trennschleifscheibe entwickelt Halten Sie alle in Ihrem Land geltenden Gesetze und Bestimmungen hinsichtlich Gesundheitsschutz und Unfallverh tung am Arbeitsplatz...

Страница 23: ...en Griff fest 9 N hern Sie die H nde nicht den sich drehenden Teilen 10 Stellen Sie sicher dass die Scheibe das Werkst ck nicht ber hrt bevor das Werkzeug eingeschaltet wurde 11 Bevor Sie das Werkzeug...

Страница 24: ...iginalabstand zwischen Schraubklemme und F hrungsplatte betr gt 0 170 mm Wenn das Werkst ck einen gr eren Abstand erforderlich macht gehen Sie wie folgt vor um diesen zu ndern Entfernen Sie die beiden...

Страница 25: ...it Schrauben durch die L cher in der F hrungsplatte Abb 11 Wenn Sie einen Abstandsblock verwenden der etwas schmaler ist als das Werkst ck wie in der Abbildung gezeigt k nnen Sie die Scheibe ebenfalls...

Страница 26: ...nd locker in ihre Halter hineinfallen Die beiden Kohlen m ssen gleichzeitig ausgewechselt werden Verwenden Sie ausschlie lich gleiche Kohlen Schrauben Sie mit einem Schraubenzieher den Kohlenhalterdec...

Страница 27: ...a munkater let eg szs g gyi s biztons gi k vetelm nyeire vonatkoz t rv nyeket s el r sokat ENF002 1 T pegys g A szersz m csak a n vt bl n felt ntetett fesz lts g egyf zis v ltakoz fesz lts g h l zatho...

Страница 28: ...k a gy l kony anyagokat 13 T vol tsa el a ter letr l azokat az anyagokat vagy hullad kot amelyek a szikr kt l meggyulladhatnak gyeljen r hogy m sok ne legyenek a szikr k tvonal ban Tartson egy megfele...

Страница 29: ...l az ramutat j r s val ellent tes ir nyba Ezut n t vol tsa le a hatlapfej csavart a k ls illeszt peremet s a t rcs t Megjegyz s Ne t vol tsa el bels illeszt peremet a gy r t s az O gy r t A t rcsa fel...

Страница 30: ...h zza meg az als fedelet a felnyit s hoz azut n hogy elt vol totta a sz rnyascsavart ahogy azt az bra is mutatja gyeljen r hogy a por elt vol t sa ut n r gz tse az als fedelet a sz rnyascsavarral A s...

Страница 31: ...ho abraz vneho rozbrusovacieho kot a Dodr iavajte z kony a nariadenie t kaj ce sa prachu a ochrany zdravia na pracovisku platn vo va ej krajine ENF002 1 Nap janie N stroj sa m e pripoji len k odpoveda...

Страница 32: ...mohlo by zap len iskrami Dbajte na to aby v dr he iskier neboli in osoby Majte v bl zkosti pripraven spr vny naplnen hasiaci pr stroj 14 Pou vajte len rezn okraj kot a Nikdy nepou vajte bo n povrch 1...

Страница 33: ...kaj iu pr rubu a kot Pozn mka Neodstra ujte vn torn obrubu kr ok a O kr ok Kot vkladajte opa n m postupom ako pri vyberan Fig 8 POZOR es hrann skrutku bezpe ne utiahnite Nedostato n utiahnutie es hran...

Страница 34: ...potiahnut m otvorte spodn kryt pod a vyobrazenia Po odstr nen prachu v dy zatvorte a zaistite spodn kryt kr dlovou maticovou skrutkou Pren anie n stroja Fig 15 Zlo te hlavicu n stroja do polohy kde m...

Страница 35: ...ve ker z kony a sm rnice t kaj c se pra nosti zdrav a bezpe nosti na pracovi ti ve va zemi ENF002 1 Nap jen N stroj lze p ipojit pouze k odpov daj c mu zdroji s nap t m stejn m jak je uvedeno na typo...

Страница 36: ...skrami Dbejte aby se v cest odletuj c ch jisker nenach zely dn osoby V bl zkosti mus b t k dispozici spr vn a dn napln n hasic p stroj 14 Pou vejte pouze b it kotou e Nikdy nepou vejte bo n povrch 15...

Страница 37: ...Pozn mka Nedemontujte vnit n p rubu prstenec a t snic krou ek P i instalaci kotou e pou ijte opa n postup demont e kotou e Fig 8 POZOR Dbejte aby byl pevn dota en roub s estihrannou hlavou Nedostate...

Страница 38: ...oj demontujte k dlov roub a otev ete doln kryt Viz obr zek Po odstran n prachu nezapome te zav t a zajistit doln kryt k dlov m roubem P en en n stroje Fig 15 Sklopte hlavu n stroje do polohy ve kter l...

Страница 39: ...39...

Страница 40: ...40 Makita Corporation Anjo Aichi Japan 884151A853...

Отзывы: