MAKERGEAR M3-ID Скачать руководство пользователя страница 8

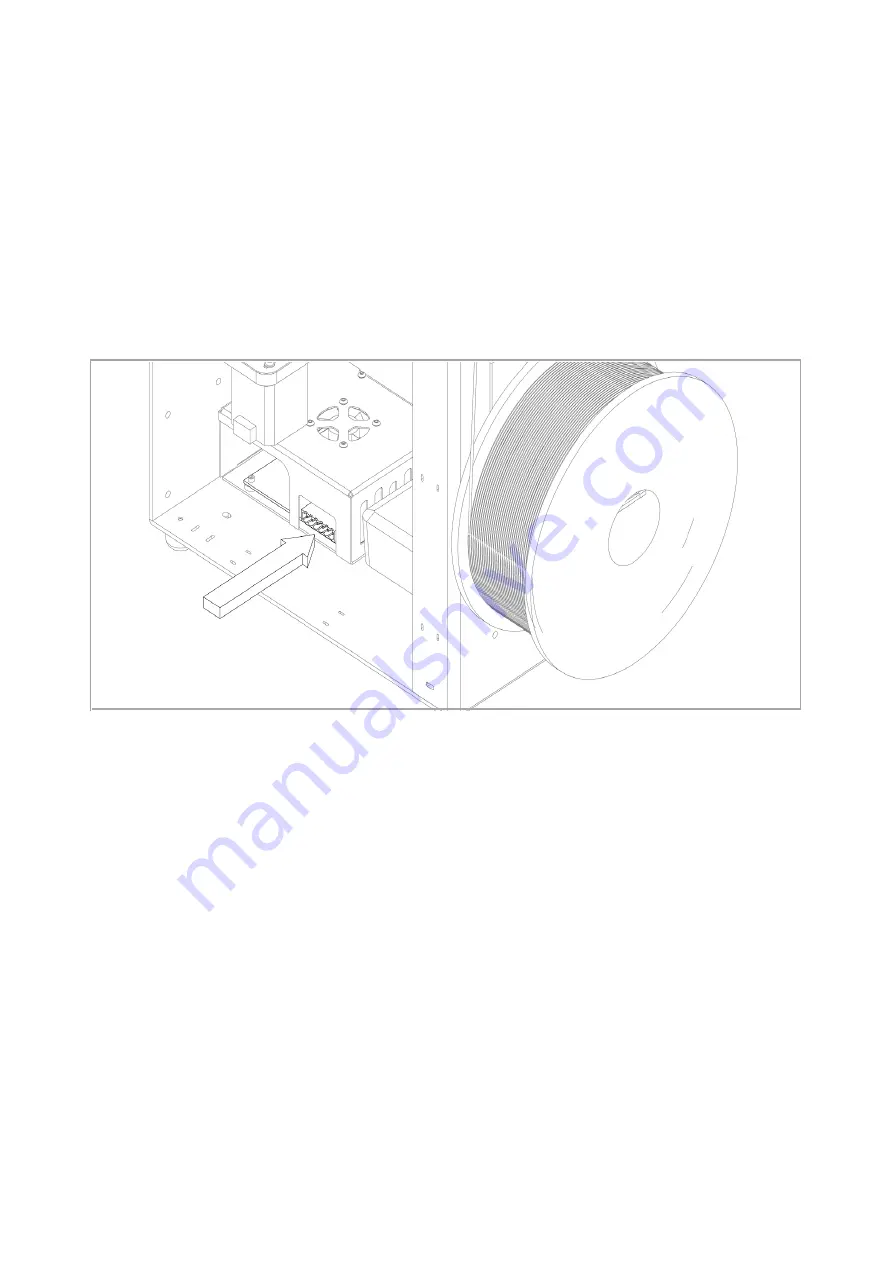
6. Insert the 6-position power supply connector into the 6-position 

electronics connector, making sure that it is SECURELY IN PLACE in the 

electronics case. Connect the power supply cord to the power supply. Next, 

plug the power supply into power outlet, and flip the switch on the power 

supply to the on position.

6

Содержание M3-ID

Страница 1: ......

Страница 2: ...s 3 What s Included 4 Hardware Setup 7 A Note About Nozzles 8 Software Setup 9 Changing Filament 10 M3 ID Features 13 What s the Function 14 Shutdown Reset Procedures 15 Maintenance Storage 16 Warrant...

Страница 3: ...tion and resources Following minimal setup your M3 ID is ready to print out of the box To ensure safety as well as high quality printing carefully follow the setup instructions included in this User G...

Страница 4: ...ove quickly so stay clear to avoid being struck or pinched 6 Keephands hair clothingawayfromprinterattachmentswhiletheprinter isoperatingtoreduceriskofinjurytopersonsand ordamagetotheprinter 7 Do not...

Страница 5: ...hat it is set to the correct voltage Toolkit hexdrivers tweezers filament guide tube feeler gauge brush and 4 extraglassbuildplatehold downclips Two 1 kg spools of 1 75 mm PLA colors may vary 2 spool...

Страница 6: ...frame 2 Remove foam from above and below the 4 legged spider inside the frame Removetheheatedbuildplatformfromitsslotinthefoamandplace it on the spider with the glass build plate facing up as shown o...

Страница 7: ...place 5 Install both spool holders as shown on page 10 using the 4 screws includedwitheachandthe3mmallenkeyandensuringthatthelongerside is facing up Place one PLA spool on theT1 right spool holder so...

Страница 8: ...o the 6 position electronics connector making sure that it is SECURELY IN PLACE in the electronicscase Connectthepowersupplycordtothepowersupply Next plug the power supply into power outlet and flip t...

Страница 9: ...ge the nozzle you must first remove the entire hot end Attempting to unscrew the nozzle directly from the M3 ID will damage the hot end Some of our users choose to print with nozzles that are either l...

Страница 10: ...s a specialized version of OctoPrint called OctoPrint for MakerGear It is an open source easy to use tool that gives users total control over their 3D printing work flow OctoPrint s basic functions in...

Страница 11: ...rude until you can see the filament extruding from the nozzle 9 Changing Filament Youwillnothavetogothroughthesetupprocessagainunlessyouchange networksorfactoryrestoretheprinter Afteryou reconnectedto...

Страница 12: ...10 M3 ID Features Front...

Страница 13: ...11 M3 ID Features Rear...

Страница 14: ...12 M3 ID Features X Stage Assembly...

Страница 15: ...resets the control electronics and shuts down the printer T0 T1 Limit Switches set home positions for X axis motion T0 T1 Print Heads deposit printing material and cool print T0 T1 Spool Holders secu...

Страница 16: ...itch off the M3 ID s power supply 1 Disconnects the printer from its current network and returns it to Access Point mode AP mode 2 Resetstheaccesspointnetworkname passwordtoitsoriginalfactory state 3...

Страница 17: ...oil from the X and Y linear rails and apply a fresh coat to each A dot of oil in each of the long grooves on the X andY rails is sufficient Once applied move each axis through its full travel multiple...

Страница 18: ...are used Due to variance in quality MakerGear is unable to provide technical support for issues related to third party filament If you are using filament or extruder components from a third party you...

Страница 19: ...r centric 3D printing experience Focusing on these three pillars has resulted in outstanding customer reviews awards andtop ratedrecognitioninpublicationsbothinandoutofthe3Dprinting world Our customer...

Страница 20: ...What are you making Tag madewithMAKERGEAR for a chance to be featured 2017 MakerGear MakerGear LLC 23632 Mercantile Road Unit G Beachwood Ohio US 44122 MakerGear...

Отзывы: