background image

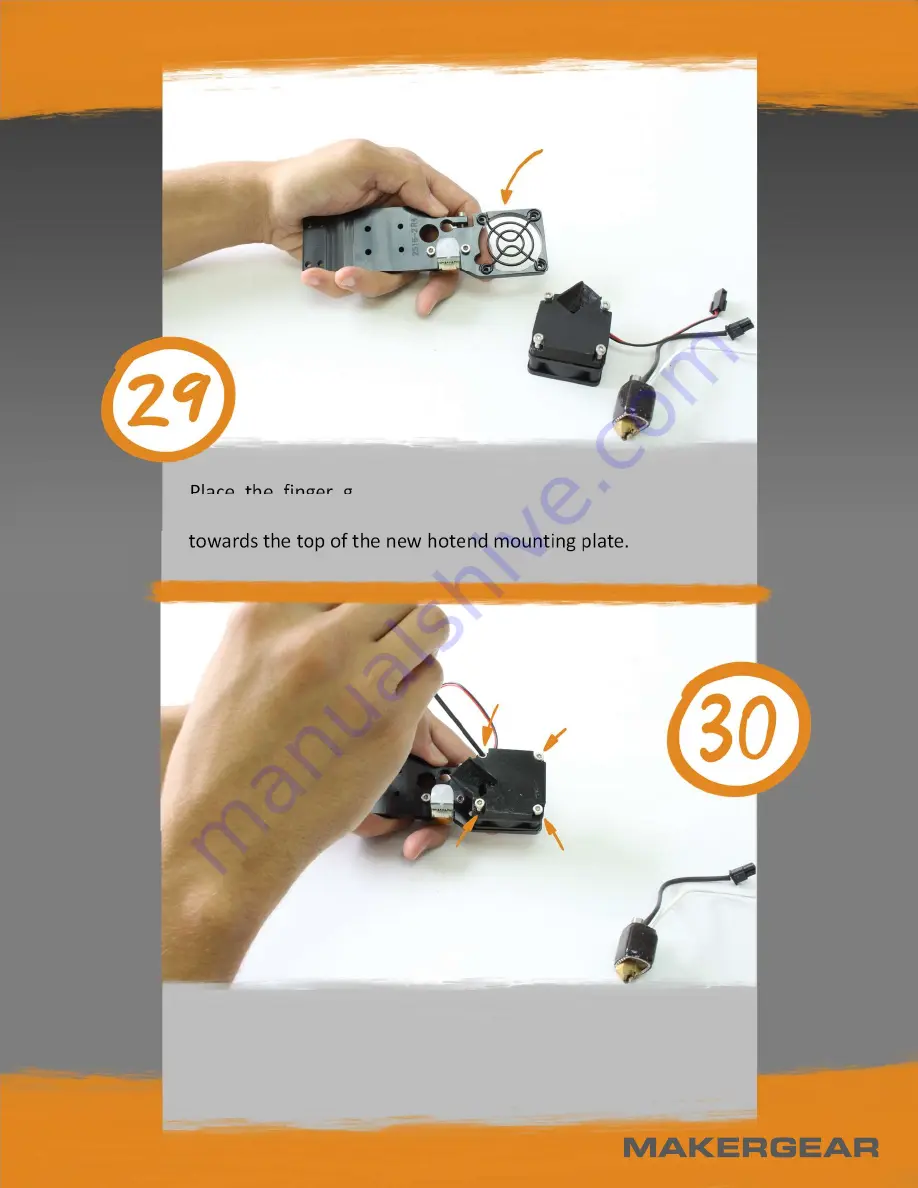
Place the finger guard into the bottom of the new hotend

mounting plate. The raised side of the finger guard should be

towards the top of the new hotend mounting plate.

Use a 2.5 mm hex driver to fasten the fan assembly to the

hotend mounting plate using the four (4) M3x25mm screws.

Make sure the orientation is correct!

Содержание M3-ID

Страница 1: ...M3 ID 3D Printer Rev 0 to Rev 1 Upgrade Guide...

Страница 2: ...LTOUCH cable 3 Zip ties 4 Four 4 M3 Bed Hold Down Clips 5 Insulative sleeve All of the fasteners you will need are already in your printer so make sure you don t misplace them during disassembly The t...

Страница 3: ...ment loaded in the T0 extruder you will need to remove it If not please skip to step 6 Open Octoprint and heat up your hotend Set the hotend to the printing temperature of the loaded filament e g ABS...

Страница 4: ...Select T0 as your tool Retract the T0 extruder by at least 70 mm...

Страница 5: ...Remove the filament and filament guide tube from T0 Home the Z axis with the house shaped button Move the Z axis down by around 30 mm this will give you room to remove the RAMBo case top later...

Страница 6: ...Shut down the printer s raspberry pi through Octoprint or by holding down the reset button for 10 seconds The raspberry pi s green light will turn off when it is properly shut down...

Страница 7: ...Locate your 6 pin power connector in the back of your printer Shut off the printer s 24V power supply and pull out the 6 pin power connector in the back of the printer...

Страница 8: ...orrect extruder Looking at the front of the printer we will be modifying the left extruder it is marked as T0 Unplug all of the molex connectors from the extruder Each one has a lever that needs to be...

Страница 9: ...Use a 2 mm hex driver to remove the M3x45mm flat head screw in the bottom right of the filament drive fan Rotate the filament drive fan clockwise to expose the screw heads beneath...

Страница 10: ...hex driver to remove the two 2 M3x25mm screws from the filament drive These screws have M3 washers on them so make sure they stay together Now the filament drive assembly is free and can be set aside...

Страница 11: ...3 M3x25mm screws from the motor mount Gently move the extruder motor aside to expose the screws beneath The motor is connected to a cable this cable can be left attached to the motor but if it is det...

Страница 12: ...river to remove the two 2 M3x14mm screws from the motor mount Now everything on top of the hotend mounting plate is free and can be set aside It is set on the top plate in the picture but it can also...

Страница 13: ...Use a 2 mm hex driver to remove the two 2 M3x10 flat head screws from the hotend mounting plate Use a 2 mm hex driver to remove the four 4 M3x16 flat head screws from the hotend mounting plate...

Страница 14: ...Remove the hotend mounting plate from the printer Now we are going to move its parts to the upgrade assembly Begin by loosening the hotend with a 2 5 mm hex driver...

Страница 15: ...Pull the hotend out and set it aside Loosen the four 4 M3x25mm screws from the hotend fan assembly...

Страница 16: ...Pull off the fan assembly and finger guard and set it aside Now locate your hotend mounting plate that came with the upgrade kit that includes a BL Touch probe...

Страница 17: ...ounting plate The raised side of the finger guard should be towards the top of the new hotend mounting plate Use a 2 5 mm hex driver to fasten the fan assembly to the hotend mounting plate using the f...

Страница 18: ...d the hotend connectors through the plate as shown Slide the hotend into the clamp and tighten it with a 2 5 mm hex driver so that the top of the hotend is flush with the top of the hotend mounting pl...

Страница 19: ...Now it is ready to be installed on the printer Loosely fasten the hotend mounting plate to the linear carriage with a 2 mm hex driver using the two 2 M3x10mm flat head screws from step 21...

Страница 20: ...rews completely This will ensure that T0 is straight When tightening multiple screws make sure all of the screws are loosely fastened before fastening all of them completely Fasten the hotend mounting...

Страница 21: ...n please continue To connect the motor line it up with its cable the connector is polarized and will only go in if the U shape is facing forward After they are lined up you can use one of your drivers...

Страница 22: ...r using the two 2 M3x14mm screws from step 19 Pull the motor mount forward and line up its right edge with the edge of the hotend mounting plate Just using a finger to feel for when they are coplanar...

Страница 23: ...Carefully rotate the motor back into the motor mount and fasten it using a 2 5 mm hex driver with the three 3 M3x25mm screws from step 17 Locate your filament drive assembly from step 16...

Страница 24: ...e filament drive assembly to the motor using a 2 5 mm hex driver and the two 2 M3x25mm screws washers from step 15 Make sure the exit for the filament drive is visually lined up with the entrance to t...

Страница 25: ...ate the filament driver fan down and fasten it using a 2 mm hex driver and the M3x45mm flat head screw from step 13 Plug in all of the molex connectors This diagram will help you find the right positi...

Страница 26: ...r the left side of the filament drive as shown Plug it into the BL Touch This connection is also polarized so you may need to flip it The next instructions will show you how to install the insulative...

Страница 27: ...Locate the insulative sleeve that came in your upgrade kit Slip the sleeve over the bottom of the sensor...

Страница 28: ...be a tight fit so if the sleeve gets stuck on the connector you can use one of your drivers to widen the opening while pushing up on the sleeve Now you can slide the sleeve up to its final position as...

Страница 29: ...der as shown and zip tie it in place Add zip ties to anchor the BL Touch harness to the original extruder harness The BL Touch harness should just follow the harnesses arc so zip tie placement isn t e...

Страница 30: ...ass the zip ties between the original harnesses and the frame until the BL Touch harness is secured all the way to the back of the RAMBo case After the zip ties are tightened you can cut off the exces...

Страница 31: ...Use a 3 mm hex driver to loosen the three 3 M4x8 screws from the right side of the printer Carefully lift the RAMBo case top and set it aside...

Страница 32: ...Plug in the BL Touch connector as shown in the next step Plug the 6 pin cable housing into the highlighted row of 6 pins The next diagram will show you the correct orientation...

Страница 33: ...h the red and brown wires towards the front and the white and orange wires in the rear Replace the RAMBo case top Use your finger to make sure the RAMBo case fan can still move freely If it doesn t th...

Страница 34: ...Use a 3 mm hex driver to fasten the RAMBo case top to the frame using the three 3 M4x8 screws from step 53 Plug the 6 pin power connector back into the RAMBo and power up your printer...

Страница 35: ...se these to replace your printer s current Bed Hold Down Clips Your bed clips hold the glass down at the four corners of your bed Remove your old bed clips using a 2 mm hex driver to unscrew the M3x22...

Страница 36: ...led toward the corner of the glass as shown above Now we are going to update your software and firmware so that your printer is compatible with its new hardware Begin by opening Octoprint and clicking...

Страница 37: ...er Upgrades to reveal the possible upgrades then choose Upgrade M3 ID Rev 0 to Rev 1 Click Upgrade ID Rev 0 to Rev 1 to begin the upgrade process and follow the on screen instructions Once the upgrade...

Страница 38: ...ter Octoprint is done upgrading navigate to the MakerGear Setup tab 1 then click the Quick Check button 2 to begin calibrating your printer After calibrating your printer you are ready to start printi...

Отзывы: