background image

Contents

1. Basic information

    A.Contents   ................................................................................    1

    B.Introduction to product   ........................................................    2

    C.Parts list   .................................................................................    3

    D.Tool tips   .................................................................................    4

    E.Me light sensor   ......................................................................    5

    F.Me sound sensor   ....................................................................    6

    G.Me RGB LED   ...........................................................................    7

2. Example 1: Light chasing robot   ...............................................    8

3. Example 2: Intelligent desk light   ............................................   11

4. Example 3: Scorpion robot   .....................................................    16

5. Suggestion about programming   ............................................   20

1

Содержание mBot

Страница 1: ...Technical support tec support makeblock com Tel 0755 2639 2228 Address 4th Floor Building C3 Nanshan iPark No 1001 Xueyuan Avenue Nanshan District Shenzhen Guangdong Province China D1 1 3_7 40 3621 Ma...

Страница 2: ...www makeblock com mBot Add on Pack Interactive Light Sound...

Страница 3: ...troduction to product 2 C Parts list 3 D Tool tips 4 E Me light sensor 5 F Me sound sensor 6 G Me RGB LED 7 2 Example 1 Light chasing robot 8 3 Example 2 Intelligent desk light 11 4 Example 3 Scorpion...

Страница 4: ...will go straight Intelligent desk light By changing the building con guration mBot can turn into an intelligent desk light The light has two operating modes touch mode in which the light brightness c...

Страница 5: ...ews and nuts 1 1 Scale 2 Me Light Sensor 2 Beam0808 072 2 Beam0824 080 1 Plate 45 1 Me RGB LED 1 Me Sound Sensor 2 RJ25 cable 35cm 1 Wrench M5 M7 9 Nut M4 4 Screw M4 8 9 Screw M4 14 5 Screw M4 22 4 Sp...

Страница 6: ...Tool tips Hexagon socket screws Phillips screw Fix the screws forcibly as shown 4 Fix the nuts forcibly as shown...

Страница 7: ...acted with light like intelligent dimming clearance light and intelligent light chaser robot The module interface is in black indicating it is an analog signal interface The sensor module is connected...

Страница 8: ...s LM2904 low power ampli er You can use this sensor to make some interactive items like voice operated switch intelligent voice activated light and robot dancing with music rhythm Technical speci cati...

Страница 9: ...inbow light and other e ects The module interface is in yellow indicating single digital interface control is adopted and it must be connected to the yellow interface on the mainboard Technical speci...

Страница 10: ...e light intensity around mBot via two light sensors on each side When the light intensity on the left side is greater than that on the right side the robot will turn left when the light intensity on t...

Страница 11: ...Beam0808 072 x2 M4 14 x4 Building steps 1 2 Beam0808 072 2 Screw M4 14 4 Nut M4 4 Me Light sensor 2 Screw M4 8 4 Me Light Sensor x2 M4 8 x4 9...

Страница 12: ...g diagram 10 Right light sensor Left light sensor Right light sensor Port4 Left light sensor Port3 Me line follower sensor Me ultrasonic sensor Left motor Right motor Left wheel left motor Please foll...

Страница 13: ...mode in which the light brightness can be regulated by touching the line follower sensor with ngers and voice control mode in which the sound intensity in the surrounding area has to be sensed and wh...

Страница 14: ...8 072 1 Beam0824 080 1 Nut M4 4 Screw M4 22 4 Beam0808 072 1 Beam0824 080 1 Nut M4 4 Screw M4 22 4 Spacer4 7 3 4 Note If your mBot is in version v1 0 without plastic protective case please refer to th...

Страница 15: ...x1 M4 14 x3 M4 x3 Beam0824 080 x1 Me Line Follower x1 M4 14 x2 Beam0824 080 x1 Beam0824 080 1 Screw M4 14 2 Me Line follower sensor 1 Beam0808 072 1 Nut M4 3 Screw M4 14 3 Screw M4 22 1 2 3 Screw M4...

Страница 16: ...M4 14 x2 M4 x2 M4 8 x4 Me SoundSensor x1 Me RGB LED x1 mBot x1 mBot chassis 1 Me RGB LED 1 Me Sound Sensor 1 Screw M4 8 4 Nut M4 2 Screw M4 14 2 4 5 14...

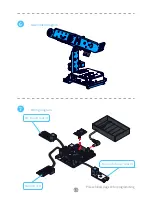
Страница 17: ...6 7 Assembled diagram Wiring diagram 15 Me sound sensor Me RGB LED Me line follower sensor Please follow page 20 for programming...

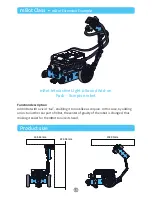
Страница 18: ...description Add mBot with a vivid tail enabling it to look like a scorpion In this case by adding an arc tail at the rear part of mBot the center of gravity of the robot is changed thus making it eas...

Страница 19: ...RGB LED x1 M4 14 x2 M4 8 x2 M4 x2 Beam0824 080 x1 M4 14 x1 M4 22 x1 M4 x1 Beam0808 072 x1 Beam0824 080 1 Me RGB LED 1 Me Sound Sensor 1 Nut M4 2 Screw M4 8 2 Screw M4 14 2 Beam0808 072 1 Nut M4 1 Scr...

Страница 20: ...3 4 M4 14 x4 M4 x4 Beam0808 072 x1 Plate 45 x1 Plate 45 1 Beam0808 072 1 Screw M4 14 4 Nut M4 4 Nut M4 2 Screw M4 14 2 18...

Страница 21: ...o remove the lithium battery from the battery shell and x it to the back of mBot with Velcro so as to ensure the center of mBot s gravity moves backwards Left wheel left motor Me ultrasonic sensor Me...

Страница 22: ...ad the latest mBlock graphical program What is mBlock mBlock is a graphic programming software based on Scratch2 0 This software is simple to operate and can allow you to program your Arduino project...

Страница 23: ......

Страница 24: ......

Страница 25: ......

Страница 26: ......

Отзывы: