


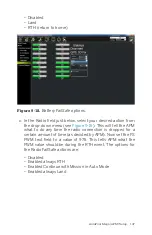


Step 3.1: 3DR radio (telemetry)
, we installed our telemetry radios for APM. These
radios come from the factory paired up in matching sets that
are both tuned to the same channel, or Net ID. In theory, you
should not have to do anything beyond plug these radios in and
hit the connect button. However, it is good to know where the
settings for the radio are located and how to change them if
need be (see
). It is also a good idea to tune in your
own Net ID if you fly with friends so that you aren’t interfering
with one another.
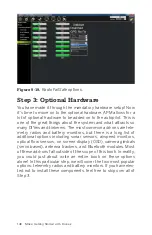
Follow these steps to check that your radios are communicating
with each other as expected:
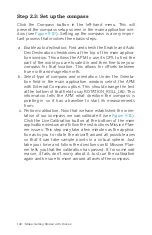
a. Make sure that you are not already connected to Mission
Planner over USB. If so, disconnect and unplug the cable.
b. Power up your radio transmitter and drone with telemetry
radio installed.
c. Connect the ground telemetry radio to your laptop and open
Mission Planner.
d. Set your COM port as needed and your Baud Rate to 57600,
then click connect.
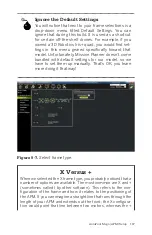
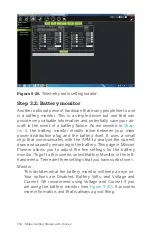
If you want to change your Net ID setting so that you can fly with
others and not cause interference, simply use the drop-down
menu to find a new channel. Be sure to set both the Local
(ground) and Remote (air) radios to the same ID number, then
click the green Save Settings button in the top of the main appli-
cation window.
ArduPilot Mega (APM) Setup 149
Содержание Belinda Kilby
Страница 1: ......
Страница 3: ...Make Getting Started with Drones Terry Kilby and Belinda Kilby...
Страница 25: ...Figure 1 5 Basic quadcopter showing how the stick commands would move the craft Introduction 13...
Страница 26: ......
Страница 90: ......
Страница 126: ......
Страница 142: ...Figure 8 7 Mobius camera next to the quick release camera mount 130 Make Getting Started with Drones...
Страница 146: ...Figure 9 4 Firmware upload has begun Figure 9 5 Firmware verification in progress 134 Make Getting Started with Drones...
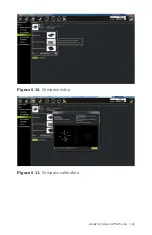
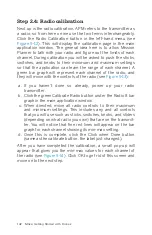
Страница 153: ...Figure 9 10 Compass setup Figure 9 11 Compass calibration ArduPilot Mega APM Setup 141...
Страница 198: ......


