background image

Première installation

1. 

Branchez le câble d’alimentation à l’arrière du système 
marqué “DC in”. Mettez le bouton à l’arrière de la radio 
sur “ON” pour afficher l’écran d’accueil.

2. 

Lors de la première utilisation, le message “Voulez-
vous configurer le réseau maintenant ? s’affichent. Les 
options OUI, OUI (WPS) ou NON s’affichent:

a. 

Si vous sélectionnez OUI, vous pouvez 
sélectionner votre réseau Wi-Fi, puis taper des 
lettres/numéros en faisant défiler avec la molette 
de navigation jusqu’à ce que le chiffre correct 
s’affiche, puis cliquer sur “>“ pour passer au chiffre 
suivant. Une fois le mot de passe saisi, appuyez sur 
la molette de navigation pour commencer.

b.  Si vous sélectionnez OUI (WPS), la radio recherche 

un réseau Wi-Fi. Sélectionnez le bouton WPS de 
votre routeur Wi-Fi pour se connecter sans mot de 
passe. 

c. 

Si NON est sélectionné, vous pouvez éviter la 
configuration Wi-Fi pour le faire dans un autre 
moment à partir de la page des réglages.

01

Содержание King's KNG-ALL-BLK

Страница 1: ...PET NET BLK Instructions Guide P E T E R H O U S E I N T E R N E T R A D I O ...

Страница 2: ...ions 10 Media Centre 11 Information Centre 13 Connections 14 Local Radio 15 Configuration Settings 16 Settings Additional Features 21 Remote Control App 23 Troubleshooting 25 Specifications 26 Warranty 26 Safety Information 27 Contents Watch video tutorials and register your product for a FREE 3 year warranty at https www majority co uk 3YEAR WARRANTY ...

Страница 3: ...1 What s in the Box Box Contents 1 Majority Peterhouse Radio 2 Power Adapter 3 Instructions Guide ...

Страница 4: ...ls And Functions Front Panel 1 Display Screen 2 Standby 3 Dimmer 4 Home 5 Favourites 6 Sleep 7 Previous 8 Alarm 9 Next 10 Select Volume dial Home Sleep Navigate Fav OK 1 4 2 6 8 3 5 7 9 10 Standby Dimmer Alarm ...

Страница 5: ...3 Controls And Functions Back View 11 ON OFF Switch 12 DC power input 13 Line Out 14 AUX In 15 USB Charging Port LINE OUT DC 12V AUX IN USB 11 12 13 14 15 ...

Страница 6: ...erhouse internet radio Please follow the guidance of the manual to set up your new purchase and begin enjoying its features If you require further assistance with your new radio please contact our support team on the Majority website https www majority co uk support ...

Страница 7: ...confirm selections Change the volume when you are on the radio station playing display screen The volume will not be altered when you are navigating around the radio as it will begin to function as the Select dial Home button Select the Home button to browse through your audio options such as Local Radio Internet Radio Media Centre Information Centre AUX Configuration Settings Also use the Home bu...

Страница 8: ...e back of the radio to ON Ref 11 to display a Welcome screen After the Welcome screen you will be able to select your chosen language by scrolling with the Select dial Ref 10 Select your language by pressing down the Select dial If this is the first time of using your radio you will get the option to set up your WiFi to stream Internet Radio with the message Would you like to configure network now...

Страница 9: ...e network now 00 00 Yes WPS NO YES 00 00 Enter Password 1 1 00 00 Move OK Input Scanning for Wireless Network 00 00 Wireless Network WPS PBC When at the Would you like to configure network now stage if you select YES WPS your radio will begin to search for WiFi connections Whilst this has been selected you will have 120 seconds to click the WPS button on your WiFi modem This will connect your WiFi...

Страница 10: ...nnection Complete Once your WiFi is connected by manually entering your WiFi password or via WPS you will be taken to the main menu screen and the WiFi signal will appear in white at the top left Your internet radio is now set up ...

Страница 11: ...ghlight Find stations under relevant categories and select your chosen internet station by selecting with the Select dial If your station is not available via this server or found in internet radio Service please refer to page 12 My MediaU Local Radio The radio is automatically set up to detect your country s top DAB stations Top 10 stations All Stations plus a variety of genres into categories in...

Страница 12: ... station Pre setting your favourite internet stations When you have found your desired station hold down Fav Ref 5 for a few seconds to go to the Add to my Favourites screen Turn the select dial to choose the preset number and select your option Ref 10 To view your preset favourite stations press the Fav button to scroll through your choices Quick use tip Once presets have been set for Internet Ra...

Страница 13: ...music such as personal computers Windows media player mobile GooglePlay and other devices Once you have selected UPnP select the radio from your device to connect and from your phone you may need to select the radio Both your device and the Peterhouse radio will need to be connected to the same WiFi network Select the device with the Select dial you want to play music or media from on the radio di...

Страница 14: ...isplay Confirm delete Select YES to delete your playlist with the Select dial My Media U Stations can be manually added on to the radio via MediaU if they are not available in internet radio mode In configuration settings there is the option to connect a MediaU account via the website http www mediayou net Ensure that WiFi is connected to the radio and then obtain the wireless MAC address of the r...

Страница 15: ...select the country followed by the town city Once you choose a chosen town city the following information will be displayed current temperature weather symbol image approximate temperature range for the next 5 days Financial Information Select from a range of stock market index s from around the world Scroll and select using the Select dial System Information View system version and wireless conne...

Страница 16: ...he back of the radio Select your chosen audio on your device and play Please ensure that your device volume is switched up for the best audio sound Line Out At the back of the radio the Line Out port Ref 13 allows for an external amplifier stereo system Simply connect an AUX cord from the Line Out port to the amplifer stereo Begin playing audio from the Internet Radio Media Centre or AUX ...

Страница 17: ...ect the option of Local Radio on the main display screen with the Select dial Ref 10 Browse through a range of radio stations in your region including top DAB stations in your area Top 10 stations and a range of genres put into categories ...

Страница 18: ...type in the WiFi password To type letters numbers scroll with the Select dial until the correct digit is displayed and click Ref 9 to go to the next digit Press Ref 7 if you wish to go back to previous digit Once you are finished press down the Select dial Ref 10 to confirm Once your WiFi is connected you will be taken to the main menu screen and the WiFi signal will appear in white at the top lef...

Страница 19: ... have got the correct unit click Ref 9 to go to the month Continue this process with the year the hour and the minutes Once the manual set up is complete press down the Select dial Ref 10 to Enter To change the format of the date and the time including setting a 12 hour or 24 hour clock you can alter these settings under the Set Time Format and Set Date Format options within this Configuration Set...

Страница 20: ...ave made your selection press the button Ref 7 to go back to the other alarm settings Select Time and turn the dial to highlight the alarm hour Once you have found the desired hour press Ref 9 to then change the minutes Once the minutes are at the correct value press down the Select dial Ref 10 to confirm and go back to alarm settings Now scroll down and select Sound with the Select dial You can n...

Страница 21: ...olume setting in the Alarm setting screen How to turn off your alarm when sounding When your alarm is sounding select the Alarm button Ref 8 or Standby button Ref 2 for alarm to stop If you have set an alarm to sound everyday or more than once the alarm icon will still remain on the main display screen Instructions Guide 00 00 Turn On Turn Off 2 2 00 00 Alarm 1 Turn Off Alarm 2 turn Off NAP Alarm Tur...

Страница 22: ...alarm volume Once the correct sound volume has been chosen wait a few seconds and the radio will automatically revert back to alarm setting options Please note The alarm volume set in this setting will be the alarm sound and it cannot be changed with the Volume Select dial Ref 10 when the alarm sounds Nap alarm After selecting Alarm in Configuration settings or the Alarm button Ref 8 on the front ...

Страница 23: ... you have chosen the correct timer amount confirm it by pressing the Select dial Ref 10 Dimmer The dimmer button allows you to select two different brightness modes You can alter the two brightness settings in Configuration settings and selecting the option for Dimmer Select Power Save mode to set the brightness for when there is no activity of the radio for 15 seconds This lower brightness level ...

Страница 24: ...Select dial Ref 10 Sleep Timer To set a sleep timer select the Sleep button Ref 6 and press repeatedly to switch between sleep times on the top right of the display screen There is an option between 15 30 60 90 120 150 180 minutes To turn Sleep off press multiple times until the timer is no longer there or Turn Off in configuration settings Alternatively you can set a sleep timer in Configuration ...

Страница 25: ... your device 2 AirMusic Control App Select this to show two QR codes one for Apple devices and one for Android Scan the relevant code to download from the App store on your phone or tablet Once the app is downloaded open the app and ensure that your radio is switched on and out of standby mode The app should then automatically connect to your Majority internet radio You can now begin adjusting set...

Страница 26: ...ecast for the standby display Choose your preferred temperature unit and enter your location This will then display in the clock display on the standby screen every 10 seconds Local radio setup Manually set up your location for Local radio rather than allowing the radio to Auto Detect Playback setup Select the playback mode of the Media Centre OFF Repeat All Repeat One or Shuffle Device Default na...

Страница 27: ...No sound Check whether unit is set to MUTE or not Check whether MODE is correctly selected or not Check whether cables are properly installed or not Function disturbance Switch off and unplug the unit Leave it for 2 minutes and switch it on again WiFi not connecting Ensure WiFi mode is selected in settings and the correct passcode is being entered for the WiFi modem Please try performing a factory...

Страница 28: ...to be valid Once on the web page use the menu to find Register Your Product You will also be given the chance to extend your warranty for an additional 24 months free of charge Warranty Power Supply DC 12V 1A Streaming UPnP DLNA Connections DC USB 3 5mm AUX In 3 5mm Line Out Input 100 240V 50 60Hz 500mA Dimension WxHxD 23 x 13 8 x 13 cm Net Weight 1 4kg ...

Страница 29: ...the apparatus 13 Dispose of used electrical products and batteries safely according to your local authority and regulations ADDITIONAL WARNINGS The apparatus shall not be exposed to dripping or splashing and no objects filled with liquid such as vases shall be places on the apparatus Main plug is used to disconnect device and it should remain readily operable during intended use In order to discon...

Страница 30: ......

Страница 31: ...www majority co uk ...

Страница 32: ...PET NET BLK P E T E R H O U S E I N T E R N E T R A D I O Bedienungsanleitung ...

Страница 33: ...rationseinstellungen 15 Einstellungen Datum und Uhrzeit 17 Einstellungen Weckeinstellungen 18 Einstellungen Andere Funktionen 21 Fernbedienung App 23 Zusätzliche Einstellungen 24 Fehlerbehebung 25 Technische Daten 26 Garantie 26 Sicherheitsinformation 27 Inhalt Video Tutorials ansehen und Ihr Produkt für eine kostenlose 3 jährige Garantie registrieren bei www majorityradios de 3JAHRE GARANTIE F 1 ...

Страница 34: ... 25 26 26 27 Bedienelemente Home Sleep Navigate Fav OK 1 4 2 6 8 3 5 7 9 10 Standby Dimmer Alarm Frontansicht Bedientasten 1 Display Bildschirm 2 Standby 3 Dimmer 4 Home 5 Lieblingssender 6 Schlaf 7 Vorherige 8 Alarm 9 Nächste 10 Auswählen Volumen ...

Страница 35: ...2 Bedienelemente Rückansicht Verbindungen LINE OUT DC 12V AUX IN USB 11 12 13 14 15 11 AN AUS Schalter 12 DC Stromeingang 13 Line Out 14 AUX In 15 USB Ladeanschluss 1 2 3 ...

Страница 36: ...3 Was ist in der Box 1 Peterhouse Internet Radio 2 DC in Stromversorgung 3 Gebrauchsanweisung Box Inhalt ...

Страница 37: ...Handbuchs um Ihren neuen Kauf einzurichten und mit den Funktionen zu beginnen Wenn Sie weitere Unterstützung bei Ihrem neuen Radio benötigen wenden Sie sich bitte an unser Support Team auf der Majority Website https www majority co uk support Na S ein u Uhr Um I zum S Sie v Einst Uhr A nach Ä R w Einst H A I dur V Einst D S des D ...

Страница 38: ...lichkeiten zu blättern und drücken Sie das Rad nach unten um die Auswahl zu bestätigen Ändern Sie die Lautstärke wenn Sie sich auf dem Display des Radiosenders befinden Die Lautstärke wird nicht verändert wenn Sie durch das Radio navigieren da es als Auswähl Einstellrad fungiert Home Taste Wählen Sie die Schaltfläche Home um Ihre Audio Optionen wie Lokal Radio Internet Radio Mediencenter Informati...

Страница 39: ...lte Sprache auswählen indem Sie mit dem Einstellrad Ref 10 scrollen Wählen Sie Ihre Sprache indem Sie das Einstellrad drücken Wenn Sie Ihr Radio zum ersten Mal benutzen haben Sie die Möglichkeit Ihr WLAN so einzustellen dass es Internet Radio mit der Meldung Möchten Sie das Netzwerk jetzt konfigurieren überträgt Wenn Sie JA wählen beginnt Ihr Radio nach Netzwerken in der Nähe zu suchen mit denen S...

Страница 40: ... Möchten Sie jetzt Netzwerk konfigurieren JA WPS NEIN JA 00 00 Password eingeben 1 1 00 00 Bewegen OK Eingabe Scannen for Funktionen 00 00 WLAN Network WPS PBC Wenn Sie beim Möchten Sie das Netzwerk jetzt konfigurieren JA WPS wählen beginnt Ihr Radio mit der Suche nach WLAN Verbindungen Während diese Option ausgewählt wurde haben Sie 120 Sekunden Zeit um auf die WPS Taste auf Ihrem WLAN Modem zu kl...

Страница 41: ...gorien und wählen Sie die gewünschte Internetstation aus indem Sie mit dem Einstellrad auswählen Wenn Ihr Sender nicht über diesen Server verfügbar ist oder unter Internetradio Dienst gefunden wird lesen Sie bitte Seite 11 My MediaU Lokalradio Das Radio wird automatisch so eingestellt dass es die besten DAB Sender Ihres Landes Top 10 Sender Alle Sender und eine Vielzahl von Genres in alphabetische...

Страница 42: ...instellung Ihrer Lieblings Internetstationen Wenn Sie Ihren gewünschten Sender gefunden haben halten Sie Fav Ref 5 einige Sekunden lang gedrückt um zum Bildschirm Zu meinen Favoriten hinzufügen zu gelangen Wählen Sie mit dem Einstellrad die Preset Nummer und wählen Sie Ihre Option Ref 10 Um Ihre gespeicherten Lieblingssender anzusehen drücken Sie die Taste Fav um durch Ihre Auswahl zu blättern Tip...

Страница 43: ... z B PCs Windows Media Player Handys GooglePlay und andere Geräte Nachdem Sie UPnP ausgewählt haben wählen Sie das Radio von Ihrem Gerät aus das Sie verbinden möchten und von Ihrem Telefon aus müssen Sie möglicherweise das Radio auswählen Sowohl Ihr Gerät als auch das Peterhouse Radio müssen mit demselben WLAN Netzwerk verbunden sein Wählen Sie das Gerät mit dem Einstellrad von dem Sie Musik oder ...

Страница 44: ...en Das Radio zeigt daraufhin Löschen bestätigen Wählen Sie JA um Ihre Playlist mit dem Einstellrad zu löschen Mein Media U Sender können über MediaU manuell zum Radio hinzugefügt werden wenn sie im Internetradio Modus nicht verfügbar sind In den Konfigurationseinstellungen besteht die Möglichkeit ein MediaU Account über die Website http www mediayou net anzuschließen Vergewissern Sie sich dass WLA...

Страница 45: ...t Sobald Sie eine Stadt ausgewählt haben werden folgende Informationen angezeigt aktuelle Temperatur Wettersymbolbild ungefähre Temperaturspanne für die nächsten 5 Tage Finanzinformationen Wählen Sie aus einer Reihe von Börsenindizes aus der ganzen Welt Blättern und Auswählen mit dem Einstellrad Systeminformationen Zeigen Informationen zur Systemversion und zur drahtlosen Verbindung an Wenn drahtl...

Страница 46: ...ünschten Audio auf Ihrem Gerät aus und spielen Sie ihn ab Bitte stellen Sie sicher dass die Lautstärke Ihres Geräts für den besten Ton eingestellt ist Line Out Auf der Rückseite des Radios ermöglicht der Line Out Anschluss ein externes Verstärker HiFi System Schließen Sie einfach ein AUX Kabel vom Line Out Anschluss an den Lautsprecher oder die HiFi Anlage an Beginnen Sie mit der Wiedergabe von Au...

Страница 47: ...Option Lokales Radio auf dem Hauptbildschirm mit dem Einstellrad Ref 10 Stöbern Sie in verschiedenen Radiosendern in Ihrer Region darunter die besten DAB Sender in Ihrer Nähe die Top 10 Sender und eine Reihe von Genres die in Kategorien eingeteilt sind ...

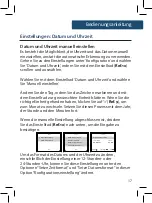
Страница 48: ...ungen Suchen Sie Ihre WLAN Verbindung und wählen Sie diese mit dem Einstellrad aus Nach der Auswahl müssen Sie möglicherweise das WLAN Passwort eingeben Um Buchstaben Ziffern einzugeben scrollen Sie mit dem Einstellrad bis die richtige Ziffer angezeigt wird und klicken Sie auf Ref 9 um zur nächsten Ziffer zu wechseln Drücken Sie die Taste Ref 7 wenn Sie zur vorherigen Ziffer zurückkehren möchten W...

Страница 49: ...tzwerk WPS PBC Wählen Sie diese Option um nach Ihrer WLAN Verbindung zu suchen Solange diese Option ausgewählt ist haben Sie 120 Sekunden Zeit um auf die WPS Schaltfläche Ihres WLAN Modems zu klicken Dadurch wird Ihr WLAN mit Ihrem Radio verbunden ohne dass Sie den Passcode manuell eingeben müssen Bedienungsanleitung ...

Страница 50: ...m zum Monat zu wechseln Setzen Sie diesen Prozess mit dem Jahr der Stunde und den Minuten fort Wenn die manuelle Einstellung abgeschlossen ist drücken Sie das Einstellrad Ref 10 nach unten um die Eingabe zu bestätigen Um das Format des Datums und der Uhrzeit zu ändern einschließlich der Einstellung einer 12 Stunden oder 24 Stunden Uhr können Sie diese Einstellungen unter den Optionen Setze Zeitfor...

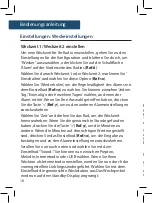
Страница 51: ...r Alarm ertönt Wenn Sie Ihre Auswahl getroffen haben drücken Sie die Taste Ref 7 um zu den anderen Alarmeinstellungen zurückzukehren Wählen Sie Zeit und drehen Sie das Rad um die Weckzeit hervorzuheben Wenn Sie die gewünschte Stunde gefunden haben drücken Sie die Taste Ref 9 um die Minuten zu ändern Wenn die Minuten auf den richtigen Wert eingestellt sind drücken Sie das Einstellrad Ref 10 um die ...

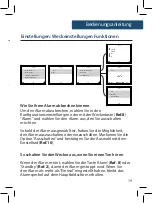
Страница 52: ...uswahl mit dem Einstellrad Ref 10 So schalten Sie den Wecker aus wenn Sie einen Ton hören Wenn der Alarm ertönt wählen Sie die Taste Alarm Ref 8 oder Standby Ref 2 damit der Alarm gestoppt wird Wenn Sie den Alarm als mehr als Einmal eingestellt haben bleibt das Alarmsymbol auf dem Hauptbildschirm erhalten Bedienungsanleitung um ms mit dem ken gen die Ein Aus 00 00 1 2 Wecker 1 Aus Wecker 2 Aus Sch...

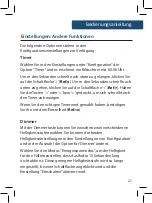
Страница 53: ...onseinstellungen auf die Option Alarm gehen oder indem Sie auf Alarm Ref 8 auf der Vorderseite des Radios drücken Scrollen Sie zu der Option für Alarmlautstärke und ändern Sie mit dem Einstellrad Ref 10 die Alarmlautstärke Wenn Sie die richtige Lautstärke gewählt haben warten Sie einige Sekunden und das Radio kehrt automatisch zu den Alarmeinstellungen zurück Bitte beachten Sie Die in dieser Einst...

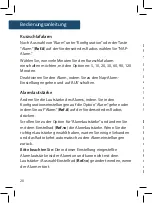
Страница 54: ... die Tasten oder bzw gedrückt um sich schnell durch den Timer zu bewegen Wenn Sie den richtigen Timerwert gewählt haben bestätigen Sie ihn mit dem Einstellrad Ref 10 Dimmer Mit der Dimmertaste können Sie zwischen zwei verschiedenen Helligkeitsstufen wählen Sie können die beiden Helligkeitseinstellungen in den Einstellungen von Konfiguration und in der Auswahl der Option für Dimmer ändern Wählen Si...

Страница 55: ...inschlaf Timer Um einen Einschlaf Timer einzustellen wählen Sie die Taste Sleep Ref 6 und drücken Sie wiederholt um zwischen den Schlaf Zeiten oben rechts auf dem Bildschirm umzuschalten Es gibt eine Option zwischen 15 30 60 90 90 120 150 180 Minuten Um den Ruhemodus auszuschalten drücken Sie mehrmals bis der Timer nicht mehr vorhanden ist Alternativ können Sie auch einen Sleep Timer in den Einste...

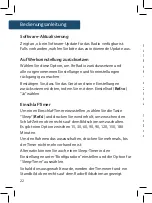
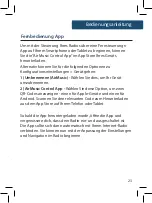
Страница 56: ...nen AirMusic Wählen Sie dies um Ihr Gerät umzubenennen 2 AirMusic Control App Wählen Sie diese Option um zwei QR Codes anzuzeigen einen für Apple Geräte und einen für Android Scannen Sie den relevanten Code zum Herunterladen aus dem App Store auf Ihrem Telefon oder Tablet Sobald die App heruntergeladen wurde öffne die App und vergewissere dich dass dein Radio ein und ausgeschaltet ist Die App soll...

Страница 57: ...e bevorzugte Temperatureinheit un geben Sie Ihren Standort ein Dies wird dann in der Uhranzeige auf dem Display alle 10 Sekunden auf den Standby Bildschirm angezeigt Lokalradio einstellen Richten Sie Ihren Standort manuell für Lokalradio ein anstatt das Radio automatisch erkennen zu lassen Wiedergabeeinstellung Wählen Sie den Wiedergabemodus des Mediums aus Mitte AUS Alle wiederholen Einmalig wied...

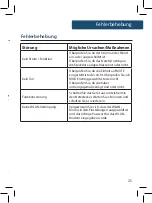
Страница 58: ...on Überprüfen Sie ob die Einheit auf MUTE eingestellt ist oder nicht Überprüfen Sie ob MODE richtig gewählt ist oder nicht Überprüfen Sie ob die Kabel ordnungsgemäß verlegt sind oder nicht Funktionsstörung Schalten Sie das Gerät aus und ziehen Sie den Netzstecker Warten Sie 2 Minuten und schalten Sie es wieder ein Keine WLAN Verbingung Vergewissern Sie sich dass der WLAN Modus in den Einstellungen...

Страница 59: ...dardgarantie von 12 Monaten geliefert Alle Artikel müssen auf https www majority co uk registriert sein damit die Garantie gültig ist Wenn Sie sich auf der Webseite befinden finden Sie im Menü Produkt registrieren Sie erhalten auch die Chance Ihre Garantie um weitere 24 Monate kostenlos zu verlängern 1 L 2 B st w 3 B 4 B 5 R mit W 6 Nur mit 7 Block Über installier 8 I W oder ande W 9 S Eink dem P ...

Страница 60: ...al funktioniert oder fallen gelassen wurde 13 Keine nackten Flammenquellen wie z B angezündete Kerzen sollten auf das Gerät gestellt werden 14 Entsorgen Sie gebrauchte elektrische Produkte und Batterien entsprechend Ihren örtlichen Behörden und Vorschriften ZUSÄTZLICHE WARNHINWEISE Das Gerät darf keinen Tropfen oder Spritzwasser ausgesetzt werden und es dürfen keine mit Flüssigkeit gefüllten Gegen...

Страница 61: ......

Страница 62: ...www majority co uk ...

Страница 63: ...P E T E R H O U S E G U I D E S R A P I D E S E N F R A N Ç A I S G U I A R A P I D A E S P A Ñ O L A G U I D E V E L O C I I T A L I A N A www majority co uk ...

Страница 64: ...ner votre réseau Wi Fi puis taper des lettres numéros en faisant défiler avec la molette de navigation jusqu à ce que le chiffre correct s affiche puis cliquer sur pour passer au chiffre suivant Une fois le mot de passe saisi appuyez sur la molette de navigation pour commencer b Si vous sélectionnez OUI WPS la radio recherche un réseau Wi Fi Sélectionnez le bouton WPS de votre routeur Wi Fi pour s...

Страница 65: ...électionnez la station de votre choix à l aide de la molette de navigation 2 Recherchez des stations ou ajoutez une nouvelle station sous Service Créez un compte MediaU en ligne et ajoutez l adresse MAC du Centre d information Système pour plus de stations Préréglage des stations radio 1 Lors de la lecture de la station que vous souhaitez prérégler appuyez sur la touche FAV et maintenez la enfoncé...

Страница 66: ...2 Pour rappeler vos stations préréglées appuyez sur la touche FAV ne la maintenez pas enfoncée pour afficher vos stations préréglées Sélectionnez une station à jouer avec la molette de navigation 03 0 ...

Страница 67: ...phériques via UPnP et créez des listes de lecture 2 Information Centre Consulter les informations météorologiques financières ou système 3 Mode AUX Sélectionnez le mode AUX sur l écran d accueil pour commencer la lecture audio via le câble AUX vers l appareil 4 Line Out Connectez un amplificateur externe ou stéréo à la radio via le port Line Out 05 ...

Страница 68: ...nt les boutons Sleep ou Alarm de la radio Pour créer des réglages utilisez la molette de navigation pour régler les unités ou passer d une valeur à l autre et utilisez les boutons ou pour passer au chiffre précédent suivant pour modifier Une fois le réglage terminé confirmez en appuyant sur la molette de navigation Téléchargez l application Air Music Control App via l app store de votre appareil p...

Страница 69: ...na SÍ puede seleccionar su red Wi Fi y luego escribir letras números desplazándose con el dial de navegación hasta que se muestre el dígito correcto y haga clic en para ir al siguiente dígito Una vez que se escribe la contraseña presione el dial de navegación para comenzar b Si selecciona SÍ WPS la radio buscará una red Wi Fi Seleccione el botón WPS en su enrutador de Wi Fi para conectarse sin esc...

Страница 70: ... una nueva estación en Servicio Cree una cuenta de MediaU en línea y agregue la dirección MAC desde Centro de información Sistema para más estaciones Presintonización de emisoras de radio 1 Al reproducir la emisora que desea preajustar presione y mantenga presionado el botón FAV durante 2 o 3 segundos para ir a la pantalla Agregar a mis favoritos Desplácese por los números predeterminados y selecc...

Страница 71: ... de UPnP y haga listas de reproducción 2 Centro de Información Vea información del clima financiera o del sistema 3 Modo AUX Seleccione el modo AUX en la pantalla de inicio para comenzar a reproducir el audio a través del cable AUX al dispositivo 4 Line Out conecte un amplificador externo o estéreo a la radio a través del puerto Line Out 05 ...

Страница 72: ... la radio Para crear configuraciones use el control de navegación para ajustar las unidades o moverse entre valores y use los botones o para pasar al dígito anterior siguiente para enmendar Una vez que se haya completado el ajuste confirme presionando el dial de navegación hacia abajo Descargue la Aplicación de control de Air Music a través de la tienda de aplicaciones de su dispositivo para contr...

Страница 73: ...na YES è possibile selezionare la rete Wi Fi e quindi digitare lettere numeri scorrendo con la rotella di navigazione fino a visualizzare la cifra corretta e fare clic su per passare alla cifra successiva Una volta digitata la password premere il selettore di navigazione per iniziare b Se si seleziona YES WPS la radio cercherà una rete Wi Fi Selezionare il pulsante WPS sul router Wi Fi per connett...

Страница 74: ... selezionare la stazione scelta con il selettore 2 Cercare le stazioni o aggiungere una nuova stazione in Service 1 Creare un account MediaU online e aggiungere l indirizzo MAC dal Centro informazioni Sistema per altre stazioni Preimpostare le Stazioni Radio 1 Quando si arriva alla stazione che si desidera preimpostare premere e tenere premuto il tasto FAV per 2 3 secondi per andare alla schermata...

Страница 75: ...2 2 Per richiamare le stazioni preimpostate premere il tasto FAV non tenere premuto per visualizzare le stazioni preimopostate Selezionare una stazione da riprodurre con il selettore 03 ...

Страница 76: ...UPnP e creare playlist 2 Information Centre Per visualizzare le informazioni meteo finanziarie o di sistema 3 AUX mode Selezionare la modalità AUX nella schermata iniziale per iniziare a riprodurre l audio sul dispositivo tramite il cavo AUX 4 Line Out Collegare un amplificatore esterno o uno stereo alla radio tramite la porta Line Out 05 ...

Страница 77: ...o Alarm sulla radio Per creare le impostazioni usare la rotella di navigazione per regolare le unità o spostarsi tra i valori e usare i tasti o per passare al numero precedente successivo per modificarla Una volta completata l impostazione confermare premendo il pulsante di navigazione Scaricare l applicazione Air Music Control App tramite l app store del proprio dispositivo per controllare la rad...

Страница 78: ...www majority co uk ...

Отзывы: