


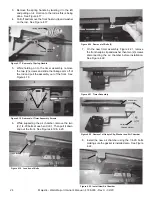


3. Remove the spring handle by twisting it to the left
and pulling on it. Hold on to the rod as this is being
done. See Figure 4.17.
4. Pull off and remove the front hairpin clip and washer
on the rod. See Figure 4.17.
Spring Handle
Hairpin
Clip and Washer
Figure 4.17 Removal of Spring Handle
5.
While holding on to the timer assembly, remove
the two (2) screws and slide the linkage arm off of
the rod and pull the assembly out of the front. See
Figure 4.18.
Remove 2 screws
Figure 4.18 Removal of Timer Assembly Screws
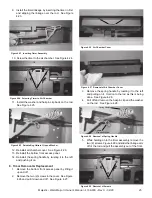
6.
While supporting the air chamber, remove the two
(2) 1/4-20 bolts at each end of it. Then pull it down
and out the front. See Figures 4.19 & 4.20.
1/4-20 Bolts
Figure 4.19 Location of Bolts
Figure 4.20 Removal of Bolts (2)
7.
On the new timer assembly, Figure 4.21, remove
the front hairpin clip and washer then two (2) screws
disconnecting the air chamber before installation.
See Figure 4.22.
Figure 4.22 Removal of Hairpin Clip, Washer and Air Chamber
Figure 4.21 Timer Assembly
8.
Install the new air chamber using the 1/4-20 bolts
making sure the gasket is installed also. See Figure
4.22.
Gasket
Figure 4.22 Install New Air Chamber
Hairpin
Clip and Washer
Air Chamber
24
Majestic • WarmMajic-II Owner’s Manual • 4188-900 • Rev C • 02/20


