4
Hardware installation
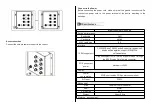
It supports 8x10/100M full/half duplex Ethernet interfaces, 1-8 interface
adopts M12 D-code 4-pin female connector.
Number
Pin definition
Pin description
1
TX+
100M Ethernet sending data positive
2
RX+
100M Ethernet receiving data positive
3
TX-
100M Ethernet sending data negative
4
RX-
00M Ethernet receiving data negative
The indicator description of the switch is shown in the following table.
Indicator lights
Status
Definition
System status LED
P1/P2
On
Power is connected and operating normally
Off
The power is unconnected or the system is
abnormal
RUN
Blinking
Device is working normal
On/Off
Device is working abnormal
Fiber Status LED
L/A
On
The port has established a valid network
connection
Blinking
The port has network activity
Off
The port has not established a valid network
connection
Ethernet RJ45 Status LED
Each Ethernet RJ45 port has two indicator lights, the yellow light is the POE
port rate indicator, and the green is the port
PoE
On
PoE port is powered normally
(Yellow)
Off
PoE port is powered abnormally
LINK/ACT
(Green)
On
The port has established a valid network
connection
Blinking
The port has network activity
Off
The port has not established a valid network
connection
Installation Precautions
To prevent equipment damage or personal injury caused by improper use, observe
the following precautions:
During the installation process, you need to wear anti-static gloves or anti-static
gloves, and power-off the switch.
Please make sure that the input voltage is within the input voltage range marked
on the switch.
The transmission distance has a certain relationship with the connected wire. It
is recommended to use a standard Cat5e/6 network cable.
The equipment must be grounded for lightning protection, otherwise the
protection level of the equipment will be greatly reduced; please use a wire of No.
20 or more to connect the grounding terminal to the ground.
The power line, ground line and signal line are laid out separately and the
distance is not less than 5cm.
Device installation
Determine the mounting hole position according to the provided size or product.


