background image

 6

1

2

3

4

5

180º

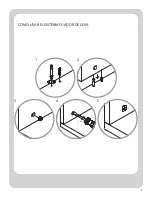
COMO USAR EL SISTEMA FIJADOR DE LEVA

Содержание STACK MS16-D4-1007-02

Страница 1: ...Service 1 877 436 7290 customersupport tenspringstreet com THIS INSTRUCTION BOOKLET CONTAINS IMPORTANT SAFETY INFORMATION PLEASE READ AND KEEP FOR FUTURE REFERENCE Manufactured By BDDMI 1321 Tyler St...

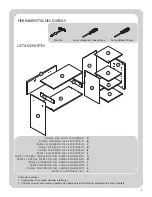
Страница 2: ...AGE RIGHT SIDE PANEL STOR AGE TOP PANEL STOR AGE BOT TOM PANEL STOR AGE BACK PANEL ADJUSTABLE SHELF X2 A B C D E F G H I J K L Before you begin 1 Check for damaged or missing parts 2 Use the carton a...

Страница 3: ...ST CAUTION 1 Make sure the screws go through the pre drilled holes properly 2 Do not over tighten bolts 5 Brown Cam Cover x2 3 Cam x18 4 Black Cam Cover x8 1 Wooden D owel x25 2 Cam B olt x18 6 White...

Страница 4: ...RE LIST CAUTION 1 Make sure the screws go through the pre drilled holes properly 2 Do not over tighten bolts 11 Shelf Pin x8 9 Binding B olt x2 10 Flat Head S crew x4 7 Allen Wrench x2 8 B olt x4 12 W...

Страница 5: ...5 HARDWARE LIST CAUTION 1 Make sure the screws go through the pre drilled holes properly 2 Do not over tighten bolts 15 Truss Head S crew x1 16 Wall S crew x1 13 Wall Anchor x1 14 Wall Strap x1...

Страница 6: ...6 1 2 3 4 5 180 HOW TO USE THE CAM LOCK SYSTEM...

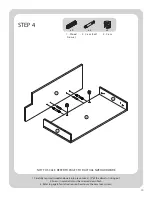
Страница 7: ...lace Leave 1 2 of the dowels sticking out 2 Screw In cam bolts must be screwed down flush 3 Refer to page 6 for instructions on how to use the cam lock system 1 Wood D owel 2 Cam B olt 3 Cam 4 Black C...

Страница 8: ...lace Leave 1 2 of the dowels sticking out 2 Screw In cam bolts must be screwed down flush 3 Refer to page 6 for instructions on how to use the cam lock system NOT TO SCALE REFER TO PAGE 3 FOR ACTUAL S...

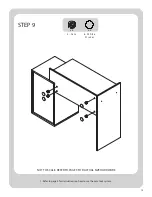
Страница 9: ...lace Leave 1 2 of the dowels sticking out 2 Screw In cam bolts must be screwed down flush 3 Refer to page 6 for instructions on how to use the cam lock system NOT TO SCALE REFER TO PAGE 3 FOR ACTUAL S...

Страница 10: ...s into place Leave 1 2 of the dowels sticking out 2 Screw In cam bolts must be screwed down flush 3 Refer to page 6 for instructions on how to use the cam lock system NOT TO SCALE REFER TO PAGE 3 FOR...

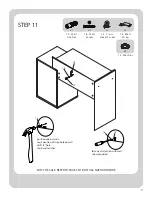
Страница 11: ...els into place Leave 1 2 of the dowels sticking out 2 Make sure the screws go through the pre drilled holes properly 3 Do not over tighten screws STEP 5 1 Wood D owe l 10 Flat Head S crew NOT TO SCALE...

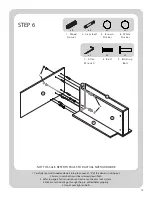
Страница 12: ...must be screwed down flush 3 Refer to page 4 for instructions on how to use the cam lock system 4 Make sure the bolts go through the pre drilled holes properly 5 Do not over tighten bolts NOT TO SCAL...

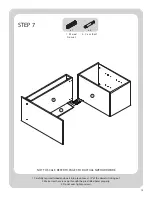
Страница 13: ...dowels into place Leave 1 2 of the dowels sticking out 2 Make sure the screws go through the pre drilled holes properly 3 Do not over tighten screws STEP 7 NOT TO SCALE REFER TO PAGE 3 FOR ACTUAL SIZ...

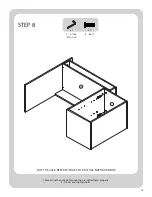
Страница 14: ...14 x1 x2 STEP 8 1 Make sure the bolts go through the pre drilled holes properly 2 Do not over tighten bolts NOT TO SCALE REFER TO PAGE 3 FOR ACTUAL SIZE HARDWARE 7 Allen Wrench 8 B olt...

Страница 15: ...15 x4 x4 STEP 9 1 Refer to page 4 for instructions on how to use the cam lock system NOT TO SCALE REFER TO PAGE 3 FOR ACTUAL SIZE HARDWARE 3 Cam 6 White Sticker...

Страница 16: ...elf supports into desired holes Different holes accommodate different shelf heights 2 Angle shelves to fit between the rails and set on top of shelf supports NOT TO SCALE REFER TO PAGE 3 FOR ACTUAL SI...

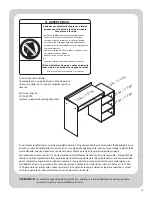
Страница 17: ...d S crew 16 Wall S crew 14 Wall Strap 12 Washer 13 Wall Anchor position against wall mark position of strap hole on wall drill 1 4 hole tap in wall anchor fasten anti tip strap with wall screw provide...

Страница 18: ...e of charge within the stated warranty period when returned by the original purchaser with proof of purchase This product is not guaranteed against wear or breakage due to misuse and or abuse Please c...

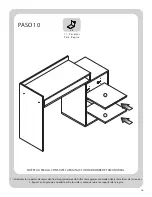
Страница 19: ...877 436 7290 customersupport tenspringstreet com ESTE MANUAL DE INSTRUCCIONES CONTIENE INFORMACI N IMPORTANTE DE SEGURIDAD POR FAVOR LEA Y GUARDE PARA REFERENCIA FUTURA Fabricado Por BDDMI 1321 Tyler...

Страница 20: ...EL ESCRITORIO PANEL DERECHO DEL ESCRITORIO PANEL SUPERIOR DEL ESCRITORIO PANEL POSTERIOR DEL ESCRITORIO PANEL LATER AL IZQUIERDO DEL ALMACENAMIENTO PANEL LATER AL DERECHO DEL ALMACENAMIENTO PANEL SUPE...

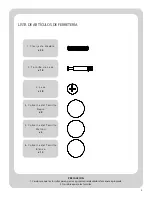
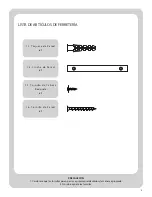
Страница 21: ...ornillos pasen por los agujeros pretaladrados de manera apropiada 2 No sobreapriete los tornillos 5 Cubier ta del Tor nillo M ar r n x2 3 Leva x18 4 Cubier ta del Tor nillo Negro x8 1 C lavija de M ad...

Страница 22: ...Cerci rese que los tornillos pasen por los agujeros pretaladrados de manera apropiada 2 No sobreapriete los tornillos 11 Pasador Para R episa x8 9 Tor nillo de Sujeci n x2 10 Tor nillo de Cabeza Plana...

Страница 23: ...PRECAUCI N 1 Cerci rese que los tornillos pasen por los agujeros pretaladrados de manera apropiada 2 No sobreapriete los tornillos 15 Tor nillo de Cabeza R edonda x1 16 Tor nillo de Pared x1 13 Taquet...

Страница 24: ...6 1 2 3 4 5 180 COMO USAR EL SISTEMA FIJADOR DE LEVA...

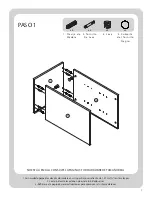
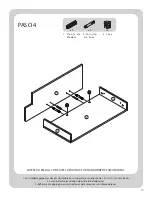
Страница 25: ...m en las clavijas 2 Los tornillos de leva deben de estar atornillados al ras 3 Refi rase a la p gina 6 para instrucciones para como usar el sistema de levas NO EST A ESCALA CONSULTE LA P GINA 3 FOR HA...

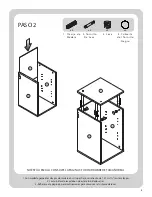
Страница 26: ...m en las clavijas 2 Los tornillos de leva deben de estar atornillados al ras 3 Refi rase a la p gina 6 para instrucciones para como usar el sistema de levas NO EST A ESCALA CONSULTE LA P GINA 3 FOR HA...

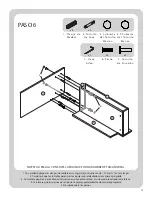
Страница 27: ...m en las clavijas 2 Los tornillos de leva deben de estar atornillados al ras 3 Refi rase a la p gina 6 para instrucciones para como usar el sistema de levas NO EST A ESCALA CONSULTE LA P GINA 3 FOR HA...

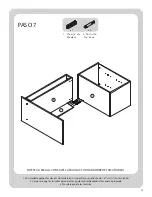
Страница 28: ...iente de 1 27 cm en las clavijas 2 Los tornillos de leva deben de estar atornillados al ras 3 Refi rase a la p gina 6 para instrucciones para como usar el sistema de levas NO EST A ESCALA CONSULTE LA...

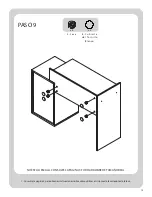
Страница 29: ...e un saliente de 1 27 cm en las clavijas 2 Cerci rese que los tornillos pasen por los agujeros pretaladrados de manera apropiada 3 No sobreapriete los tornillos NO EST A ESCALA CONSULTE LA P GINA 3 FO...

Страница 30: ...la p gina 4 para obtener instrucciones sobre c mo utilizar el sistema de la cerradura de la leva 4 Cerci rese que los pernos pasen por los agujeros pretaladrados de manera apropiada 5 No sobreapriete...

Страница 31: ...Deje un saliente de 1 27 cm en las clavijas 2 Cerci rese que los tornillos pasen por los agujeros pretaladrados de manera apropiada 3 No sobreapriete los tornillos NO EST A ESCALA CONSULTE LA P GINA...

Страница 32: ...PASO 8 1 Cerci rese que los pernos pasen por los agujeros pretaladrados de manera apropiada 2 No sobreapriete los pernos NO EST A ESCALA CONSULTE LA P GINA 3 FOR HARDWARE DE TAMA O REAL 7 Llave Allen...

Страница 33: ...9 1 Consulte la p gina 4 para obtener instrucciones sobre c mo utilizar el sistema de la cerradura de la leva NO EST A ESCALA CONSULTE LA P GINA 3 FOR HARDWARE DE TAMA O REAL 3 Leva 6 Cubier ta del To...

Страница 34: ...agujero deseado Diferentes agujeros acomodan direrentes alturas de las repisas 2 Repisas en ngulo para quedarle entre los rieles y coloque sobre los soportes de la repisa 11 Pasador Para R episa NO E...

Страница 35: ...ha en la pared taladre un agujero de 6 35 mm 1 4 golpee el taquete de pared apriete la cincha anti caidas con los tornillos proporcionados NO EST A ESCALA CONSULTE LA P GINA 3 FOR HARDWARE DE TAMA O R...

Страница 36: ...nuestro Servicio al Cliente al 1 877 436 7290 para obtener informaci n sobre la garant a Esta garant a le otorga derechos legales espec ficos y usted tambi n puede tener otros derechos que var an de...

Отзывы: