


►
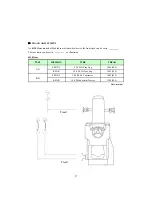
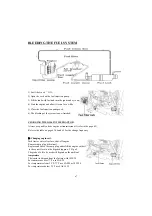
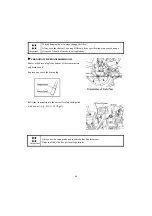
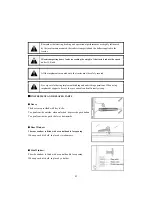
FUEL FILTER
The fuel filter/water separator (if equipped) is
not usually supplied by Perkins.
The following test describes a typical fuel
filter/water separator.
Refer to the OEM information for further
Information on the fuel filter/water separator.
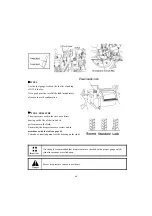
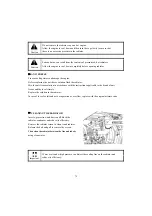
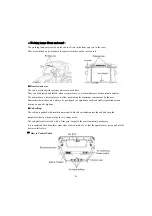
Turn the fuel supply valve (if equipped) to the
OFF position before performing this maintenance.
Place a tray under the fuel filter in order to catch
any fuel that might spill. Clean up any spilled fuel
immediately.
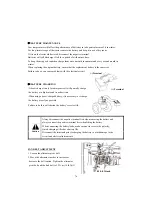
1. Close the fuel supply valve (if equipped).
pp y
(
q pp )
2. Clean the outside of the fuel filter assembly.
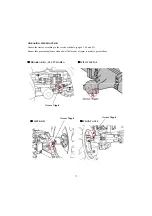
Note
: If the fuel filter element is not equipped with a drain, remove cap. Remove the nylon insert in
order to reduce the lever of fuel in the fuel filter element. A reduction in the level of fuel in
the fuel filter element will help prevent fuel from being spilled when the element is removed.
Notice
: Do not use a tool in order to remove the fuel filter. Attempting to remove the fuel filter with a
filter wrench or a filter strap could damage the locking ring.
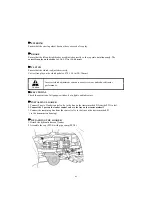
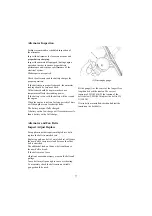
3 Hold fuel filter and rotate quick release collar counterclockwise Remove and discard
3. Hold fuel filter and rotate quick release collar counterclockwise. Remove and discard.
Note
: If the element is equipped with a sediment bowl, remove the sediment bowl from the element.
Thoroughly clean the sediment bowl. Inspect the O-ring seals. Install new O-ring seals, if
necessary. Install the sediment bowl to the new element. Hand tighten the sediment bowl.
Hand tightening is the only method that should be used.
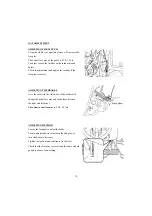
Notice
: Do not fill fuel filters with fuel before installing them. Contaminated fuel will cause
accelerated wear to fuel system parts.
4. Ensure that the fuel filter base is clean. Push a new fuel filter fully into the fuel filler base.
70
y
5. Hold the fuel filter in place. Fit locking ring into position. Rotate the locking ring clockwise in
order to fasten the fuel filter to the fuel filter base.
6. Open the fuel supply valve (If equipped).
Содержание 10 Series
Страница 1: ...Mahindra USA Inc 5203 Aeropark Drive Houston TX 77032 281 449 7771 www mahindrausa com...
Страница 2: ......
Страница 3: ......
Страница 4: ......
Страница 53: ...OPERATING THE 3 POINT LINKAGE TPL 49...
Страница 108: ...6110 5010 Gear Cab TYPE WIRING DIAGRAM A3 104...
Страница 109: ...6110 5010 Gear Cab ELECTRIC SYSTEM DIAGRAM 105...
Страница 110: ...6110 5010 Gear Cab WIRING DIAGRAM 1 106...
Страница 111: ...6110 5010 Gear CABIN WIRING DIAGRAM 2 107...
Страница 112: ...6110 5010 Gear CABIN WIRING DIAGRAM 3 108...
Страница 114: ...6110 Gear POWER TRAIN 110...
Страница 115: ...DATE JOB CARD NO NATURE OF DEFECT PARTS REPLACEMENT W CLAIM NO AND DATE REMARK S TRACTOR HISTORY CARD 111...
Страница 116: ...DATE TRACTOR HOURS NATURE TYPE OF REPAIR SERVICE CARRIED OUT SERVICE RECORD 112...
Страница 117: ...DATE JOB DONE MACHINE HOURS FUEL CONSUMPTION ENGINE OIL TOPPED UP REMARK S START END DAILY OPERATION LOG 113...
Страница 118: ...PART REPLACEMENT RECORD DATE PART DESCRIPTIO N Q TY COST DATE PART DESCRIPTION Q TY COST 114...
Страница 119: ......
Страница 120: ...6110 Gear Cab Operator s Manual For Tractors Code No 1261 940 001 0 Printed in June 2012 1st Edition...


