BATTERY REQUIREMENT FOR FLYING SANTA:
• Battery: 1x 3.7V LiPo Rechargeable Battery Pack (included)
• Capacity: 550 mAh
CHARGING FLYING SANTA BATTERY
BEFORE YOU START
PAIRING THE CONTROLLER TO THE DRONE
A connection must be made between the Flying Santa and the remote
control to function. Follow these steps to pair the Flying Santa with the
remote control.
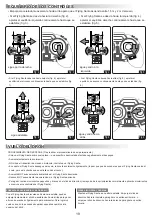
1. Switch on the Flying Santa and place it on flat ground. The red LED
lights on the Flying Santa will flash.
2. Turn the power switch button to ‘ON’ position. The LED on the remote
control transmitter will then also flash.
3. Push the throttle sticks to the top position and then pull down to the
bottom position (fig. 1). The power indicator on the remote control will
light up. The pairing procedure is now complete.
BATTERY REQUIREMENT FOR REMOTE CONTROL
• Batteries: 3 x 1.5V "AAA"/LR03/AM4 (not included)
• Rating: DC 4.5V, 0.5W
INSERTING/REPLACING REMOTE CONTROL BATTERIES
*Make sure the power switch is on “OFF” position.
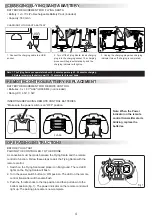
CHARGING FLYING SANTA BATTERY
REMOTE CONTROL BATTERY REPLACEMENT
OPERATING INSTRUCTIONS
3 x AAA
1. Connect the charging cable to a USB
socket.
2. Turn off the Flying Santa. Insert charging
plug into the charging socket. The charging
process will begin automatically, and the
charging indicator will light up.
3. Unplug the charging plug when charging
indicator turns off, charging is completed.
Note: 1. The Flying Santa can operate for about 4 - 5 minutes per every 40 - 50 minutes charging.
2. Before recharging the battery, wait 10 - 15 minutes for it to cool down.
Note: When the Power
indicator on the remote
control transmitter starts
blinking, replace the
batteries.
Fig 1
1
2
4


