24
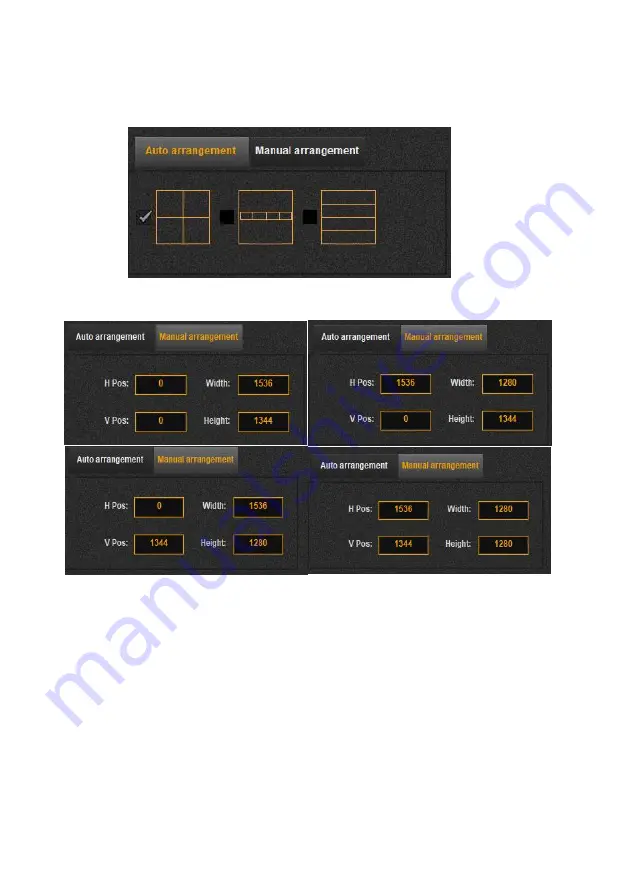
Then select auto arrangement configuration to auto mosaic
Or select manual, to set each output mosaic parameters manually.
Страница 1: ...4K Video Mosaic Box User ManualV1 1 Before using this video mosaic box please read this manual carefully and preserved for reference in the future MIG F4...
Страница 2: ...onic mechanical photocopying record or other way for any business and profitable purpose The product specifications and information mentioned in this manual is just for reference will not give prior n...
Страница 3: ...ion 5 Controlling Software operation introduction 7 Install and unload 7 Running Environment 7 Installing processing 8 Unload the software 9 Open the software 11 Connection indication window 12 Main p...
Страница 4: ...t Software Do not change decompile disassemble decrypt or reverse engineer the software installed in the product these acts are illegal Features 4 Screens Splicing in 1 box 2 DP inputs 2 HDMI inputs S...
Страница 5: ...head Before you operate any hardware please turn off the video mosaic box s power and to set you on the electrostatic by touching the ground surfaces Please use the processor in clean dry and ventilat...
Страница 6: ...4 screens mosaic smart control and auto backup it supports multiple DP and HDMI input ports single input supports maximum 4K 2K 60Hz DP supports 8K 1k 60Hz input resolution and downward compatible wit...
Страница 7: ...Output Indication Port Quantity Resolution each DVI output DVI or HDMI 4 1024 768 1366 768 1440 900 1280 1024 1680 1050 1600 1200 2560 816 1440 1440 50Hz and 60Hz optional Customized output resolutio...
Страница 8: ...working conditions indicator light Green light flashes when system is working 3 WIFI indicator light Green light when WIFI working conditions OK 4 Output synchronization status indicator light Synchro...
Страница 9: ...6 MIG F4 left side The outputs of MIG F4 can be 4 DVI or 4 HDMI two types of outputs are optional...
Страница 10: ...of the controller is achieved by the software Running Environment CPU frequency 1 6GHz RAM 1G Video memory 512M Windows XP Windows 7 32 Bit or 64 Bite Windows 8 32 Bit or 64 Bite Minimum Display Reso...
Страница 11: ...8 Installing processing...
Страница 12: ...ue Select program installation location and setup the program user Confirm all the setting and click Next to go on Installing process starting Ask for uses permission please select Yes When they finis...
Страница 13: ...10 Double click the installer start the uninstalling with the software click Next to go on Finish and click Close...
Страница 14: ...11 Open the software After opened the software you will see software interface as the above 1 connection prompt window 2 input status display area 3 function area...
Страница 15: ...ding connection serial port selected click connect to proceed connection click disconnect to proceed disconnection Select the corresponding connection serial port normally COM3 refresh rate selection...
Страница 16: ...ing menu in the MISC after connection confirmed 2 check device firmware version 3 the Upgrade menu can upgrade FPGA MCU HDMIRX of the device 4 factory reset 5 Get data from machine which is to get bac...
Страница 17: ...utput refresh rare should be the same the output will be synchronous and at the same time indicating current input and output refresh rate 2 Frame conversion mode In this mode the output can be synchr...
Страница 18: ...ter select the current preset Image crop can crop the edge of signal source enter this menu and switch on the function set the height width and H pos V pos value to crop the selected input signal ther...
Страница 19: ...e input width height and refresh rate in current interface or can go to the Advance to precede more specific value setting and also can reset the parameters All the four input ports of F4 to be reset...
Страница 20: ...set not only brightness contrast gamma and color temperature of each output separately but also the color temperature configuration of all the outputs at the same time and also can customize RGB valu...
Страница 21: ...F4 maximum 4 layers can set each layer switch and layer width and height or H and V position and can also drag to modify in the layer display area 2 Zoom setting area to zoom individual layer can dra...
Страница 22: ...be set within the second box area 2 The third box area is to set four output mosaic setting area after the second item output window setting finished directly select auto arrangement to do mosaic aut...
Страница 23: ...mode all the outputs resolution and window are default 1920 1080 for all the 4 types of quick mosaic and can be set cross horizontal and vertical select any one of the 4 modes to achieve quick mosaic...
Страница 24: ...ed port such as COM3 in the dialog of serial communication configuration then click connect button computer control software will then begin communication 2 Check connection status On top right of the...
Страница 25: ...2 Specific application Quick set menu can be used to achieve the whole set up if F4 uploading resolution is 1920 1080 as below If the screens to be set are not standard resolution as the example below...
Страница 26: ...n 4 each screen resolution for the sending card setting is as the above Setting procedure is as follows 1 Set each output window parameters according to the actual pixel of the corresponding each outp...
Страница 27: ...24 Then select auto arrangement configuration to auto mosaic Or select manual to set each output mosaic parameters manually...
Страница 28: ...ur layer switch quick button to open relevant layer then use mouse to drag the layer edge to modify the size and position Also can input accurate figure in the layer setting menu modify the size and p...
Страница 29: ...to restore to the normal state after actions have been taken Select a preset and click save button there will be a dialog box popped up click YES button to confirm then the preset number keys will be...
Страница 30: ...uced besmirch or surface scratches and other abnormal using causes of malfunction or damage Demolition machine or modification which is not to be agreed by our company Using in the not specified used...