background image

9

10

NOTE:


" 0.0h "

When setting the TIMER ON or 

TIMER OFF functions, up to 10 hours, 

the time will increase in 30 minute 

increments with each press. After 10 

hours and up to 24, it will increase in 1 

hour increments. The timer will revert to 

zero after 24 hours. 

You can turn off either function by 

setting its timer to 

  .   

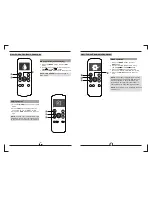
2. Press the 

TIMER OFF 

button repeatedly


    to set the time when you want the unit to


    turn off.

3. Wait 2 seconds, then the TIMER OFF

    function will be activated. The digital

   display on your remote control will then

   return to the temperature display. 

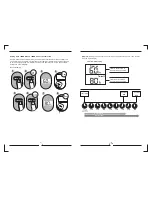
Example:

 Setting unit to turn on after 2.5 

hours.

Example:

 Setting unit to turn off after 5

hours.

2sec

ON/OFF

MO

DE

FAN

SHORT

CUT

TIMER 

ON

TIMER O

F

F

TEMP

SLEEP

1sec

x5

1

3

2

4

TIMER OFF function

The 

TIMER OFF

 function allows you to 

set a period of time aft

e

r which the unit 

will automatically turn off.

1. 

This number indicates the 

    amount of time after the current time 

    that you want  the unit to turn off. 

    For example, if you set TIMER OFF for 

    2 hours, 

  will appear on the 

    screen, and the unit will turn off after 

    2 hours.

Press the 

TIMER OFF

 button. By 

    default, the last time period that you 

    set and an "h" (indicating hours)will 

    appear on the display.


 Note:


 "  2.0h " 

2sec

x10

ON/O

FF

MOD

E

FAN

SHOR

T

CUT

TIMER

 ON

TIMER

 OF

F

TEMP

SLEE

P

1sec

1

3

2

4

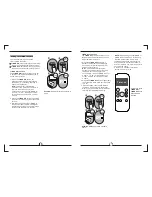
TIMER ON

TIMER ON

TIMER OFF

TIMER OFF

Continue to press 

TIMER ON

 or  

TIMER OFF

 until 

desired time is 

reached.


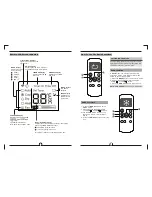
Setting the TIMER function


Your air conditioning unit has two


timer-related functions:


TIMER ON

- sets the


amount of timer after


which the unit


will automatically turn on.


TIMER OFF

- sets the


amount of time after


which the unit


will automatically turn off.


TIMER ON function


The


TIMER ON

 function


allows you to set


a


period of  time after


which the


unit will


automatically turn on.


1.


Press the


TIMER ON

 button. By

    default, the last time period that  you 

    set and an "h" (indicating hours) will 


appear on the display.

 Note:


This


number


indicates the


amount of time  after the current time 

    that you want  the unit to turn on. 


For


example, if you set TIMER ON for


2


hours,  "  2.0h "


will


appear on the


screen, and the


unit will turn on after


2


hours.


2.


Press the


TIMER ON


button


repeatedly


to set the time


when you


want the unit to


turn on.


3. Wait 2 seconds, then the TIMER ON


function


will be activated. The


digital


display on your


remote control will


then


return to the temperature


display.

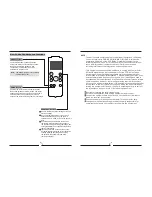
ON/OFF

TEMP

SHORT

   CUT

TIMER

  ON

TIMER

  OFF

MODE

FAN

SLEEP

LED

Timer on

SWING

Содержание RG57H/BG

Страница 1: ... manual carefully before using your air conditioner REMOTE CONTROL MANUAL AIR CONDITIONER For any service needs call 1 855 368 8606 MAGNAVOX and SMART VERY SMART are registered trademarks of Koninklijke Philips N V and are used under license from Koninklijke Philips N V ...

Страница 2: ...H B BGE 23 F 140 F 4 Handling the remote control 2 Remote Control Specifications 3 Function buttons 5 Remote LCD screen indicators 6 How to use the basic functions 13 How to use the advanced functions Remote Control Specifications ON OFF TEMP SHORT CUT TIMER ON TIMER OFF MODE FAN SLEEP SWING LED RG57H B BGE ...

Страница 3: ...ore than 2 months Inserting and Replacing Batteries Your air conditioning unit comes with twoAAA batteries Put the batteries in the remote control before use 1 Slide the back cover from the remote Control downward exposing the battery compartment 2 Insert the batteries paying attention to match up the and ends of the batteries with the symbols inside the battery compartment 3 Slide the battery cov...

Страница 4: ...range 0 24 hours This display is blank when operating in FAN mode Remote LCD Screen Indicators ON OFF ON OFF TEMP TEMP SHORT CUT SHORT CUT TIMER ON TIMER ON TIMER OFF TIMER OFF MODE MODE FAN FAN SLEEP SLEEP LED LED SWING SWING How To Use The Basic Functions SETTING TEMPERATURE The operating temperature range for units is 62 F 86 F You can increase or decrease the set temperature in 1 F increments ...

Страница 5: ...se The Basic Functions ON OFF TEMP SHORT CUT TIMER ON TIMER OFF MODE FAN LED ON OFF TEMP SHORT CUT TIMER ON TIMER OFF MODE FAN SLEEP LED ON OFF TEMP SHORT CUT TIMER ON TIMER OFF MODE FAN SLEEP LED SLEEP SWING SWING SWING How To Use The Basic Functions DRY operation dehumidifying 1 Press the MODE button to select DRY mode 2 Set your desired temperature using the Temp or Temp button 3 Press the ON O...

Страница 6: ...st time period that you set and an h indicating hours will appear on the display Note 2 0h 2sec x10 ON OF F MO DE FA N SH OR T CU T TIM ER ON TIM ER OF F TE MP SLE EP 1sec 1 3 2 4 TIMER ON TIMER ON TIMER OFF TIMER OFF Continue to press TIMER ON or TIMER OFF until desired time is reached Setting the TIMER function Your air conditioning unit has two timer related functions TIMER ON sets the amount o...

Страница 7: ...nit to turn on automatically at 7 00 PM You want it to operate for 2 hours then automa tically turn off 9 00 PM Do the following ON OFF ON OFF MO DE MO DE SH OR T SH OR T CU T CU T TIME R ON TIME R ON TE MP TE MP sec sec 4 8 3 7 X12 X16 2 6 1 5 TIMER ON TIMER ON TIMER OFF TIMER OFF at Example Setting the unit to turn on after 6 hours operate for 2 hours then turn off see the figure below Your remo...

Страница 8: ...ada it should comply with CAN ICES 3 B NMB 3 B In USA this device complies with part 15 of the FCC Rules Operation is subject to the following two conditions 1 This device may not cause harmful interfe rence and 2 this device must accept any interference received including interference that may cause undesired operation This equipment has been tested and found to comply with the limits for a Class...

Страница 9: ......

Отзывы: