background image

1-15-2

D7N4HTI

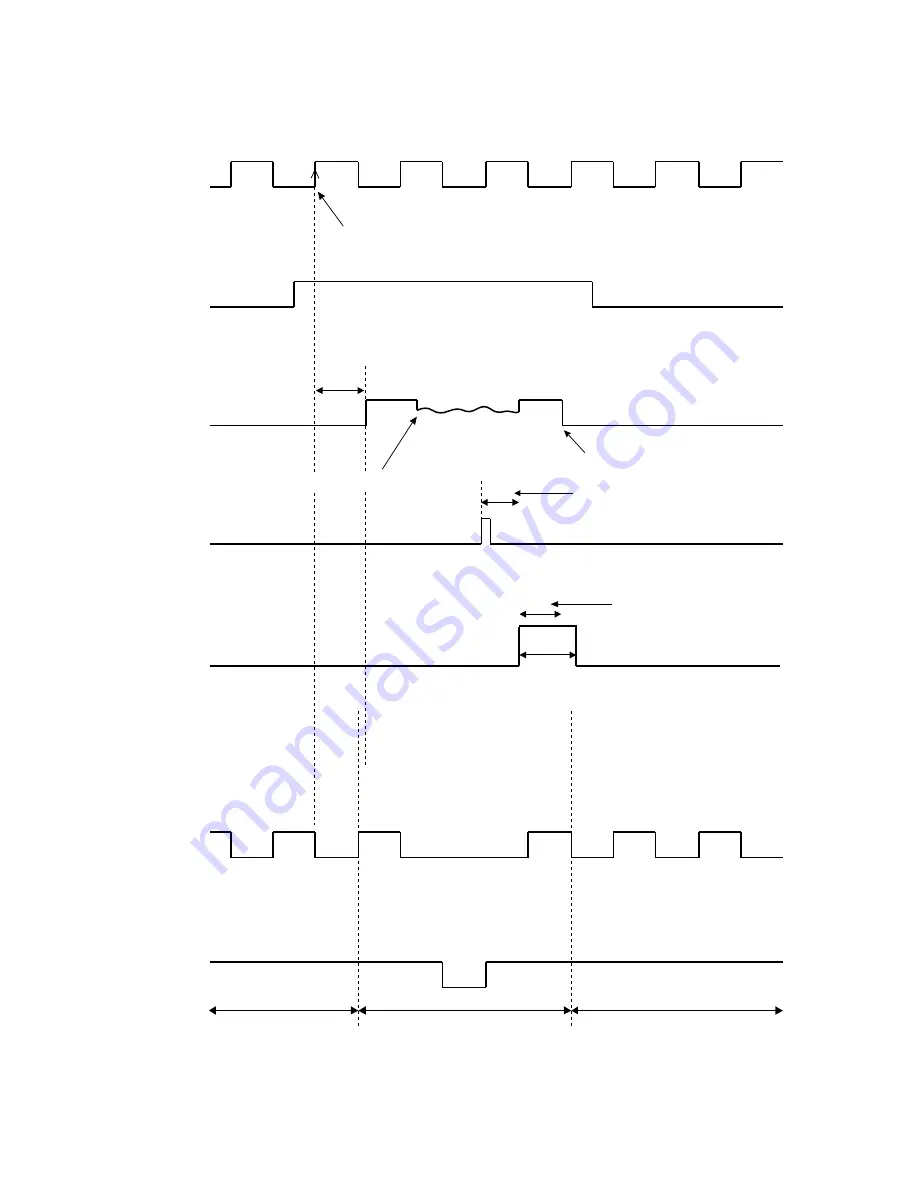
Still/Slow Control Frame Advance Timing Chart

1) SP Mode

Fig. 1

18   RF-SW

F-AD
(Internal Signal)

 C-DRIVE

PB CTL

27  C-F/R

79   H-A-SW

78   C-ROTA

The first rise of RF-SW after a rise in F-AD signal

Acceleration Detection (T1)

AT

"H"

"Z"

"H"

"L"

"L"

Stop detection (T2)

ST

Slow Tracking Value

BL

Reversal Limit Value

STILL

FRAME ADVANCE

STILL

20ms

Содержание MWD2206 - DVD/VCR

Страница 1: ...s I Exploded Views I Parts List When servicing the deck mechanism refer to MK14 Deck Mechanism Section Deck Mechanism Part No N2440FL DVD PLAYER VIDEO CASSETTE RECORDER MWD2206 STANDBY ON POWER ON VIDEO AUDIO REW F FWD STOP EJECT PLAY RECORD CHANNEL SOURCE VCR OPEN CLOSE DVD PREV STOP DISC IN PLAY PLAY NEXT REC TIMER REC IR ...

Страница 2: ...mproper service methods may damage the equipment It also is important to understand that these CAUTIONS and NOTICES ARE NOT EXHAUSTIVE Funai could not possibly know evaluate and advice the service trade of all conceivable ways in which service might be done or of the possible hazardous consequences of each way Consequently Funai has not undertaken any such broad evaluation Accordingly a servicer w...

Страница 3: ...VCR 1 8 1 Firmware Renewal Mode 1 9 1 Function Indicator Symbols 1 10 1 Block Diagrams 1 11 1 Schematic Diagrams CBA s and Test Points 1 12 1 Waveforms 1 13 1 Wiring Diagram VCR Section 1 14 1 Wiring Diagram DVD Section 1 14 2 System Control Timing Charts 1 15 1 IC Pin Function Descriptions 1 16 1 Lead Identifications 1 17 1 Exploded Views 1 18 1 Mechanical Parts List 1 19 1 Electrical Parts List ...

Страница 4: ...t R P Vp p 0 8 1 0 1 2 1 3 Video S N Y R P dB 40 45 SP Mode W O Burst 1 4 Video Color S N AM R P dB 35 41 SP Mode 1 5 Video Color S N PM R P dB 33 36 SP Mode 1 6 Resolution PB Line 230 245 SP Mode 2 Servo 2 1 Jitter Low µsec 0 07 0 12 SP Mode 2 2 Wow Flutter 0 3 0 5 SP Mode 3 Normal Audio 3 1 Output PB dBV 9 6 3 SP Mode 3 2 Output R P dBV 9 6 1 5 SP Mode 3 3 S N R P dB 36 41 SP Mode 3 4 Distortion...

Страница 5: ...nditions Unit Nominal Limit 1 Video Output 75 Ω load Vpp 1 0 0 1 2 Coaxial Digital Out 75 Ω load mVpp 500 50 3 Audio PCM 3 1 Output Level 1 kHz 0 dB 47k Ω load Vrms 2 0 3 2 S N 47k Ω load dB 100 3 3 Freq Response DVD fs 48 kHz 0 5 dB 47k Ω load Hz 20 22 k CD fs 44 1 kHz 0 5 dB 47k Ω load Hz 20 20 k 3 4 THD N DVD 1 kHz 0 dB 47k Ω load 0 01 CD 1 kHz 0 dB 47k Ω load 0 01 ...

Страница 6: ...hen the diode is turned on Do not look directly at the laser beam CAUTION Use of controls and adjustments or doing procedures other than those specified herein may result in hazardous radiation exposure Location Top of DVD mechanism Do not look directly at the laser beam coming from the pickup or allow it to strike against your skin Drive Mechanism Assembly Laser Beam Radiation Laser Pickup Turnta...

Страница 7: ... especially 1 Wires covered with PVC tubing 2 Double insulated wires 3 High voltage leads D Use specified insulating materials for hazardous live parts Note especially 1 Insulation tape 2 PVC tubing 3 Spacers 4 Insulators for transistors E When replacing AC primary side components transformers power cord etc wrap ends of wires securely about the terminals before soldering F Observe that the wires ...

Страница 8: ...ug prongs and externally exposed accessible parts RF terminals antenna terminals video and audio input and output terminals microphone jacks earphone jacks etc is lower than or equal to the specified value in the table below Measuring Method Power ON Insert load Z between B earth ground power cord plug prongs and exposed accessible parts Use an AC voltmeter to measure across the terminals of load ...

Страница 9: ...machine then apply hot air to the Flat Pack IC about 5 to 6 seconds Fig S 1 1 2 Remove the flat pack IC with tweezers while applying the hot air 3 Bottom of the flat pack IC is fixed with glue to the CBA when removing entire flat pack IC first apply soldering iron to center of the flat pack IC and heat up Then remove glue will be melted Fig S 1 6 4 Release the flat pack IC from the CBA using tweez...

Страница 10: ... by one using a sharp pin or wire to which solder will not adhere iron wire When heating the pins use a fine tip soldering iron or a hot air desoldering machine Fig S 1 4 3 Bottom of the flat pack IC is fixed with glue to the CBA when removing entire flat pack IC first apply soldering iron to center of the flat pack IC and heat up Then remove glue will be melted Fig S 1 6 4 Release the flat pack I...

Страница 11: ...rs Fig S 1 6 Note When using a soldering iron care must be taken to ensure that the flat pack IC is not being held by glue When the flat pack IC is removed from the CBA handle it gently because it may be damaged if force is applied 2 Installation 1 Using desoldering braid remove the solder from the foil of each pin of the flat pack IC on the CBA so you can install a replacement flat pack IC more e...

Страница 12: ...ed to remove any static electricity that may be charged on the body 2 Ground for Workbench Be sure to place a conductive sheet or copper plate with proper grounding 1 MΩ on the workbench or other surface where the semi conductors are to be placed Because the static electricity charge on clothing will not escape through the body grounding band be careful to avoid contacting semi conductors with you...

Страница 13: ...pe into the Deck Mechanism Assembly and press the PLAY button The tape will be loaded into the Deck Mechanism Assembly Make sure the power is on connect S INH hollow to GND This will stop the function of Tape Start Sensor Tape End Sensor and Reel Sensors If these TPs are connected before plugging in the unit the function of the sensors will stay valid See Fig 1 Note Because the Tape End Sensors ar...

Страница 14: ...king or repair work To avoid damage of pickup follow next procedures 1 Disconnect Connector CN301 Remove two Screws S 6 and lift the DVD Main CBA Unit Fig D4 2 Short the three short lands of FPC cable with solder before removing the FFC cable CN201 from it If you disconnect the FFC cable CN201 the laser diode of pickup will be destroyed Fig D4 3 CAUTION 3 When reassembling confirm the FFC cable CN...

Страница 15: ... hole of Cam Gear with the pin of LD SW the shaft of Cam Gear with the hole of LD SW as shown in Fig D6 S 1 1 Top Case Fig D1 L 1 L 2 L 1 2 Front Assembly Fig D2 S 2 S 2 3 Top Bracket Fig D3 CN401 CN601 S 3 S 3 S 3 S 4 S 5 5 Partition Plate 6 Loader Holder 4 DVD Mechanism Assembly CN201 CN301 S 6 7 DVD Main CBA Unit DVD Mechanism A S 6 Fig D4 View for A Short the three short lands by soldering Eit...

Страница 16: ...1 6 3 E8A61DC Fig D5 S 7 S 7 S 8 8 VCR Chassis Unit S 7 S 8 ...

Страница 17: ...of Deck Assembly and Main CBA Desolder From Capstan Motor Assembly Printing side Desolder From Cylinder Assembly From ACE Head Assembly Lead with blue stripe Lead with blue stripe Desolder Lead with red stripe 12 Main CBA SW512 LD SW LD SW Pin Hole Hole Shaft Cam Gear 12 Main CBA 9 Deck Assembly Pin 12 Main CBA 9 Deck Assembly 11 Power SW CBA Desolder Lead with blue stripe ...

Страница 18: ... Remove four Screws S 3 in Fig D3 Do not disconnect connectors 3 While lifting up the DVD Mechanism rotate the roulette in the direction of the arrow as shown below 4 Pull the tray slowly manually The gear is turned to the direction of the arrow The Back of DVD Mechanism Assembly DVD Mechanism ...

Страница 19: ...0 001 50 V Div F Range DC AC 20 MHz 2 Alignment Tape FL8A Head Switching Position Adjustment Purpose To determine the Head Switching position during playback Symptom of Misadjustment May cause Head Switching noise or vertical jitter in the picture Note TP751 V OUT TP302 RF SW VR501 Switching Point Main CBA Reference Notes Playback the Alignment tape and adjust VR501 so that the V sync front edge o...

Страница 20: ... unit in that order Fig a appears on the screen 2 Press CLEAR C RESET button on the remote control unit Fig b appears on the screen When OK appears on the screen the factory default will be set 3 To exit this mode press STANDBY ON button MODEL Version Region EXIT POWER EEPROM CLEAR CLEAR Fig a differs depending on the models MODEL Version Region EEPROM CLEAR OK EXIT POWER EEPROM CLEAR CLEAR differ...

Страница 21: ...er on by pressing the STANDBY ON button and the tray will close 9 Press 1 2 3 4 and DISPLAY buttons on the remote control unit in that order Fig g appears on the screen 10 Press CLEAR C RESET button on the remote control unit Fig h appears on the screen When OK appears on the screen the factory default will be set Then the firmware renewal mode is complete 11 To exit this mode press STANDBY ON but...

Страница 22: ...orrectly P ON 5V Power safety detection Cause Indicator Active When reel or capstan mechanism is not functioning correctly EJECT A R is displayed on a TV screen Refer to Fig 1 When tape loading mechanism is not functioning correctly EJECT A T is displayed on a TV screen Refer to Fig 2 When cassette loading mechanism is not functioning correctly EJECT A C is displayed on a TV screen Refer to Fig 3 ...

Страница 23: ... CS YCA SCL 14 YCA SDA 15 YCA CS 16 YCA SCL YCA SDA YCA CS SW511 REC SW TO VIDEO BLOCK DIAGRAM TO AUDIO BLOCK DIAGRAM CLOCK DATA TU701 TUNER UNIT 10 11 VCR TV 4 POWER CN508 CN509 D561 POWER SW518 LD SW 68 AL 12V 1 AL 5V AL 5V SW512 AL 12V AL 18V P ON 5V LD SW AL 5V D555 S LED TO POWER SUPPLY BLOCK DIAGRAM 12 13 IIC BUS SCL 10 VCR TV IIC BUS SDA KEY SWITCH KEY SWITCH TP502 P ON 9V S INH 5 CTL 6 CTL...

Страница 24: ... R 2 4 5 6 VIDEO AGC TUNER FRONT REAR R P R P SYNC SEPA FBC Y C MIX CCD 1H DELAY R P YNR COMB FILTER CHROMINANCE SIGNAL PROCESS IC301 VIDEO SIGNAL PROCESS HEAD AMP 26 57 32 30 QV QH 6dB AMP TO SERVO SYSTEM CONTROL BLOCK DIAGRAM TO SERVO SYSTEM CONTROL BLOCK DIAGRAM CYLINDER ASSEMBLY RF SW RF SW 59 V ENV H A SW H A COMP H A COMP TP302 VIDEO L 2 HEAD VIDEO R 2 HEAD TP301 C PB D V SYNC C SYNC D V SYN...

Страница 25: ... CBA PB AUDIO SIGNAL REC AUDIO SIGNAL Mode SP REC 58 55 53 54 D REC H AUDIO MUTE H TO SERVO SYSTEM CONTROL BLOCK DIAGRAM FULL ERASE HEAD YCA CS YCA SCL YCA SDA JK752 AUDIO IN1 JK755 AUDIO IN2 TO DVD VIDEO AUDIO BLOCK DIAGRAM DVD SECTION FRONT REAR IC751 OUTPUT SELECT DVD AUDIO L DVD AUDIO R 3 2 4 5 TP753 Q763 A OUT R BUFFER Q762 BUFFER TP754 A OUT L SW CTL DVD VCR DVD VCR JK751 AUDIO R OUT1 AUDIO ...

Страница 26: ...RAM P ON L P DOWN H Q063 Q064 HOT COLD A V F CAUTION Fixed voltage or Auto voltage selectable power supply circuit is used in this unit If Main Fuse F1001 is blown check to see that all components in the power supply circuit are not defective before you connect the AC plug to the AC power supply Otherwise it may cause some components in the power supply circuit to fail NOTE The voltage for parts i...

Страница 27: ...SW2005 SKIP UP SW2006 SKIP DOWN SW2003 PLAY 78 80 77 79 56 DISCIN L 54 SKIP DOWN 53 SKIP UP 49 REMOTE 55 PLAY DVD MAIN CBA UNIT DRIVE CBA IC301 SERVO DRIVE CN301 M SLED MOTOR M SPINDLE MOTOR IC101 MICRO CONTROLLER SLED MOTOR DRIVE FOCUS ACTUATOR DRIVE SPINDLE MOTOR DRIVE TRACKING ACTUATOR DRIVE 126 TRAY IN SLD 67 SPDL 66 TRACKING DRIVE 127 FOCUS DRIVE 65 TO DIGITAL SIGNAL PROCESS BLOCK DIAGRAM FS ...

Страница 28: ...D MEMORY DATA RAM DSP DECODER I O PROCESSOR INST ROM DATA RAM INST ROM SERIAL D A GENERAL I O INTERRUPT CONTROLLER TIMER WATCH DOG TIMER REMOTE CONTROL 32BIT CPU STREAM I F EXTERNAL MEMORY I F SDRAM ECC UMAC 111 112 62 DEBUG BCU INST RAM DATA RAM D A D A D A TO DVD VIDEO AUDIO BLOCK DIAGRAM 131 139 Y I P C Pr Cr Pb Cb VIDEO Y I P VIDEO C VIDEO Pr Cr VIDEO Pb Cb TO DVD VIDEO AUDIO BLOCK DIAGRAM 152...

Страница 29: ...Pr Cr DVD VIDEO WF9 WF7 WF8 WF4 12 12 DVD AUDIO L 14 14 DVD AUDIO R 13 13 DVD AUDIO MUTE 16 16 SPDIF DVD AUDIO L DVD AUDIO R WF5 VIDEO Pb Cb OUT VIDEO Y OUT VIDEO Pr Cr OUT JK1403 TO DIGITAL SIGNAL PROCESS BLOCK DIAGRAM MAIN CBA DVD MAIN CBA UNIT TO AUDIO BLOCK DIAGRAM VCR SECTION TO VIDEO BLOCK DIAGRAM VCR SECTION REAR DVD AUDIO L DVD AUDIO R DVD AUDIO MUTE TO DIGITAL SIGNAL PROCESS BLOCK DIAGRAM...

Страница 30: ...k in the schematic diagram and the parts list Before replacing any of these components read the parts list in this manual carefully The use of substitute replacement parts that do not have the same safety characteristics as specified in the parts list may create shock fire or other hazards Notes 1 Do not use the part number shown on these drawings for ordering The correct part number is shown in t...

Страница 31: ...y original replacement parts which are listed with their part numbers in the parts list section of the service manual 4 Mode SP REC 5 Voltage indications for PLAY and REC modes on the schematics are as shown below 6 How to read converged lines 7 Test Point Information A V F This symbol means fast operating fuse Ce symbole represente un fusible a fusion rapide 2 3 1 5 0 2 5 PLAY mode STOP mode 5 0 ...

Страница 32: ...1 12 3 Main 1 7 Schematic Diagram VCR Section E8A60SCM1 ...

Страница 33: ...1 12 4 Main 2 7 Sensor Power SW Schematic Diagram VCR Section E8A60SCM2 ...

Страница 34: ...1 12 5 Main 3 7 Schematic Diagram VCR Section E8A60SCM3 ...

Страница 35: ...1 12 6 Main 4 7 Schematic Diagram VCR Section E8A60SCM4 ...

Страница 36: ...1 12 7 Main 5 7 Schematic Diagram VCR Section E8A60SCM5 ...

Страница 37: ...1 12 8 Main 6 7 DVD Open Close Schematic Diagram VCR Section E8A60SCM6 ...

Страница 38: ...C power supply Otherwise it may cause some components in the power supply circuit to fail NOTE The voltage for parts in hot circuit is measured using hot GND as a common terminal Ce symbole reprèsente un fusible à fusion rapide CAUTION For continued protection against fire hazard replace only with the same type fuse ATTENTION Pour une protection continue les risqes d Incele n utiliser que des fusi...

Страница 39: ...1 12 10 E8A60SCD1 DVD Main 1 3 Schematic Diagram DVD Section 1 NOTE Either IC461 or IC462 is used for DVD MAIN CBA UNIT ...

Страница 40: ...1 12 11 E8A60SCD2 DVD Main 2 3 Schematic Diagram DVD Section ...

Страница 41: ...1 12 12 E8A60SCD3 DVD Main 3 3 Schematic Diagram DVD Section ...

Страница 42: ...ly Otherwise it may cause some components in the power supply circuit to fail NOTE The voltage for parts in hot circuit is measured using hot GND as a common terminal Ce symbole reprèsente un fusible à fusion rapide CAUTION For continued protection against fire hazard replace only with the same type fuse ATTENTION Pour une protection continue les risqes d Incele n utiliser que des fusible de même ...

Страница 43: ...ise it may cause some components in the power supply circuit to fail NOTE The voltage for parts in hot circuit is measured using hot GND as a common terminal Ce symbole reprèsente un fusible à fusion rapide CAUTION For continued protection against fire hazard replace only with the same type fuse ATTENTION Pour une protection continue les risqes d Incele n utiliser que des fusible de même type Risk...

Страница 44: ...1 Pin 16 of CN1601 AUDIO R 1V 0 5ms V OUT E E 0 2V 20µs V OUT 0 5V 50µs RF SW 5V C PB RF SW 5V 5ms 0 2V NOTE Input VCR COLOR BAR SIGNAL WITH 1KHz AUDIO SIGNAL WF1 WF3 WF10 WF15 DVD POWER ON STOP MODE WF4 WF6 CD 1kHz PLAY WF7 WF9 WF4 WF6 Pin 2 of IC751 WF5 Pin 8 of CN1601 Pin 10 of CN1601 VIDEO Y 0 2V 20µs VIDEO C 0 2V 20µs VIDEO CVBS 0 5V 20µs 1 13 1 D7NFNWF1 ...

Страница 45: ... of TU701 Pin 5 of TU701 Pin 17 of TU701 NOTE Input VCR COLOR BAR SIGNAL WITH 1KHz AUDIO SIGNAL WF1 WF3 WF10 WF15 DVD POWER ON STOP MODE WF4 WF6 CD 1kHz PLAY WF7 WF9 MOD A 0 5V 0 2ms MOD V 0 5V 20µs PLL CLK 2V 2ms PLL DATA 2V 2ms TU AUDIO 0 5V 0 2ms TU VIDEO 0 2V 20µs D7NFNWF2 1 13 2 ...

Страница 46: ...GND VODEO Pr Cr GND VIDEO Pb Cb VIDEO Y I P GND VIDEO C GND GND 4 5 6 7 8 9 10 11 15 CN1601 DVD AUDIO MUTE DVD AUDIO L DVD AUDIO R SPDIF 12 13 14 16 REMOTE DISCIN L 21 22 DVD POWER 23 DVD PLAY DVD OPEN CLOSE 24 25 DVD STOP 26 CAPSTAN MOTOR FULL ERASE HEAD FE HEAD VIDEO R 1 HEAD VIDEO L 1 HEAD VIDEO IN2 AUDIO IN2 FRONT VIDEO L 2 HEAD VIDEO R 2 HEAD MAIN CBA DECK ASSEMBLY SENSOR CBA POWER SW CBA DVD...

Страница 47: ... GND GND GND GND GND GND PWRCON 14 15 16 17 18 19 20 21 22 23 REMOTE 24 25 DVD POWER 26 DVD PLAY DVD OPEN CLOSE 27 28 DVD STOP 29 CN401 PICK UP UNIT CN201 1 2 3 4 5 6 7 8 9 10 11 12 13 14 15 16 17 18 19 20 TS TS FS CD LD FS GND DVD PD GND CD PD PD MONI DVD LD VREF E GND B DVD P ON 5V CD DVD D A C F GND LD DETECTOR FS TS 7 9 11 2 3 6 5 4 GND VODEO Pr Cr GND VIDEO Pb Cb VIDEO Y I P GND VIDEO C GND 4...

Страница 48: ...00 V 5 00 V CL 0 00 V 0 25 V 0 00 V SB 1 06 V 1 50 V 1 21 V TL 0 66 V 1 05 V 0 91 V FB 1 99 V 2 60 V 2 17 V SF 1 51 V 1 98 V 1 80 V SM 3 20 V 3 75 V 3 40 V AU 0 26 V 0 65 V 0 44 V AL 4 51 V 5 00 V 5 00 V SS 2 61 V 3 19 V 2 97 V RS Note Symbol Loading Status EJ Eject CL Eject REW Reel SB REW Reel Stop B TL Stop B Brake Cancel FB Brake Cancel FF REW SF FF REW Stop M FF REW SM Stop M FF REW Stop A AU...

Страница 49: ...de Fig 1 18 RF SW F AD Internal Signal C DRIVE PB CTL 27 C F R 79 H A SW 78 C ROTA The first rise of RF SW after a rise in F AD signal Acceleration Detection T1 AT H Z H L L Stop detection T2 ST Slow Tracking Value BL Reversal Limit Value STILL FRAME ADVANCE STILL 20ms ...

Страница 50: ...D Internal Signal C DRIVE PB CTL 27 C F R 79 H A SW 78 C ROTA H Z H L L STILL STILL AT ST BL Stop detection T2 Acceleration Detection T1 Slow Tracking Value Reversal Limit Value FRAME ADVANCE The first rise of RF SW after a rise in F AD signal 20ms ...

Страница 51: ...EV LD REV LD REV 0 2S 0 5S PIN NO CL EJ SS SS AU AU TL LD SW CL SS LM FWD M REV C DRIVE Z ON ON C F R DRUM ROTATION P ON L AUDIO MUTE H D REC H D PB PAUSE SLOW AU AL AL AU SF SM EJ AU RS SF SM TL FB AL SB 68 21 27 22 7 24 VCR TV 10 POWER OFF STOP PLAY RS FS STILL SLOW PLAY STOP PLAY DISPLAY 0 1S SB TL SB FB SM SM SF AL AL RS AU AL SS AU AL SM 0 8S 0 2S 0 3S 1 0S 0 2S 1 5S 2H 2 5S 4H 0 5S 0 2S 0 8S...

Страница 52: ... FB SF AU AU FB SF 1 0S 1 2S 0 2S 0 2S 40mS 0 4S 0 2S 0 2S 0 4S 20mS 40mS 0 2S 20mS 0 2S 0 4S 40mS 20mS 0 1S Fig 4 PIN NO LD SW CL SS LM FWD M REV C DRIVE Z ON ON C F R DRUM ROTATION P ON L AUDIO MUTE H D REC H D PB EJ AU RS SF SM TL FB AL SB 68 21 27 22 7 24 VCR TV 10 DISPLAY ST S END S ON REC REW FF STOP EJECT 0 5S 1 0S 0 2S 0 5S 0 2S 0 5S 0 5S 0 5S 0 2S 0 2S 0 2S 1 5S 2 5S Short REV 1 0S 0 2S L...

Страница 53: ... Section Tray IN TL221 Sled Drive TP303 Disc Drive TP301 Focus Drive TP304 Tracking Drive TP302 0V 3 3V 0V 1 65V 0V 0V 0V 1 65V 1 65V 1 65V Tray Close Play Play Tray Open Tray Close Disc Rotation Play Disc Stop Tray Open ...

Страница 54: ... RF SW Video Head Switching Pulse H L 19 OUT D V SYNC Dummy V sync Output H Hi z 20 IN RESET System Reset Signal Reset L L 21 OUT LM FWD REV Loading Motor FWD REV Output H Z L 22 OUT P ON L Power On Signal to Low L 23 NU Not Used 24 OUT D REC H Delayed Record Signal H 25 NU Not Used 26 OUT DVD POWER DVD Power Control Signal H 27 OUT C F R Capstan Motor FWD REV Control Signal FWD L REV H H L 28 OUT...

Страница 55: ...matic Frequency Control Signal A D 64 IN V ENV Video Envelope Comparator Signal A D 65 IN PG DELAY Video Head Switching Pulse Signal Adjusted Voltage A D 66 IN KEY 2 A D Key Data Signal 2 A D 67 IN KEY 1 A D Key Data Signal 1 A D 68 IN LD SW Deck Mode Position Detector Signal A D 69 IN ST S Tape Start Position Detector Signal A D 70 OUT VCR LED L VCR Mode LED Signal Output L Pin No IN OUT Signal N...

Страница 56: ...101D08DYA Note A Anode K Cathode E Emitter C Collector B Base R Reference S Source G Gate D Drain KRA103M AT P KRC103M AT P KTA 1266 GR AT P KTA1267 Y AT P KTC3193 Y AT P KTC3199 Y BL AT P 2SC1815 Y TE2 F T KTC3198 Y AT P KTC3203 Y AT P 2SC2001 T A K PS2561A 1 W PT204 6B 12 KIA4558P P CD4053BNSR RN1511 TE85R F 16 9 8 1 MM1637XVBE G D S 2SK3543 Q 1 Anode 2 Cathode 3 Emitter 4 Collector ...

Страница 57: ...9 L0 9 DVD Main CBA Unit Sensor CBA Sensor CBA A4 A5 AC1001 2B11 2B15 2B15 RM2001 DVD Open Close CBA W002 W011 W012 2L091 2L054 A10 A14 2L012 2L082 B Main CBA Power SW CBA 2B15 2B13 2L021 2L062 A F F B A F1001 W006 2B15 2B16 A1X A8 A9 A18 A3 See Electrical Parts List for parts with this mark Some Ref Numbers are not in sequence 2B15 A23 These FFC cables are included in 1B2 DVD mechanism ...

Страница 58: ...1 18 2 E8A61PEX Packing S2 S2 S2 S2 S1 Unit A14 FRONT S3 X1 X4 X20 X5 X2 X3 ...

Страница 59: ...1B2 DVD MECHA E7 N79F0KVM N79F0KVM 2B2 TOP BRACKET H9600UD 0VM204470 2B3 RODER HOLDER H9600UD 0VM306676 2B16 TAPE HIMELON H9206JD 0VM413956 2B40 PARTITION PLATE E8A00UD 1VM321985 2L011 SCREW P TIGHT M3X8 BIND HEAD GBJP3080 2L012 SCREW S TIGHT M3X6 BIND HEAD GBJS3060 2L021 SCREW P TIGHT M3 12 BIND GBJP3120 2L022 SCREW P TIGHT M3X8 BIND HEAD GBJP3080 2L041 SCREW P TIGHT 3X10 BIND HEAD GBHP3100 2L051...

Страница 60: ...CHD1JKB0B103 C330 ELECTROLYTIC CAP 1µF 50V M H7 CE1JMAVSL1R0 C331 CHIP CERAMIC CAP B K 0 01µF 50V CHD1JKB0B103 C332 ELECTROLYTIC CAP 1µF 50V M H7 CE1JMAVSL1R0 C333 CHIP CERAMIC CAP F Z 0 1µF 50V CHD1JZB0F104 C336 CHIP CERAMIC CAP B K 0 01µF 50V CHD1JKB0B103 C339 CHIP CERAMIC CAP B K 0 047µF 50V CHD1JKB0B473 C340 CHIP CERAMIC CAP B K 0 1µF 25V CHD1EKB0B104 C341 CHIP CERAMIC CAP B K 0 047µF 50V CHD1...

Страница 61: ...JZB0F104 C1247 ELECTROLYTIC CAP 470µF 6 3V M CE0KMASDL471 C1249 ELECTROLYTIC CAP 47µF 16V M H7 CE1CMAVSL470 C1351 CHIP CERAMIC CAP B K 0 1µF 25V CHD1EKB0B104 C1352 ELECTROLYTIC CAP 47µF 6 3V M H7 CE0KMAVSL470 C1354 CHIP CERAMIC CAP CH J 100pF 50V CHD1JJBCH101 C1355 CHIP RES 1608 1 10W 0 Ω RRXAZB5Z0000 Ref No Description Part No C1421 CHIP CERAMIC CAP B K 0 01µF 50V CHD1JKB0B103 C1422 CHIP CERAMIC ...

Страница 62: ...3199P Q2002 TRANSISTOR KTC3199 Y AT P NQSYKTC3199P Q2013 TRANSISTOR KTC3199 Y AT P NQSYKTC3199P Ref No Description Part No RESISTORS R001 GLASS GLAZE RES 1 2W J 3 3M Ω RXX2JZLZ0335 R031 CHIP RES 1 10W J 1k Ω RRXAJB5Z0102 R032 CHIP RES 1 10W J 4 7k Ω RRXAJB5Z0472 R034 CHIP RES 1 10W F 2 2k Ω RRXAFB5H2201 R038 CARBON RES 1 4W J 270 Ω RCX4JATZ0271 R039 CHIP RES 1 10W F 4 7k Ω RRXAFB5H4701 R041 CHIP R...

Страница 63: ...S 1 10W J 330 Ω RRXAJB5Z0331 R702 CARBON RES 1 4W J 1 8k Ω RCX4JATZ0182 Ref No Description Part No R703 CHIP RES 1 10W J 47k Ω RRXAJB5Z0473 R704 CARBON RES 1 4W J 1k Ω RCX4JATZ0102 R705 CARBON RES 1 4W J 1k Ω RCX4JATZ0102 R752 CHIP RES 1 10W J 75 Ω RRXAJB5Z0750 R753 CHIP RES 1 10W J 75 Ω RRXAJB5Z0750 R756 CHIP RES 1 10W J 47k Ω RRXAJB5Z0473 R757 CHIP RES 1 10W J 47k Ω RRXAJB5Z0473 R758 CARBON RES ...

Страница 64: ...0614B SST0101HH013 MISCELLANEOUS 2B11 HEAD SHIELD H9600UD 0VM306770 2B15 BUSH LED F H3700UD 0VM409508 2L062 SCREW B TIGHT M3X8 BIND HEAD GBHB3080 2L082 SCREW S TIGHT M3 5 BIND 3 5 BIND GBHS3050 A4 JACK BOARD TUNER H9600UD 0VM306675 A5 JACK BOARD RCA H9610UD 0VM306766 AC1001 AC CORD W O A GND WIRE UL CSA 1770 BLACK WAC0172LTE17 F1001 FUSE TIME RAG SIC 1A 250V UC PSE PEG20C0W3002 FH1001 FUSE HOLDER ...

Страница 65: ...MWD2206 E8A60UD 2006 04 26 ...

Страница 66: ... illustration at right This service manual shows only the differences between the MWD2206 E8C60UD model and the MWD2206 E8A60UD model All other information is described in the service manual of the MWD2206 E8A60UD model J U L Y 2 0 0 6 Rating Label E8C60UD DVD PLAYER VIDEO CASSETTE RECORDER MWD2206 STANDBY ON POWER ON VIDEO AUDIO REW F FWD STOP EJECT PLAY RECORD CHANNEL SOURCE VCR OPEN CLOSE DVD P...

Страница 67: ...rts from the MWD2206 E8A60UD model Ref No Description Part No MECHANICAL PARTS A10 RATING LABEL U E8C60UD X20 OWNERS MANUAL E8A60UD 1VMN22093A ELECTRICAL PARTS DVD MAIN CBA UNIT N7CFDKUP MWD2206 E8C60UD 2006 07 19 ...

Отзывы: