background image

4

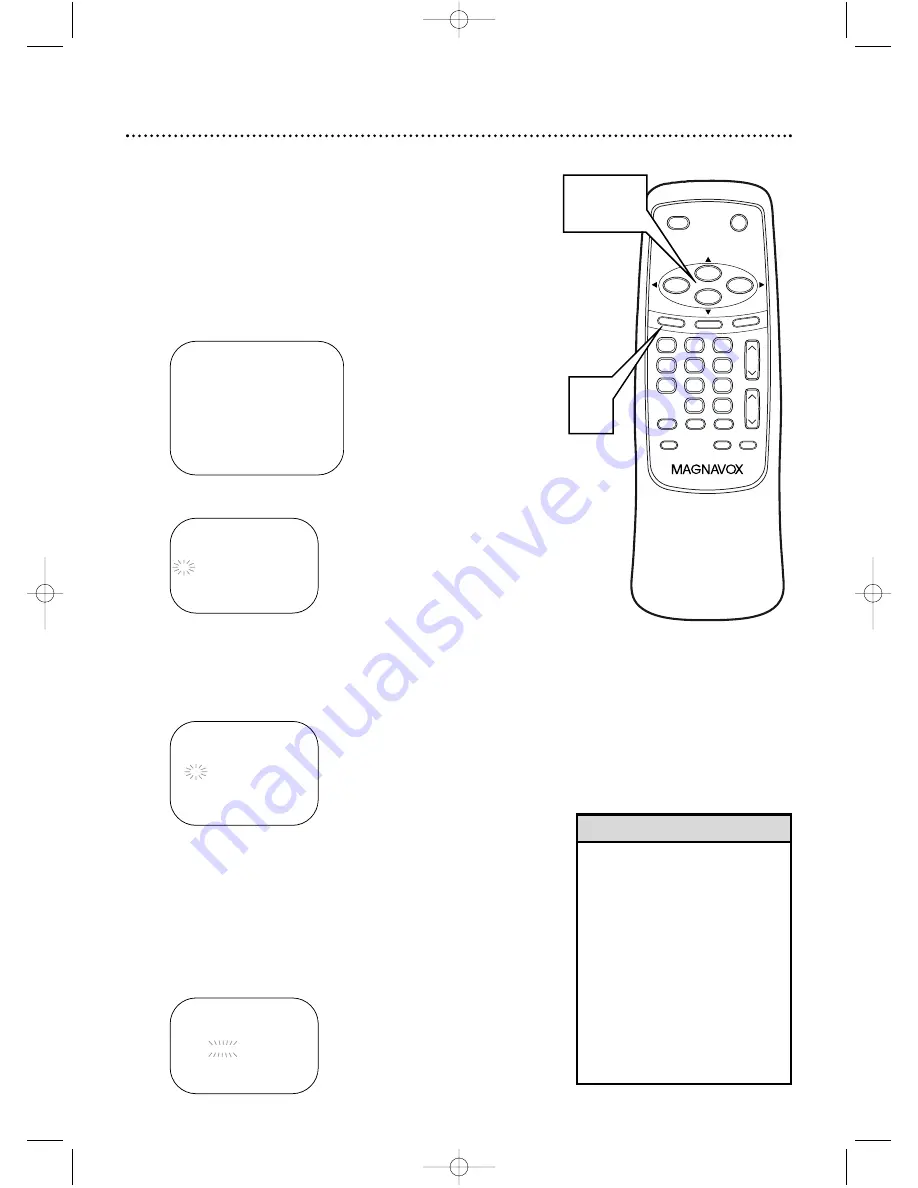
For a one-time recording, press PLAY/

until the

desired date appears.
Or, to record a TV program at the same time on
the same channel every day, press STOP/

until

EVRY DAY appears.
Or, to record a TV program at the same time on
the same channel every week, for example every
Monday, press STOP/

until EVRY and your

desired day of the week appear together.
Finally, press F.FWD/

B

.

– TIMER PROGRAMMING –

CH   DATE       BEGIN   END

- -     -/- -  - - -      -:- -         -:- -   - -

- -     -/- -  - - -      -:- -         -:- -   - -

- -     -/- -  - - -      -:- -         -:- -   - -

B

61   7/05  FRI       -:- -         -:- -   - -

- -     -/- -  - - -      -:- -         -:- -   - -

- -     -/- -  - - -      -:- -         -:- -   - -

- -     -/- -  - - -      -:- -         -:- -   - -

- -     -/- -  - - -      -:- -         -:- -   - -

26  Timer Recording

Follow the steps below to program the TV/VCR to record TV pro-
grams while you’re away from home. The TV/VCR will turn itself
on, record, and turn itself off automatically.

Before you begin, make sure ...

The clock is set. If the clock is not set, MANUAL CLOCK SET
appears. See page 14 to set the clock, then set the recording.

Channels are set. Details are on pages eight and 10.

A tape is in the TV/VCR.

1

Press MENU. Press PLAY/

▲ 

or STOP/

to select

TIMER PROGRAMMING. Press F.FWD/

B

.

2

Press PLAY/

or STOP/

to select a program posi-

tion. Then, press F.FWD/

B

.

3

Press PLAY/

or STOP/

until the desired channel

number appears. (Example: CH61) Then press
F.FWD/

B

If the TV/VCR is connected to a Cable Box or

Satellite Box, the TV/VCR must be on CH3 or CH4. Set CH
as 03 or 04 in the Timer Programming menu. Select the
channel to be recorded on the Cable Box/Satellite Box.

•  If you are using Timer recording,

you may not operate the unit
manually.

•  The erase-prevention tab on the

cassette must be in place (or you
must put tape over the hole).

•  If the erase-prevention tab is

removed, the cassette will eject
when you press POWER to turn
off the TV/VCR.

•  If the tape ends before the

recording is complete, the TV/VCR
will stop recording immediately
and eject the tape.

Helpful Hints

Example:
one-time
recording

– TIMER PROGRAMMING –

CH   DATE       BEGIN   END

- -     -/- -  - - -      -:- -         -:- -   - -

- -     -/- -  - - -      -:- -         -:- -   - -

- -     -/- -  - - -      -:- -         -:- -   - -

B

- -    -/- -  - - -      -:- -         -:- -   - -

- -     -/- -  - - -      -:- -         -:- -   - -

- -     -/- -  - - -      -:- -         -:- -   - -

- -     -/- -  - - -      -:- -         -:- -   - -

- -     -/- -  - - -      -:- -         -:- -   - -

– M E N U –

B

TIMER PROGRAMMING
PICTURE CONTROL
SETTING CLOCK
CHANNEL SET UP
USER’S SET UP
V-CHIP SET UP
LANGUAGE [ENGLISH]
CAPTION [OFF]
ZERO RETURN
TIME SEARCH

– TIMER PROGRAMMING –

CH   DATE       BEGIN   END

- -     -/- -  - - -      -:- -         -:- -   - -

- -     -/- -  - - -      -:- -         -:- -   - -

- -     -/- -  - - -      -:- -         -:- -   - -

B

61    -/- -  - - -      -:- -         -:- -   - -

- -     -/- -  - - -      -:- -         -:- -   - -

- -     -/- -  - - -      -:- -         -:- -   - -

- -     -/- -  - - -      -:- -         -:- -   - -

- -     -/- -  - - -      -:- -         -:- -   - -

TIME SEARCH

MUTE

RECORD

SPEED

RESET

0

8

9

7

5

6

4

2

3

1

PAUSE/STILL

+100

STOP

F.FWD

PLAY

REW

VOL.

DISPLAY

MENU

POWER

SLEEP/WAKE UP

CH.

ALT.CH

1-4

1

MC13D1MG  3/22/02  1:26 PM  Page 26

Содержание MC13D1MG

Страница 1: ...E ANY PROBLEMS OUR REPRESENTATIVES CAN HELP YOU GET THE MOST FROM YOUR NEW PRODUCT BY EXPLAINING HOOKUPS FIRST TIME SETUP FEATURE OPERATION DO NOT ATTEMPT TO RETURN THIS PRODUCT TO THE STORE FOR FAST HELP CALL US FIRST 1 800 705 2000 THANK YOU FOR MAKING US A PART OF YOUR HOME IMPORTANT RETURN YOUR WARRANTY REGISTRATION CARD WITHIN 10 DAYS SEE WHY INSIDE MC13D1MG 3 22 02 1 26 PM Page 1 ...

Страница 2: ...t you must return your Warranty Registration Card within 10 days So please mail it to us right now Know these safetysymbols This bolt of lightning indi cates uninsulated material within your unit may cause an electrical shock For the safety of everyone in your household please do not remove product covering The exclamation point calls attention to features for which you should read the enclosed li...

Страница 3: ...en the equipment and receiver 3 Connect the equipment into an outlet on a circuit different from that to which the receiver is connected 4 Consult the dealer or an experienced radio TV technician for help Magnavox recommends you use only video cassette tapes that have the mark Other tapes may cause poor picture quality and excessive deposits on the video heads that the warranty may not cover if da...

Страница 4: ...tatus Displays 20 Adjusting the Picture Controls 21 Basic Operations Playing 22 Playback Options 23 Recording 24 Recording Options One Touch Recording 25 Timer Recording 26 28 Timer Recording Auto Return 29 Rerecording Tape Duplication 30 Playing Options Repeat Play 31 Rental Playback 32 Zero Return 33 Time Search 34 Additional Features Closed Caption 35 Setting V Chip 36 38 Sleep Timer 39 Wake Up...

Страница 5: ...artment lid Battery Safety Battery Usage CAUTION To prevent battery leakage that may result in bodily injury or damage to the unit Install ALL batteries correctly with the and markings on the battery aligned as indicated on the unit Do not mix batteries for example old with new or carbon with alkaline and Remove batteries when the unit will not be used for a long time Recording Prevention Video ca...

Страница 6: ...ed AHooking Up Your TV VCR With a Cable Signal or Outdoor Antenna BHooking Up Your TV VCR With a Cable Box To view any channel set the TV VCR to the Cable Box output channel channel 03 or 04 Then select channels at the Cable Box CHooking Up Your TV VCR With an Indoor Antenna To install a rod antenna not supplied push the stem of the antenna into the antenna hole on the top of the TV VCR Connect th...

Страница 7: ...cks on front of TV VCR AUDIO VIDEO OUT Jacks on VCR Connect an Audio cable to the AUDIO OUT Jack on the VCR and to the AUDIO In Jack on the front of the TV VCR Connect a Video cable to the VIDEO OUT Jack on the VCR and to the VIDEO In Jack on the front of the TV VCR 3 Before you turn on the TV VCR go to page eight 2 When all other connections are complete plug in the TV VCR s power cord DHooking U...

Страница 8: ...a video tape before setting TV channels press the MENU button on the remote control To set up channels later see Resetting TV Channels on page 10 To select cable channels higher than 99 press the 100 button then press the Number buttons for the last two digits For exam ple to select channel 125 press 100 2 5 Precede single digit channel numbers with a zero for example 01 09 Helpful Hints 3 Press P...

Страница 9: ... captioning 1 Press MENU Press PLAY or STOP to select LANGUAGE M E N U TIMER PROGRAMMING PICTURE CONTROL SETTING CLOCK CHANNEL SET UP USER S SET UP V CHIP SET UP B LANGUAGE ENGLISH CAPTION OFF ZERO RETURN TIME SEARCH 2 Press F FWD B or REW s to select ENG LISH or ESPAÑOL Spanish The selected lan guage will appear inside the 3 Press MENU to remove the menu TIME SEARCH MUTE RECORD SPEED RESET 0 8 9 ...

Страница 10: ... USER S SET UP V CHIP SET UP LANGUAGE ENGLISH CAPTION OFF ZERO RETURN TIME SEARCH 2 Press PLAY or STOP to select AUTO PRESET Then press F FWD B The TV VCR scans and memorizes all the active channels in your area When scanning is complete the TV VCR will go to the lowest available channel automatically Use the CH annel o p buttons to select memo rized channels Use the Number buttons to select non m...

Страница 11: ...til the channel number you wish to add or delete appears You also can use the Number buttons or the CH annel button to enter it 0 8 ADD DELETE 4 Press F FWD B or REW s to add or delete the channel Deleted channels will appear in light red Added channels will appear in light blue To delete another channel repeat steps 3 4 5 Press MENU to remove the menu To confirm that a channel has been added or d...

Страница 12: ...trol or change the channels of the Cable Box or Satellite Box Helpful Hints Set the clock accurately for proper timer recording If a Public Broadcasting Station PBS is available in your area follow Auto Clock Setting below If not follow Manual Clock Setting on pages 14 15 Auto Clock Setting You can have the TV VCR set the clock automatically by using the PBS channel in your area Once you have set ...

Страница 13: ...l SETTING CLOCK AUTO CLOCK ON B AUTO CLOCK CH AUTO MANUAL CLOCK SET D S T OFF 4 Press MENU to remove the menu 5 Press POWER to turn off the TV VCR If the TV VCR sets the time incorrectly it may have taken the time from a PBS station in a different time zone Enter the correct local PBS station manual ly at step 3 or follow the steps for Manual Clock Setting on pages 14 15 Helpful Hint TIME SEARCH M...

Страница 14: ...NEL SET UP USER S SET UP V CHIP SET UP LANGUAGE ENGLISH CAPTION OFF ZERO RETURN TIME SEARCH 2 Press PLAY or STOP to select MANUAL CLOCK SET Then press F FWD B SETTING CLOCK AUTO CLOCK ON AUTO CLOCK CH AUTO B MANUAL CLOCK SET D S T OFF 3 Press PLAY or STOP until your desired month appears Example May 05 Then press F FWD B MANUAL CLOCK SET MONTH DAY YEAR 0 5 HOUR MINUTE 4 Press PLAY or STOP until yo...

Страница 15: ...0 5 0 7 TUE 2 0 0 2 HOUR MINUTE 0 5 4 0 P M 8 Press MENU Although seconds are not displayed they begin counting from 00 when you press MENU on the remote control Use this feature to synchro nize the clock with the correct time 5 40 PM To adjust the clock later follow steps 1 2 on page 14 Then press F FWD B or REW s to select the item you want to change Enter the correct infor mation by pressing PL...

Страница 16: ...ess F FWD B M E N U TIMER PROGRAMMING PICTURE CONTROL B SETTING CLOCK CHANNEL SET UP USER S SET UP V CHIP SET UP LANGUAGE ENGLISH CAPTION OFF ZERO RETURN TIME SEARCH 2 Press PLAY or STOP to select D S T Then press F FWD B until ON or OFF appears SETTING CLOCK AUTO CLOCK ON AUTO CLOCK CH AUTO MANUAL CLOCK SET B D S T ON 3 Press MENU to remove the menu TIME SEARCH MUTE RECORD SPEED RESET 0 8 9 7 5 6...

Страница 17: ...sound is muted will restore the sound POWER Button Press to turn on or off the TV VCR REW rewind Button When tape playback is stopped press to rewind the tape at high speed During tape playback press to rewind the tape while the pic ture stays on the screen Details are on page 23 Press to select a menu item RECORD Button Press once to start a recording Details are on page 24 Number Buttons Use to ...

Страница 18: ... the BRIGHTNESS or to return to a previous menu F FWD Fast Forward Button When tape playback is stopped press to fast forward the tape at high speed During playback press to fast forward the tape while the picture stays on the screen Press to change a setting of a menu item for example to adjust the BRIGHTNESS or to advance to the next menu Record Light This light flashes during a record ing It li...

Страница 19: ... your antenna or cable here Details are on page six Antenna Hole Connect the stem of an indoor antenna here Details are on page six AC Power Cord Connect to a standard AC outlet to supply power to the TV VCR MC13D1MG 3 22 02 1 26 PM Page 19 ...

Страница 20: ...After five seconds only the clock and channel number remain To clear them press DISPLAY 20 On Screen Status Displays When Closed Captions are ON details are on page 35 The On Screen Display disappears after five seconds This is true even if you press MUTE or press PAUSE STILL while recording COUNT 0 12 34 5 40PM CH2 Off mode Counter mode Clock mode Press DISPLAY once STOP 5 40PM CH2 SP COUNT 0 12 ...

Страница 21: ...UAGE ENGLISH CAPTION OFF ZERO RETURN TIME SEARCH 2 Press PLAY or STOP until the desired control is displayed You can select BRIGHT CONTRAST COLOR TINT or SHARPNESS 3 Press F FWD B or REW s to adjust the con trol BRIGHT PPPPPPPCPPPPPPP If you do not begin changing an adjustment within five seconds of selecting a control the Picture Control menu will disappear The original settings will probably giv...

Страница 22: ... the steps below to play a tape 1 Insert a tape in the TV VCR The power will come on If the tape s record tab is missing playback should start automatically 2 If playback does not start automatically press PLAY to start playback 3 Press STOP to stop playback 4 Press REW ind to rewind the tape 5 When the tape finishes rewinding press STOP EJECT on the TV VCR to remove the tape TIME SEARCH MUTE RECO...

Страница 23: ...e another VCR for example Helpful Hints Forward and Reverse Searching SP LP SLP 1 During tape playback press and release F FWD B or REW ind A fast forward or reverse picture search will begin 2 To return to normal playback press PLAY Super High Speed Searching LP SLP 1 During tape playback press F FWD B or REW ind then press again The TV VCR will now search in super high speed Press F FWD B or REW...

Страница 24: ...d light will glow If the tape does not have a record tab the TV VCR will eject the tape Insert another tape 5 To pause the recording for example during commercials press PAUSE STILL The Record light will flash To resume recording press PAUSE STILL again or press RECORD The Record light will glow 6 To stop recording press STOP Cassette type Playback Time Tape Speed T160 T120 T60 SP Standard Play 2 ...

Страница 25: ...d by the number of times you press REC OTR Each press of REC OTR will increase the recording time by 30 minutes It may be set up to a maximum recording length of eight hours OTR 2 30 SP If you press REC OTR 18 times normal recording resumes To stop an OTR press STOP p To show the remaining time press DISPLAY OTR will appear briefly on the TV screen Recording stops when 0 00 is reached The maximum ...

Страница 26: ...hen press F FWD B 3 Press PLAY or STOP until the desired channel number appears Example CH61 Then press F FWD B If the TV VCR is connected to a Cable Box or Satellite Box the TV VCR must be on CH3 or CH4 Set CH as 03 or 04 in the Timer Programming menu Select the channel to be recorded on the Cable Box Satellite Box If you are using Timer recording you may not operate the unit manually The erase p...

Страница 27: ...GRAMMING CH DATE BEGIN END B 61 7 05 FRI 7 30PM 8 50PM 9 Press PLAY or STOP until the desired tape speed appears Example SP 10Press F FWD B or REW s To set another pro gram repeat steps 2 10 Or press MENU to remove the menu 11Press POWER to set the timer recording The Record light will appear You must turn off the TV VCR to activate automatic timer recording If the power is not off and you continu...

Страница 28: ...t press POWER to turn on the TV VCR 2 Press MENU Press PLAY or STOP to select TIMER PRO GRAMMING Press F FWD B 3 Press PLAY or STOP to select a timer recording then press F FWD B 4 Press F FWD B repeatedly to select the information you want to change Press REW s to go back if necessary Press PLAY or STOP to enter the correct information 5 Press POWER to turn off the TV VCR again to set the recordi...

Страница 29: ...S SET UP RENTAL OFF REPEAT PLAY OFF B AUTO RETURN ON If you press POWER while the tape is rewinding Auto Return will stop If there is a power failure the TV VCR will retain its memory for this feature Helpful Hints 3 Press MENU When all the timer recordings are completed the TV VCR will rewind to the beginning of the recorded program s Press PLAY to play the tape from the beginning of the timer re...

Страница 30: ...ot supplied Connect the source unit VCR or camcorder to a power source after connections are made 2 The VCR or camcorder will play your tape Insert a prerecorded tape in the source unit If playback begins press STOP on the unit 3 The TV VCR will record your tape Insert a blank tape in the TV VCR Make sure the tape s record tab is intact The TV VCR power will turn on automati cally 4 Point the TV V...

Страница 31: ...or STOP to select USER S SET UP Then press F FWD B M E N U TIMER PROGRAMMING PICTURE CONTROL SETTING CLOCK CHANNEL SET UP B USER S SET UP V CHIP SET UP LANGUAGE ENGLISH CAPTION OFF ZERO RETURN TIME SEARCH USER S SET UP RENTAL OFF B REPEAT PLAY ALL AUTO RETURN OFF 2 Press PLAY or STOP to select REPEAT PLAY Press F FWD B or REW s repeatedly until ALL or BLANK appears 3 Press MENU to remove the menu ...

Страница 32: ...Y or STOP to select RENTAL Press F FWD B or REW s until ON appears 3 Press MENU to remove the menu 4 Press PLAY to start playback RENTAL PLAY B appears To Cancel Rental Playback Repeat steps 1 2 but select OFF at step 2 using F FWD B or REW s Press MENU to remove the menu Once you select Rental Playback it stays in effect even after you turn off the TV VCR The TV VCR will retain the Rental setting...

Страница 33: ...Press MENU Press PLAY or STOP to select ZERO RETURN Then press F FWD B The counter will appear on the screen When the tape reaches the point at which you set the counter to zero the tape will stop Press PLAY to watch the tape M E N U TIMER PROGRAMMING PICTURE CONTROL SETTING CLOCK CHANNEL SET UP USER S SET UP V CHIP SET UP LANGUAGE ENGLISH CAPTION OFF B ZERO RETURN TIME SEARCH TIME SEARCH MUTE REC...

Страница 34: ...his point press MENU 4 Press REW s or F FWD B The TV VCR will rewind or fast forward the specified amount of time The time counts down as the search progresses When 0 00 is reached the tape will start playback automatically Or to cancel the time search before it finishes press STOP EJECT TIME SEARCH 2 50 Time Search can be set up to a maximum of 9 hours 50 minutes 9 50 10 minutes at a time This fu...

Страница 35: ... displays foreign lan guage closed captions foreign language words show ing what a character is saying TEXT1 and TEXT2 display half screen text such as a channel guide schedule or announcement OFF turns off closed captions Captions will not appear on the screen M E N U TIMER PROGRAMMING PICTURE CONTROL SETTING CLOCK CHANNEL SET UP USER S SET UP V CHIP SET UP LANGUAGE ENGLISH B CAPTION CAPTION1 ZER...

Страница 36: ... MENU Press PLAY or STOP to select V CHIP SET UP Then press F FWD B M E N U TIMER PROGRAMMING PICTURE CONTROL SETTING CLOCK CHANNEL SET UP USER S SET UP B V CHIP SET UP LANGUAGE ENGLISH CAPTION OFF ZERO RETURN TIME SEARCH 2 Press PLAY or STOP to select TV RAT ING Then press F FWD B V CHIP SET UP B TV RATING MPAA RATING TV Rating Explanations V Violence S Sexual situations L Language D Inappropriat...

Страница 37: ...n press F FWD B to select BLOCK or VIEW TV PG BLOCK B D BLOCK L BLOCK S BLOCK V BLOCK TV Y7 BLOCK B FV BLOCK 4 Press MENU to remove the menu 3 Press PLAY or STOP to select a rating Press F FWD B to select BLOCK or VIEW B TV Y VIEW TV Y7 VIEW TV G VIEW TV PG VIEW TV 14 VIEW TV MA VIEW When you select a rating category and choose BLOCK the higher rating categories will automatically be blocked as we...

Страница 38: ...LOCK When you select a rating category and choose BLOCK the higher rating categories will automatically be blocked as well while the lower categories will be available for viewing When you select VIEW for G all other ratings will auto matically be available for viewing 4 Press MENU to remove the menu MPAA Rating Explanations G General Audience PG Parental Guidance suggested PG 13 Unsuitable for ch...

Страница 39: ...MER 2 00 3 Press MENU to exit the Sleep Timer setting To cancel the Sleep Timer press SLEEP WAKE UP until SLEEP TIMER appears Press PLAY STOP F FWD B or REW s to select OFF To see how much time remains before the TV VCR turns itself off press SLEEP WAKE UP twice then press MENU to exit the Sleep Timer setting Helpful Hints TIME SEARCH MUTE RECORD SPEED RESET 0 8 9 7 5 6 4 2 3 1 PAUSE STILL 100 STO...

Страница 40: ... the TV VCR The TV VCR will turn on at the specified time WAKE UP ON OFF ON TIMER B TV TAPE TV TIME 12 OOAM 2 Press PLAY or STOP to select TV TAPE Press F FWD B or REW s to select TV or TAPE If you select TV the current TV channel will be on when the TV VCR turns on Select TAPE to start tape playback when the TV VCR turns on WAKE UP ON OFF ON TIMER TV TAPE TV B TIME 12 OOAM 3 Press PLAY or STOP to...

Страница 41: ...jected with the TV VCR power on or off but the TV VCR must be plugged in If a timer recording is programmed a tape cannot be ejected when the power is off Turn on the TV VCR power then eject the tape Be sure to insert a tape and turn off the TV VCR power for the timer recording Automatic Tracking Adjustment The TV VCR automatically adjusts the tracking to give you the best possible picture quality...

Страница 42: ...g start and stop times correctly Details are on pages 26 28 Midnight is 12 a m Noon is 12 p m Make sure the TV VCR power is off Set the clock Details are on pages 12 15 Put a tape in the TV VCR The tape must have a record tab With ShowGuard you don t have to worry about losing your timer recordings If the power fails timer recordings will be restored when the clock is reset The clock will reset it...

Страница 43: ...hannels above 69 Enter channel numbers as a two digit number If you want to select channels 100 and above press the 100 button then the Number buttons for the last two digits Details are on page eight If you are using an antenna and do not have Cable TV service only channels 2 69 will be available Details are on pages eight and 10 11 You cannot insert a tape into the TV VCR Insert the tape window ...

Страница 44: ...ting pales or brightens the TV VCR color Dubbing copying a tape using a VCR HQ high quality a feature in the TV VCR circuitry which provides enhanced picture detail Mode a TV VCR operation OTR One Touch Recording a timed recording that starts immediately and records for 30 minutes to eight hours whichever you specify Picture adjusting increases or decreases the contrast of the picture on the scree...

Страница 45: ... 8 H x 14 1 2 W x 14 7 8 D MC13D1MG 389mm x 367mm x 377mm 19 1 2 H x 19 3 8 W x 18 3 4 D MC19D1MG 492 5mm x 491mm x 475mm Weight 23 15 lbs 10 5 kg MC13D1MG Weight 42 99 lbs 19 5 kg MC19D1MG Tuner Broadcast Channels VHF 2 13 UHF 14 69 Cable TV Channels 1 125 Terminals Antenna In VHF UHF 75 ohms unbalanced Video In RCA connector Audio In RCA connector Earphone 3 5 mm CES Electrical Specifications Vi...

Страница 46: ...ficially distributed by Magnavox In countries where Magnavox does not distribute the product the local Magnavox service organization will attempt to provide service although there may be a delay if the appropriate spare parts and technical manual s are not readily available MAKE SURE YOU KEEP Please keep your sales receipt or other document showing proof of purchase Attach it to this owner s manua...

Страница 47: ...ttons 17 one touch recording 25 pause still button 17 23 picture adjusting 21 play button 17 18 playback options 23 playing 22 power button 17 18 cord 7 19 ratings movie 38 39 tv 36 37 rear panel 19 rec otr button 18 25 record light 18 recording 24 recording prevention 5 remote control buttons 17 using 5 remote sensor 18 repeat play 31 rerecording 30 rew ind button 18 rew ind button 17 23 rewindin...

Страница 48: ...ermined that this product meets the ENERGY STAR guidelines for energy efficiency ENERGY STAR is a U S registered mark This owner s manual is made of recycled paper TIM E SE AR CH MU TE RE CO RD SP EE D RE SE T 0 8 9 7 5 6 4 2 3 1 PA US E S TIL L 1 00 STO P F FW D PLA Y REW VO L DIS PL AY M E N U PO W ER SLE EP WA KE UP CH AL T C H Remote Control 4835 218 37336 Two AA Batteries 4835 138 17012 MC13D...

Отзывы: