background image

47

EN

Editing

Before 

you 

start

Changing 

the 

Setup 

menu

Others

Connections

Getting 

started

Recording

Playing 

discs

Playing discs

Note

•  The A-B Repeat playback can 

only be set with in the current 
title (for DVDs), or current 
track (for Audio CDs).

•  To cancel the repeat 

playback, select “OFF” at the 
step 2. The repeat setting will 
also be cancelled when you 
stop playback.

•  You cannot select “Group” 

during the random playback 
of MP3 files.

•  Repeat playback is not 

available when you play the 
Video CD with PBC function.

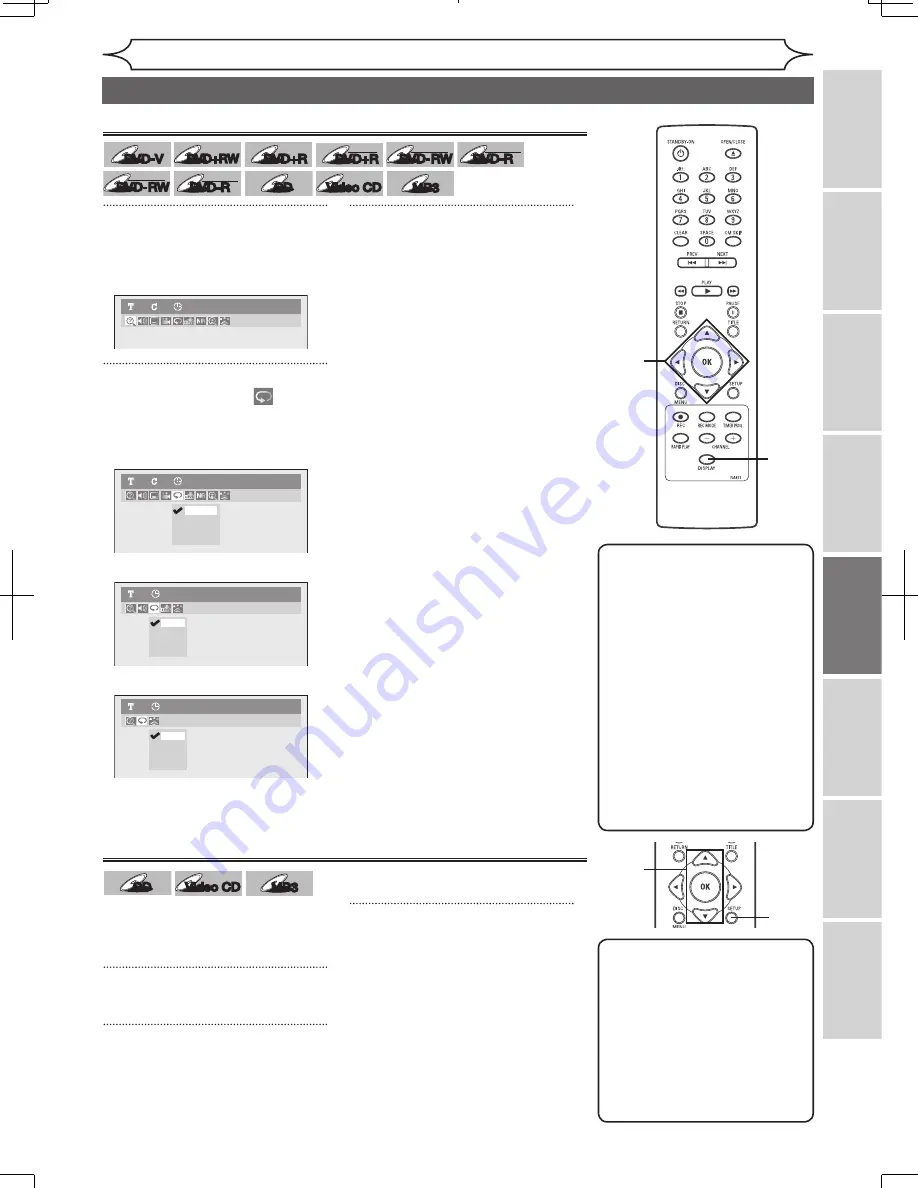
Repeat playback

1

During playback, press 
[DISPLAY].

Display menu will appear.

2

Using [

{

 / 

B

], select 

. Press 

[OK].

Repeat menu will appear.
    <DVD-Video>

    <Audio CD, Video CD>

    <MP3 files>

3

Using [

K

 / 

L

], select a desired 

option to repeat. Press [OK].

The selected repeat play will start.

Title:

The current title will be played 
repeatedly. (DVD only)

Chapter:

The current chapter will be played 
repeatedly. (DVD only)

All:

The current disc will be played 
repeatedly. (Audio CD, MP3, 
Video CD)

A-B:

The A-B point will be played 
repeatedly.
When pressing 

[OK]

 while A-B 

is highlighted, A-B repeat is set. 
Press 

[OK]

 again to decide the 

starting point (A).
Press 

[OK] 

after setting point A to 

select the ending point (B).

Track:

The current track will be played 
repeatedly. (Audio CD, MP3, 
Video CD)

Group:

The current group will be played 
repeatedly. (MP3 only)

1

Note

•  To cancel random playback, 

press 

[STOP 

C

]

 twice during 

random playback. “Playmode 
OFF” appears on the TV 
screen.

•  For Video CDs with PBC 

function, the PBC setting will 
be switched to off automatically 
when you start random playback.

Random playback

With this function, you can play a 
disc randomly instead of playing in 
the original order.

1

Press [SETUP].

2

Using [

K

 / 

L

], select “CD 

Playback Mode”. Press [OK].

CD Playback Mode menu will 
appear.

 3

Using [

K

 / 

L

], select “Random 

Play”. Press [OK].

Random playback will start.

2

3

1

2

Track
All
Group

OFF

MP3

1

0:00:00

Track
All
A-B

OFF

Audio CD

1

0:00:00

Title
Chapter
A - B

OFF

DVD-Video

1

1

0:00:00

Repeat/Random/Program playback

DVD-Video

1

1

0:00:00

3

CD

CD

Video CD

Video CD

MP3

MP3

DVD-V

DVD-V

DVD-V

DVD-V

DVD+RW

DVD+RW

DVD+R

DVD+R

DVD+R

DVD+R

DL

DVD-RW

DVD-RW

+VR

DVD-R

DVD-R

+VR

DVD-RW

DVD-RW

Video

DVD-R

DVD-R

Video

CD

CD

Video CD

Video CD

MP3

MP3

Содержание CMWR10D6

Страница 1: ...PCM BITSTREAM COAXIAL AUDIO IN VIDEO RF cable not supplied RF cable supplied Video cable supplied Audio cable supplied Back of TV or Cable TV signal Connect Connect Connect Connect Antenna Back of this unit 2 1 3 4 IN OUT Cable box or Satellite box Remote Control Initial Setup Français Español English Initial Setup Channel Preset Auto Presetting Now CH 1 Using K L select your desired language and ...

Страница 2: ...onnectez Connectez Connectez 2 1 3 4 IN OUT Câble vidéo fourni Câble audio fourni ou Signal de câblodistri bution Antenne Arrière de l appareil Arrière du téléviseur Câble RF fourni Récepteur câble ou satellite Télécommande Initial Setup Français Español English Réglage initial Préréglage canal Prér auto instant CH 1 À l aide des touches K L sélectionnez la langue de votre choix et appuyez sur OK ...

Страница 3: ... case follow the instructions below 1 The antenna input jack of your TV may have been already occupied If so disconnect the RF cable from your TV and then connect the RF cable to the ANTENNA IN jack of this unit 2 Connect the ANTENNA OUT jack of this unit to your RF modulator usually marked ANT IN by the RF cable 3 Connect your RF modulator to your TV by another RF cable 4 Connect the AUDIO VIDEO ...

Страница 4: ... to radio communications However there is no guarantee that interference will not occur in a particular installation If this equipment does cause harmful interference to radio or television reception which can be determined by turning the equipment off and on the user is encouraged to try to correct the interference by one or more of the following measures 1 Reorient or relocate the receiving ante...

Страница 5: ...nce receptacles and the point where they exit from the appliance 13 Outdoor Antenna Grounding If an outside antenna or cable system is connected to the product be sure the antenna or cable system is grounded so as to provide some protection against voltage surges and built up static charges Article 810 of the National Electrical Code ANSI NFPA No 70 provides information with regard to proper groun...

Страница 6: ...ended that the user switch the connection to the standard definition output If there are questions regarding your TV set compatibility with this 525p DVD recorder please contact our customer service center Installation Location For safety and optimum performance of this unit Install the unit in a horizontal and stable position Do not place anything directly on top of the unit Do not place the unit...

Страница 7: ...rty Consult your dealer or an Authorized Service Center for inspection and cleaning of the laser optical pickup unit DISC HANDLING Handle the discs so that fingerprints and dust do not adhere to the surfaces of the discs Always store the disc in its protective case when it is not used IR SIGNAL CHECK If the remote control does not work properly you can test if the remote control sends out the infr...

Страница 8: ...ecifications 76 Limited Warranty Back Cover Before you start 2 Precautions 2 Table of contents 6 Features 7 Symbol in this Owner s Manual 7 Functional overview 8 Installing batteries in the remote control 11 Using a remote control 11 DISPLAY menu 11 Setup menus 12 Connections 13 Connection to a TV 13 Connection to a cable box or satellite box 14 Connection to an Audio System 15 Getting started 16 ...

Страница 9: ...e recorded on CD R RW Editing Deleting titles You can delete titles which you do not need anymore Putting names on titles You can put your favorite names on titles Setting Clearing chapter marks You can set clear chapter marks on titles Hiding unwanted chapters To keep others from playing back some chapters without permission you can hide chapters Setting pictures for thumbnails You can change pic...

Страница 10: ...ward step by step When playback is paused press and hold for 1 5 seconds to play slow forward 8 STANDBY ON button Press to turn the unit on and off If timer programmings have been set press to set the unit in timer standby mode 9 AUDIO input jacks EXT2 Use to connect external equipment with a stand ard audio cable 10 VIDEO input jack EXT2 Use to connect external equipment with a stand ard video ca...

Страница 11: ...nt with a coaxial digital input jack with a digital coaxial cable 6 AUDIO OUT jacks Use to connect a TV monitor AV receiver or other equipment with a standard audio cable 7 COMPONENT VIDEO OUTPUT jacks Use to connect a TV monitor with component video inputs with a component video cable 8 S VIDEO OUT jack Use to connect the S Video input of a TV moni tor AV receiver or other equipment with an S Vid...

Страница 12: ...lso be turned on by press ing this button Functional overview cont d Before you start Remote Control 5 REV E button During playback press to fast reverse Or when playback is paused press to play slow reverse 6 PLAY B button Press to start or resume play 7 STOP C button Press to stop playback or recording Press to exit from the Title list 8 RETURN button Press to return to the previ ously displayed...

Страница 13: ...6 feet 5m within 15 Below approx 10 feet 3m within 30 Installing batteries in the remote control Install two AAA size batteries supplied matching the polarity indicated inside battery compartment of the remote control Note Incorrect use of batteries can result in hazards such as leakage and bursting Please observe the following Do not mix new and old batteries together Do not use different kinds o...

Страница 14: ... Allows you to rename the disc formatted with DVD VR 2 Disc Protect Allows you to protect a disc from accidental editing or recording 3 Erase Disc DVD RW DVD RW only Allows you to erase all contents in the disc and format it 4 Make Edits Compatible DVD RW only Allows you to make edits possible to play discs in other units after editing titles Finalize DVD R DVD R DVD RW only Allows you to finalize...

Страница 15: ...is unit Back of TV 3 2 1 4 5 Plug in the AC power cord of this unit 6 Note Connect this unit directly to the TV If the A V cables are connected to a VCR pictures may be distorted due to the copy protection system When Progressive Scan mode is selected no video signal will be output from the VIDEO OUT or S VIDEO OUT jack After you have completed connections Switch the input selector on your TV to a...

Страница 16: ...sible With this setup You can record any unscrambled channel by selecting the channel on the cable box or satellite box Be sure that the cable box or satellite box is turned on You cannot record one channel while watching another channel ANTENNA AUDIO IN VIDEO IN L R AUDIO OUT VIDEO OUT E1 IN IN OUT OUT S VIDEO COMPONENT VIDEO OUTPUT L Y PB CB PR CR R DIGITAL AUDIO OUTPUT PCM BITSTREAM COAXIAL AUD...

Страница 17: ... unit Note The audio source on a disc in a Dolby Digital Multi channel surround format cannot be recorded as digital sound by an MD or DAT deck By hooking this unit up to a Multi channel Dolby Digital decoder you can enjoy high quality Dolby Digital Multi channel surround sound as heard in the movie theaters Playing a DVD using incorrect settings may generate noise distortion and may also damage t...

Страница 18: ...ord on the following type of discs For example when you want to record repeatedly on the same disc select the rewritable DVD RW DVD RW type disc When you want to save recordings without any alteration a non rewritable DVD R DVD R can be your choice Step 3 Insert a blank disc To open To close 2 Loading This operation may take a while to be recognized 3 1 Step 2 Turn on the unit Remote Control Step ...

Страница 19: ...discs formatted with DVD VR mode You can edit the following from a title list or setup menu Deleting titles Putting names on titles Setting clearing chapter marks Hiding chapters Setting pictures for thumbnails Dividing a title DVD RW DVD RW only Putting name on disc Finalizing a Disc This will allow DVD R DVD RW DVD R discs recorded on this unit to be played back on a different DVD player without...

Страница 20: ...ng on page 22 If a Public Broadcasting Station PBS is available in your area follow Auto Clock Setting on page 21 Channel setting 2 Using K L select Channel Press OK Channel menu will appear 3 Using K L select Auto Channel Preset Press OK The unit will start getting channels available in your area 4 Press SETUP to exit You can select only the channels memorized in this unit by using CHANNEL and th...

Страница 21: ... 1 To select E2 by pressing 0 0 2 Details are on page 35 Channel setting cont d Getting started 4 Select the channel number to add or delete Press or CHANNEL to move to a lower channel number Press B or CHANNEL to move to a higher channel number Press the Number buttons to select a channel number directly 5 Using K L select Add or Delete Press OK The channel number will be added or deleted from th...

Страница 22: ...Press SETUP to exit 1 2 3 4 5 Notes on TV channel audio When you record a TV program available in second audio or stereo you have to select either Stereo or SAP in Required Settings beforehand Refer to the following table to check an appropriate setting You can only play the disc in second audio if a TV program is available in second audio and you set TV Audio Select to SAP TV Audio Select SAP Ste...

Страница 23: ...ppear 4 If you do not know your PBS channel number Using K L select Auto Press OK The setting will be activated If you know your PBS channel number Using K L select Manual Press OK Using the Number buttons or K L enter your PBS channel number Press OK The setting will be activated If you want to set the clock manually and cancel the Auto Clock Setting function Using K L select OFF in Auto Clock Se...

Страница 24: ...2006 SUN 12 00 AM 5 Using K L enter the time hour minute Press B A cursor will move to AM Clock Setting JAN 02 2006 MON 12 00 AM 6 Press K L to select AM or PM Press OK The settings will be activated Although seconds are not dis played they begin counting from zero 7 Press SETUP to exit if Clock menu appears Note Your clock setting will be lost if either there is a power failure or this unit has b...

Страница 25: ... select TV Aspect Press OK Option window will appear 4 3 Letter Box 4 3 Pan Scan 16 9 Wide TV Aspect Refer to the Note on this page 4 Using K L select a desired option Press OK 5 Press SETUP to exit Note If you have a standard TV Select 4 3 Letter Box so that black bars appear on the top and bottom of the screen when playing wide screen picture and all that Select 4 3 Pan Scan for a full height pi...

Страница 26: ...de Recording time Video Sound Quality Disc Size 8cm Disc 60 min 120 min 150 min 180 min 240 min 360 min 12cm Disc poor poor good good HQ 1Hr SP 2Hr SPP 2 5Hr LP 3Hr EP 4Hr SLP 6Hr 18 min 36 min 45 min 54 min 72 min 108 min HQ 1Hr SP 2Hr SPP 2 5Hr LP 3Hr EP 4Hr SLP 6Hr The recording time are estimates and actual recording time may differ The audio and video quality is getting poorer as the Recordin...

Страница 27: ...er to page 62 for playing on other units after editing This Unit DVD player Not Playable Playable DVD R DVD RW DVD R DVD RW Not finalized Not performing Make Edits Compatible after editing titles ᵤᶇᶌᵿᶊᶇᶘᶇᶌᶅᵈ ᵤᶇᶌᵿᶊᶇᶘᶇᶌᶅᵈ ᵫᵿᶉᶃᴾᵣᶂᶇᶒᶑᴾᵡᶍᶋᶎᵿᶒᶇᶀᶊᶃᵈ ᵫᵿᶉᶃᴾᵣᶂᶇᶒᶑᴾᵡᶍᶋᶎᵿᶒᶇᶀᶊᶃᵈ ᵈᵷᶍᶓᴾᶁᵿᶌᶌᶍᶒᴾᶄᶇᶌᵿᶊᶇᶘᶃᴾᶍᶐᴾᵫᵿᶉᶃᴾᵣᶂᶇᶒᶑᴾᵡᶍᶋᶎᵿᶒᶇᶀᶊᶃᴾᶇᶌᴾᶍᶒᶆᶃᶐᴾᵢᵴᵢᴾᶐᶃᶁᶍᶐᶂᶃᶐᶑᵌ Editing titles Once DVD R DVD R DVD RW discs are finalized you c...

Страница 28: ...pter marks may slightly deviate from the one you specified on the Auto chapter screen A blank chapter may be created depending on the remaining time of the disc Auto Chapter 5 minutes 10 minutes 15 minutes 30 minutes 60 minutes OFF You can set a specified time for chapter marks 10 minutes has been selected as the default 1 Press SETUP 2 Using K L select Recording Press OK 3 Using K L select Auto C...

Страница 29: ...sert your disc with its label facing up Align the disc to the disc tray guide 4 Press OPEN CLOSE A to close the disc tray When inserting a brand new DVD RW DVD RW disc the unit automatically starts to format If titles have been recorded on the disc the title list is displayed Press STOP C to exit the title list 5 Using REC MODE select a recording mode Refer to Recording mode on page 24 6 Using CHA...

Страница 30: ...the unit and load a recordable disc Make sure that the TV input is set on the unit 2 Using REC MODE select a recording mode Refer to Recording mode on page 24 3 Using CHANNEL or the Number buttons select a desired channel to record 4 Press REC I repeatedly to select desired recording time Recording times appear on the TV screen 30 minutes to 8 hours Recording will start When the unit reaches the s...

Страница 31: ... Clock Setting on page 22 before setting a timer programming Press s B to move the cursor to the left and the right in the timer programming menu After step 8 the recording will start immediately after the recording time you set 1 2 3 4 5 6 Timer Programming 2 3 4 5 6 7 8 1 JAN 01 12 57AM E1 Date Start End CH Mode Timer Programming 2 3 4 5 6 7 8 1 JAN 01 E1 Date Start End CH Mode Timer Programming...

Страница 32: ...ont panel of the unit STOP C on the remote control is not effective If the timer program did not complete correctly the error number appears in the Timer Programming list Timer Programming 2 3 4 5 6 7 8 JAN 01 12 57AM 1 57AM CH 8 E22 Date Start End CH Mode A program with the error number is grayed and asterisked in the Timer Programming list Once the Timer Programming list with error line s is dis...

Страница 33: ...ording PROG B When the recording time is entirely overlapped PROG A will not be recorded If there is a power failure or this unit has been unplugged for more than 30 seconds the clock setting and all timer programming will be lost If a disc is not on the tray TIMER REC indicator flashes and Timer Recording cannot be performed In some cases TIMER REC indicator will be on momentarily around the star...

Страница 34: ... steps 1 to 2 above 2 Using K L select a title to be overwritten Press OK 3 Using K L select Play Press OK Playback will start 4 Press PAUSE F at the point from which you want to start overwriting 5 Press REC I FI mark Display menu CH and the time lapse will be displayed as stated above Channel can be changed 6 Press REC I again Overwriting recording starts 7 Press STOP C to stop recording Title n...

Страница 35: ...than the existing title Overwriting from the beginning of the title Title name A Title name B Title name A Title name B 30 180 seconds will be cut off Overwriting Title A Existing Title B After overwriting PROG A When overwriting title is longer than the existing title Overwriting from the beginning of the title Title name A Title name B Title name A Overwriting Title A Existing Title B After over...

Страница 36: ...OK If you want to use S VIDEO IN jack select S Video In If you want to use VIDEO IN Composite jack select Video In 6 Press SETUP to exit 1 Press SETUP 2 Using K L select Required Settings Press OK 3 Using K L select Video Input Press OK Front of this unit Rear of this unit ANTENNA AUDIO IN VIDEO IN L R AUDIO OUT VIDEO OUT E1 IN IN OUT OUT S VIDEO COMPONENT VIDEO OUTPUT L Y PB CB PR CR R DIGITAL AU...

Страница 37: ...nt is connected E2 or E1 To use the input jacks on the back of this unit select E1 Rear position by pressing 0 0 1 with the Number buttons on the remote control To use the input jacks on the front of this unit select E2 Front position by pressing 0 0 2 with the Number buttons on the remote control 5 Select a recording mode by pressing REC MODE Refer to Recording mode on page 24 6 Press RECORD I on...

Страница 38: ...e 25 1 Press SETUP 2 Using K L select Disc Edit Press OK Disc menu will appear 3 Using K L select Finalize Press OK Confirmation window will appear 4 Using K L select Yes Press OK Finalizing will start 5 Finalizing is completed 1 4 2 3 4 Finalizing 100 Finalizing 90 Finalize No Yes To cancel finalizing DVD RW only To cancel finalizing at step 4 press STOP C select Yes with B then press OK Finalizi...

Страница 39: ...at the end of the disc space 1 Press SETUP 2 Using K L select Recording Press OK Recording menu will appear 3 Using K L select Auto Finalize Press OK Auto Finalize menu will appear 4 Using K L select Disc Full or End of Timer Rec Press OK Option window will appear 5 Using K L select ON Press OK Your setting will be activated 6 Press SETUP to exit Auto finalizing 1 Auto Finalize End of Timer Rec OF...

Страница 40: ...le using a Video CD with PBC function PBC appears on the screen NOTE When playing Video CDs with PBC function some operations e g track search and repeat tracks cannot be performed Cancel PBC function temporarily to perform those operations refer to page 70 Hint for DVD playback The contents of DVD disc are generally divided into titles Titles may be further subdivided into chapters Logo Disc DVD ...

Страница 41: ...sc Protect OFF Finalize Finalized DVD RW DVD RW DVD R DVD R DVD RW DVD RW VR DVD R DVD R VR 39 EN Editing Before you start Changing the Setup menu Others Connections Getting started Recording Playing discs Playing discs 4 7 1 2 4 5 7 Basic playback 6 4 Playback This operation may take a while to be recognized disc tray guide 1 SP 2Hr 2 3 NOV 21 06 11 00AM CH12 SP NOV 21 06 0 20 44 NOV 22 06 11 35A...

Страница 42: ...aying discs 1 Press STANDBY ON Turn the TV on and be sure to select the input to which the unit is connected 2 Press OPEN CLOSE A to open the disc tray The disc tray will open 3 Insert your disc with its label fac ing up Align the disc to the disc tray guide 4 Press PLAY B to start play back Playback will start If you are playing a DVD Video disc or Video CD with PBC function a menu may appear Ref...

Страница 43: ...e to play Press OK Play will begin at the title you selected TITLE button Displays the Title menu of a DVD disc which varies with the disc Cursor K L B buttons Moves the cursor around screen OK button Selects the currently highlighted menu option Number buttons Selects a numbered menu option some discs only Press OK later 3 Press TITLE to exit the title menu For Video CDs When PBC Video CD only in...

Страница 44: ...tles for DVD discs or tracks for MP3 is not possible For Video CDs approximate forward reverse speeds are x2 x8 x16 For Audio CDs and MP3 files approximate speed is fixed at x8 with sound To return to the normal play press PLAY B 1 2 2 1 Note For MP3 files playback will resume from the beginning of the track at which playback was stopped Some Video CDs with the PBC function resume playback from th...

Страница 45: ...VD V DVD V DVD V DVD V DVD RW DVD RW DVD R DVD R DVD R DVD R DL DVD RW DVD RW VR DVD R DVD R VR DVD RW DVD RW Video DVD R DVD R Video Step by step playback 1 During playback press PAUSE F Play will pause and sound will be muted 2 Press NEXT G repeatedly The play will advance one frame or step at a time when you press NEXT G with the sound muted To play step by step backward Press PREV H repeatedly...

Страница 46: ... 3 Using K L select a desired marker number When it reaches the desired point press OK The title track number and the time will be displayed 4 To return to the marker later Using K L select the desired marker number Press OK Note To clear a marker select the marker number to be cleared then press CLEAR All markers will be erased when you operate these operations listed below Opening the disc tray ...

Страница 47: ...ing DISPLAY 1 During playback press DISPLAY Display menu will appear 2 Using B select Press OK The number next to will be highlighted Title Using K L or the Number buttons enter a desired title number to search Press OK Title search will start Chapter Press B to move to the number next to for chapter Using K L or the Number buttons enter a desired chapter number to search Press OK Chapter search w...

Страница 48: ...During playback press NEXT G to skip the current track and move to the next The track will move forward one at a time To go back to the beginning of the current track press PREV H Press it repeatedly to go to the previous track The track will move backward one at a time 1 Time search Note Time search function is available only in the same track or title Time search is not available when you play t...

Страница 49: ...repeatedly When pressing OK while A B is highlighted A B repeat is set Press OK again to decide the starting point A Press OK after setting point A to select the ending point B Track The current track will be played repeatedly Audio CD MP3 Video CD Group The current group will be played repeatedly MP3 only 1 Note To cancel random playback press STOP C twice during random playback Playmode OFF appe...

Страница 50: ...lect the format of audio and video as you prefer depending on the contents of the disc you are playing Note Some discs will only allow you to change the subtitle from the disc menu Press TITLE or DISC MENU to display the disc menu If a 4 digit language code appears in the subtitle menu at step 2 refer to the Language code on page 74 Switching subtitles Many DVD Video discs have subtitles in one or...

Страница 51: ... 4 Using K L select a desired audio channel Press OK Audio channel will switch 2 L 3 R 1 L R Audio CD 1 0 00 00 2 Dolby Digital 2ch French 1 Dolby Digital 5 1ch English DVD Video 1 1 0 00 00 Switching virtual surround system You can enjoy stereophonic virtual space through your exciting 2 channel stereo system 1 During playback press DISPLAY Display menu will appear 2 Using B select Press OK Virtu...

Страница 52: ...sired option Press OK Your setting will be activated This function reduces noise in the playback picture When playing back discs recorded in long time mode such as EP or SLP mode select Type 1 or Type 2 Type 2 is more effective When playing back discs with a few noises such as DVD Video discs select OFF DVD Video 1 1 0 00 00 Type 1 Type 2 OFF DVD Video 1 1 0 00 00 DVD Video 1 1 0 00 00 Note Angle ...

Страница 53: ... the following items Be sure that once you edit titles they will not remain as original Deleting titles Refer to page 52 Putting names on titles Refer to page 53 Setting chapter marks Refer to page 54 Clearing chapter marks Refer to pages 54 55 Hiding chapters Refer to page 56 Setting pictures for thumbnails Refer to page 57 Dividing a title DVD RW DVD RW only Refer to page 58 Editing discs Setup ...

Страница 54: ... onto the disc momentarily Title list will appear DVD RW DVD RW DVD R DVD R Edit Title Delete Edit Title Name Chapter Mark Index Picture Title Dividing Current Chapter NOV 22 05 11 00AM CH12 EP 0 00 59 1 1 2 3 NOV 21 06 11 00AM CH12 SP NOV 21 06 0 20 44 Overwrite NOV 22 06 11 35AM CH13 EP NOV 22 06 0 10 33 EMPTY TITLE 1 37 52 SP 2Hr SP 2Hr Edit Play Title Delete No Yes 0 00 59 1 NOV 22 05 11 00AM ...

Страница 55: ...leted Edit Title Name a b c A B C 1 2 3 NOV 22 05 11 00AM CH12 EP 0 00 59 6 Edit Title Name No Yes MY FAVORITE 6 0 00 59 Edit Title Name a b c A B C 1 2 3 M 0 00 59 6 Press ABC DEF GHI JKL MNO PQRS TUV WXYZ space abc def ghi jkl mno pqrs tuv wxyz space space _ 2 3 4 5 6 7 8 9 0 1 ABC abc Select 123 1 Press character set will be changed to the mode automatically 2 Press to character set will be cha...

Страница 56: ...ructions continue on the next page Note When the number of chapter marks in a title is 99 and the number of chapter marks in a disc is 254 chapter marks cannot be added Besides the above mentioned it is not likely to be able to add according to recorded time and number of chapters Remaining time of the disc may decrease when adding chapter marks or increase when clearing chapter marks depending on...

Страница 57: ...chapter marks will be deleted 6 Press RETURN to exit Data will be written onto the disc momentarily Editing Editing discs cont d Clearing chapter marks cont d This operation may take a while to be completed Chapter 2 2 Chapter Mark Delete All No Yes Are you sure NOV 22 05 11 00AM CH12 EP 3 0 00 59 4 6 3 2 This operation may take a while to be completed Chapter Mark Delete All No Yes NOV 22 05 11 0...

Страница 58: ...ion is com pleted press RETURN twice to exit Data will be written onto the disc momentarily If you want to return Visible select the chapter to be shown Then using K L select Visible at the step 4 on this page Data will be written onto the disc momentarily After that title list is displayed Hiding chapters This operation may take a while to be completed Current Chapter Hidden Visible 0 00 59 1 NOV...

Страница 59: ...t 1 Follow steps 1 to 3 on page 52 to display the Edit menu 2 Using K L select Index Picture Press OK 3 Press PLAY B and then PAUSE F to decide the picture to be set as the thumbnail It is convenient to use PREV H NEXT G REV E and FWD D for finding the thumbnail picture Press OK Confirmation window will appear 4 Using K L select Yes Press OK A picture for thumbnail will be set 5 Press RETURN to ex...

Страница 60: ... OK Confirmation window will appear 4 Using K L select Yes Press OK The title will be divided into two new titles Both title names are identical and index pictures are reset to the first scene at this point Data will be written onto the disc momentarily Note You cannot divide a title of the disc on which the number of recording title comes up to the maximum 49 and the number of recording chapter c...

Страница 61: ...indow will appear 5 Using K L select Yes Press OK The name you entered will be activated for the title Data will be written onto the disc momentarily Editing discs Setup menu 1 2 DVD RW DVD RW DVD R DVD R DVD RW DVD RW VR DVD R DVD R VR Press STOP C if you are playing a disc Disc Edit Disc Protect OFF ON Erase Disc Make Edits Compatible Edit Disc Name Disc Edit Disc Protect OFF ON Finalize Edit Di...

Страница 62: ...K Data will be written onto the disc momentarily Setting or releasing disc protect This operation may take a while to be completed Disc Protect OFF ON No Yes Editing discs Setup menu cont d DVD RW DVD RW DVD R DVD R DVD RW DVD RW VR DVD R DVD R VR Disc Edit Disc Protect OFF ON Erase Disc Make Edits Compatible Edit Disc Name Disc Edit Disc Protect OFF ON Edit Disc Name Finalize 3 2 Disc Edit Disc P...

Страница 63: ...t Press OK Confirmation window will appear 3 Using K L select Yes Press OK Data will be written onto the disc momentarily Setting or releasing disc protect cont d Editing discs Setup menu cont d Disc Edit Disc Protect ON OFF Erase Disc Make Edits Compatible Edit Disc Name Disc Edit Disc Protect ON OFF Edit Disc Name Finalize This operation may take a while to be completed Disc Protect ON OFF No Ye...

Страница 64: ...it Disc Name Editing discs Setup menu cont d 2 DVD RW DVD RW DVD RW DVD RW VR DVD RW DVD RW Video Press STOP C if you are playing a disc Erase Disc Yes No When you press Yes all the contents in the disc will be erased Are you sure to erase the disc Making edits compatible You will need to perform Make Edit Compatible to play in other DVD players 1 Follow steps 1 to 2 on page 59 to display the Disc...

Страница 65: ...et the language for OSD On Screen Display Angle Icon ON OFF Set the display or undisplay of multi angle icon in a case the DVD in playback mode contains multi angle scene Screen Saver OFF 5 minutes 10 minutes Set the time to work the screen saver on the screen 3 Audio setting Pages 66 67 Digital Out PCM 48kHz 96kHz Set whether the sound recorded in 96kHz will be down sampled in 48kHz Dolby Digital...

Страница 66: ... will be activated When Original is selected the audio language will be in the disc s default language Audio Language Default Original Set the Audio language 1 Press SETUP 2 Using K L select Playback Press OK Playback menu will appear 3 Using K L select Language Press OK Language menu will appear 4 Using K L desired item Press OK Press STOP C if you are playing a disc Language setting 1 2 4 3 Lang...

Страница 67: ...ss CLEAR or s to erase numbers entered incorrectly Display setting 1 Press SETUP 2 Using K L select Display Press OK Display menu will appear 3 Using K L select a desired item Press OK Press STOP C if you are playing a disc 5 Language setting cont d 1 2 3 Display Angle Icon ON Screen Saver 10 minutes OSD Language English OSD Language Français Español English Using K L select a setting Press OK You...

Страница 68: ...s OK Playback menu will appear 3 Using K L select Disc Audio Press OK Press STOP C if you are playing a disc Choose the appropriate Audio settings for your external equipment It will only affect a disc playback Audio setting Display setting cont d 4 1 Digital Out Set the digital audio output Using K L select a setting Press OK Option window will appear Proceed to step A or B Note Dynamic Range Con...

Страница 69: ...for PCM Default 48kHz Digital Out PCM 96kHz 48kHz Using K L select a setting Press OK Your setting will be activated 48kHz If your amplifier decoder is NOT compatible with 96kHz PCM select 48kHz 96kHz sound will be output in 48kHz 96kHz If your amplifier decoder is compatible with 96kHz PCM select 96kHz 96kHz sound will be output B A Note When playing disc with copyright protection Even if you sel...

Страница 70: ... Yes Press OK 7 Using K L select Yes within 15 seconds Press OK Your setting will be activated 8 Press SETUP to exit 4 Press SETUP to exit Note If your TV is compatible with Progressive Scan 525p 480p you must use the Component video cable commercially available to connect this unit to the TV See Method 2 on page 13 If not use the video cable and set the Progressive Scan to OFF or press and hold S...

Страница 71: ...ng a disc Some DVD Video discs feature a Parental Lock level Playback will stop if the ratings exceed the levels you set it will require you to enter a password before the disc will playback This feature prevents your children from viewing inappropriate material Changing the Setup menu Parental Lock Default All Set the Parental Lock level Using K L change the parental level Press OK Option window ...

Страница 72: ...cont d Change the password Settings for PBC Playback Control 1 Press SETUP 2 Using K L select CD Playback Mode Press OK CD Playback menu will appear 3 Using K L select PBC Video CD only Press OK 4 Using K L select ON or OFF Press OK Your setting will be activated Press STOP C if you are playing a disc PBC Video CD only Default ON You can select images or information on the menu screen by activatin...

Страница 73: ... farther apart TV program reception does not fill the screen Try to set the channels with Auto Channel Preset or Manual Channel Preset in the Setup menu pages 18 19 Select a channel of any TV program using CHANNEL The playback picture or TV program from the equipment connected through the unit is distorted If the playback picture output from a DVD player VCR or tuner goes through the unit before r...

Страница 74: ...m the AC outlet and connect it again The program contains copy protection signals that restricts copying The timer setting overlapped with another setting that has priority The subtitle language cannot be changed or turned off Multilingual subtitle are not recorded on the DVD Video The DVD Video prohibits changing of the subtitles Try changing the subtitle using the DVD Video s menu The disc does ...

Страница 75: ...pside down Insert the standardized disc which bear the marks on page 38 Insert the disc with the labeled side facing up Recording Error Can not record on this disc Cause Error message Solution Playback is not authorized in the region of the DVD Video disc which you inserted in the unit The current selected parental level in the SETUP Menu prohibits playback The recording function encountered the c...

Страница 76: ...66 Quechua 6367 Rhaeto Romance 6459 Romanian 6461 Russian 6467 Samoan 6559 Sangho 6553 Sanskrit 6547 Scots Gaelic 5350 Serbian 6564 Serbo Croatian 6554 Sesotho 6566 Setswana 6660 Shona 6560 Recording Error Recording Error You cannot record more than 254 chapters on one disc Recording Error You cannot record on this disc as Control Information is full Recording Error You cannot record on this disc ...

Страница 77: ...ost common system of encoding digital audio found on CDs and DAT Excellent quality but requires a lot of data compared to formats such as Dolby Digital and MPEG audio For compatibility with digital audio recorders CD MD and DAT and AV amplifiers with digital inputs this unit can convert Dolby Digital and MPEG audio to PCM See also Digital audio Progressive Scan 525p 480p A type of display that doe...

Страница 78: ...t Input level Jacks Video output Output level Jack Component video output Output level Jacks S Video input Y luminance Input level C color Input level Jacks Audio input During audio input Jacks Audio output During audio output Jacks S Video output Y luminance Output level C color Output level Jack VHF UHF antenna input output terminal Input 1 rear 2 front 1 Vp p 75Ω RCA jack Output 1 rear 1 Vp p 7...

Страница 79: ...77 EN MEMO ...

Страница 80: ...ts from accident misuse abuse mishandling misapplication alteration faulty installation improper maintenance commercial use such as hotel rental or office use of this product or damage which results from fire flood lightning or other acts of God THIS WARRANTY DOES NOT COVER PACKING MATERIALS ANY ACCESSORIES EXCEPT REMOTE CONTROL ANY COSMETIC PARTS COMPLETE ASSEMBLY PARTS DEMO OR FLOOR MODELS FUNAI...

Отзывы: